example32_modal.php HOME Examples overview Download Ask a question / privacy policy / imprint
example33_clean.php

Create interactive 2D/ 360°/ 3D product presentations / product catalogues with clickable hotspots and hotspot areas using high or ultra resolution images!

Loading, please wait...
About AJAX-ZOOM hotspot editor
[Editor version: 3.0.1, date: 2016-08-05]

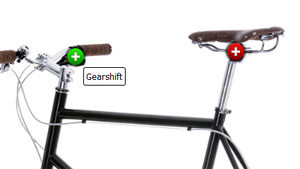
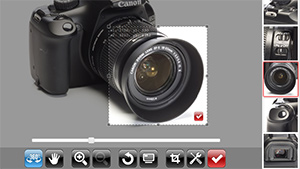
Flash free online hotspot editor for AJAX-ZOOM 3D/360/2D player. With the help of this editor you can create multiple hotspots or rectangle image areas and setup several click / mouseover actions for them e.g. links, tooltips, popup lightboxes or bind your own JavaScript functions including AJAX-ZOOM API for several events. The default example is a 360 degrees image set. You can however load any other images like catalogue pages or photo albums and create hotspots on single (2D) images as well.

As a result the hotspot editor returns a JSON object with all settings including the positions of the hotspots and / or rectangle image areas. Among other considerable possibilities this JSON object can be saved to a JavaScript file and loaded into any other AJAX-ZOOM example later.

How does it work?
  1. Hit the Load content tab and follow the instructions in order to change the image(s) you would like to configure with hotspots. For testing just leave whatever is loaded on default.
  2. Hit the Hotspots -> New Hotspot tab and define a new hotspots name. Push "ADD NEW HOTSPOT" button.
  3. Adjust the hotspot position(s) by simply dragging it to the desired place. For 360 we found it more convenient to use arrow keys to spin while adjusting the positions (mouse pointer has to be over the player). For precise positioning enlarge to the max zoom level! For moving by one pixel in any direction you can also use numbers block on your keyboard. You might also find it easier to roughly set the positions in Hotspots -> Positions tab before actually doing this precisely with zoom in the player.
  4. You can change the appearance of your hotspot under Hotspots -> Hotspot Appearance tab now or later. All the settings applied there e.g. defining a different hotspot image and it's size can be taken over for all hotspots at once.
  5. Define what happens when the user clicks on / goes with mouse over a particular hotspot. Hit the Tooltips / Text tab and select the hotspot, it turns red. Under the Tooltips tab you can define most commonly used options for default tooltip which looks similar to Fancybox (it is not Fancybox). If you do not like the appearance you can always modify its CSS (.axZmToolTipInner, .axZmToolTipOuter, .axZmToolTipTitle) or just set a different class (toolTipTitleCustomClass and toolTipCustomClass options). As an idea - the content of the tooltip can be iFrame with any other different content in it. If nothing helps - you want something completely different, you can define event actions on your own. They are saved as strings in the JSON object and will be instantly evaled when loaded.
  6. Fine-tuning: possibly there are additional options which might not be "visualized" in this hotspot editor release. Under Save / Edit JSON -> Import / Edit you will see the complete JSON object. Any option (property, value) can be customized for each hotspot individually. For a complete description of the options see under Option / Docu tab.
  7. After you have created, positioned and configured your hotspots the JSON should be saved somewhere to be accessed later by the player. This can be done under Save / Edit JSON -> Save JSON to JavaScript file tab. Since AJAX-ZOOM does not utilize any DB we provide only saving to JavaScript file as generic way of saving the work. The file is written into '/pic/hotspotJS/' directory (which has to be writeable by PHP); you can change the path to any other directory by editing '/axZm/saveHotspotJS.php'; The password for saving is set inside saveHotspotJS.php as well.
  8. The saved JS file is then called over an AJAX-ZOOM callback when the player is loaded... jQuery.fn.axZm.loadHotspotsFromJsFile('../pic/hotspotJS/eos_1100D.js'); If you will use a database you can just change the first few lines in this file to load and POST the JSON. All variables are explained inline. You can even parse this file as a template... There is no need to change anything in this file except the upper part with few variables in order to implement it in any CMS.
"Clean" examples

This file (example33.php) is the actual hotspots editor. With the help of this editor you can define and edit the hotspots. It is supposed to be in some restricted area of your page. For showing the results and integration of the player into your frontend please use one of the following "clean" examples as the starting point. Also please be aware of that AJAX-ZOOM is highly configurable so you can change the look and feel of nearly everything you could think of.

example33_clean.php basically it has the same setup as this editor but without the toolbar under the player.
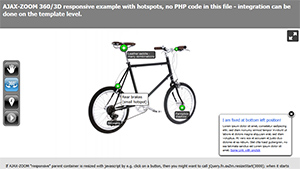
For responsive integrations please use example33_responsive.php
Gallery with mixed content - still images, videos from diverse sources like Youtube/Vimeo/Dailymotion, documents and 360/3D with or without hotspots.
Alternatives
Sometimes you would want not to put visible hotspots on a spin but only spin to a certain frame and zoom to the area you want to show. In this case we suggest you to take a look at example35.php which is also the main editor for this; there you will find links to "clean" and responsive implementations. 
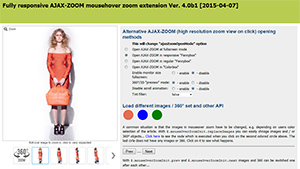
With this tool you can easily create several crops / thumbnails from 2D images / galleries, 360 spins or 3D multirow which are loaded into AJAX-ZOOM player.
E-Commerce
The basis for ecommerce modules / plugins is mainly example32_responsive.php. It does already support hotspots over options settings. This editor will be certainly, maybe already is (please check), integrated into our modules for Magento, PrestaShop, Opencart, WooCommerce, Shopware and other plugins.
Build Applications

AJAX-ZOOM offers an extended API to handle hotspots in various ways. In fact the entire hotspot editor is built upon this API. The result of the hotspot configurator is a static configuration saved in a file. However you can also build applications which will set hotspots dynamically depending e.g. on users choice.

Tutorial for developers of how to add "tags" to the images and let the users add title and description. This is a little different version of the hotspot editor which is kept simple and is focused only on couple AJAX-ZOOM hotspot features. The example is not completed in the sense that it is meant for developers who can complete and adjust for their own needs.
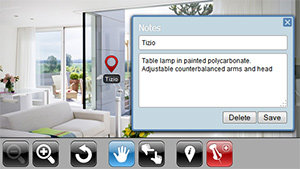
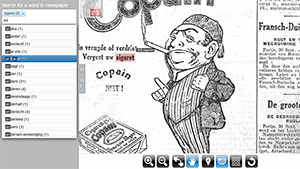
example34 shows an application, where hotspots are created dynamically and highlight choosen words in the text (saved as image).

If you would like AJAX-ZOOM team to build an application for you, please get in touch with us.

Notes
  • IE8, IE9 - if you want to test hotspots working on older IE, this will fail on some functionality if you will be using simulation of older version in new IE developer tools. Please use real old IE version or at least real IE9 version developer tools to test!
  • The Options / Docu tab only refers to the possible configurations of the hotspots and not the AJAX-ZOOM player. AJAX-ZOOM player itself can be configured with hundreds of other options to suit anybody's needs. See AJAX-ZOOM documentation and other examples.
  • The file saveHotspotJS.php is very simple and can be ported to any other language other than PHP within minutes. Due to possible XSS attacks it is not recommended to have this file publicly accessible as it is in this example.
  • For an alternative method of loading hotspots configurations and positions see also under Load content tab.
  • This hotspot editor extension is fairly new and you can expect it to be extended in the nearby future. As usual, your feedback on usability along with suggestions is much appreciated!
  • Please note that the position object of each hotspot accepts absolute positions of the original image (pixel values) or relative percentage values. So in case you already have the coordinates they can be easily imported in AJAX-ZOOM JSON object.

Comments (1)

william seitz 2013-03-27 01:27:25
william seitz considering 365 viewer for certain products we sell online

Leave a Comment

Looking for a place to add a personal image? Visit www.gravatar.com to get Your own gravatar, a globally-recognized avatar. After you're all setup, your personal image will be attached every time you comment.
The final code example

The only difference between any other AJAX-ZOOM implementation / example is that the JavaScript file with JSON data produced by this editor is loaded in AJAX-ZOOM onLoad callback with jQuery.fn.axZm.loadHotspotsFromJsFile API, see below... Once again, do not try to adapt this editor (example33.php) for final view. You can use other example33_x examples or basically any other example for this.

JavaScript & CSS files in Head

Please note that depending on configured hotspots functionality other plugins like Fancybox might be needed!


<!-- jQuery core -->
<script type="text/javascript" src="https://ajax.googleapis.com/ajax/libs/jquery/1.8.3/jquery.min.js"></script>

<!-- AJAX-ZOOM core, needed! -->
<link href="../axZm/axZm.css" type="text/css" rel="stylesheet" />
<script type="text/javascript" src="../axZm/jquery.axZm.js"></script>
					
HTML markup in body

<div style="min-width: 100px;">
	<div id="abc">
		<!-- Content inside target will be removed -->
		<div style="padding: 20px">Loading, please wait...</div>
	</div>
</div>
					
Javascript to init AJAX-ZOOM with hotspots

// Create empty object
var ajaxZoom = {};

// Define callbacks, for complete list check the docs
ajaxZoom.opt = {
	onBeforeStart: function(){
		// Set backgrounf color, can also be done in css file
		jQuery(".axZm_zoomContainer").css({backgroundColor: "#FFFFFF"});
	},
	onLoad: function(){
		// Some settings can be set inline
		jQuery.axZm.spinReverse = false;

		// Load hotspots over this function...
		// or just define jQuery.axZm.hotspots here and trigger jQuery.fn.axZm.initHotspots();
		jQuery.fn.axZm.loadHotspotsFromJsFile("../pic/hotspotJS/eos_1100D.js", false, function(){
			// Do something after hotspots are loaded
		});
	}
};

// Define the path to the axZm folder, adjust the path if needed!
ajaxZoom.path = "../axZm/";

// Define your custom parameter query string
// example=spinIpad has many presets for 360 images
// You can change them in /axZm/zoomConfig.inc.php after elseif ($_GET['example'] == 'spinIpad')
// 3dDir - best absolute path to the folder with 360/3D images
// for 2D you can use zoomData, e.g. zoomData=/your/path/image1.jpg|/your/otherPath/image2.jpg
ajaxZoom.parameter = "example=spinIpad&3dDir=/pic/zoom3d/Uvex_Occhiali";

// The ID of the element where ajax-zoom has to be inserted into
ajaxZoom.divID = "abc";

// Fire AJAX-ZOOM
jQuery.fn.axZm.load({
	opt: ajaxZoom.opt,
	path: ajaxZoom.path,
	parameter: ajaxZoom.parameter,
	divID: ajaxZoom.divID
});
					
Documentation of the hotspot configuration object options

These options below are only about possible hotspot settings and not the AJAX-ZOOM player itself. AJAX-ZOOM player can be configured with hundreds of other options to suit anybody's needs. See AJAX-ZOOM documentation and other examples.

   - focus
- highlight selected - draggable - hide inactive
Positions overview (beta)
In this overview you can roughly set the position of the hotspots in each frame and then set it precisely in the player. Click anywhere on the image to toggle the hotspot in the particular frame. Click on the frame number to spin to this frame in the player.
Create new hotspot
Below are only couple settings you can set right away. For 360/3D after you have created a new hotspot it is recommended to switch to the "Positions" tab to the right and roughly set the positions of your newly created hotspot in each frame.
- duplicate current hotspot
- point    - rectangle
- makes most sense for 360 / 3D
- set altTitle same as hotspot name
Left: Top:
The 'left', 'top', 'width' and 'height' values can be pixel values related to original size of the image (e.g. left: 1600, top: 900 or left: '1600px', top: '900px') or they can be percentage values (e.g. left: '45.75%', top: '37.3%').
Icon
width: px    height: px    - same width / height
Please note, that when a specific hotspot is selected in the editor, the default "hotspotImage" (the red round with plus sign on it) is applied to highlight the selection. This happens only in this hotspot configurator and does not affect your final code. Also the hotspots are only draggable in this configurator. This behaviour in configurator can be enabled and disabled right below the hotspot selector at top of this page.
CSS classes
Instead of using png icons for hotspots you could also use CSS class, e.g. "axZm_cssHotspot" as an example. You could also use two or more CSS classes, e.g. "axZm_cssHotspot axZm_pulse" will result in a pulsing css hotspot. You can add your own css file to this editor by adding the link to $css_file_src array which can be found at very top inside this php / tpl file... Also you can add the classes to the list $hotspot_classes so they visually appear under the form field below.
e.g. axZm_rotate or axZm_pulse
e.g. axZm_rotate_stop
   - apply for all hotspots
Advanced settings
zoomRangeMin: %    zoomRangeMax: %
- for landmarks set to "top"
offsetX: px    offsetY: px
opacity:    opacityOnHover:
px
  
  
borderWidth: px    borderColor:    borderStyle:
  
Perspective (experimental)
The experimental "perspective" feature is only available for 360 (not 3D) and hotspots of type "pointer".
  
px
deg
   - focus
- highlight selected - draggable - hide inactive
Default popup - contents
If you want to show some sort of a virtual window with contents in it you could use and configure something similar to "Fancybox" here. If you do not like the appearance you can always modify its CSS (.axZmToolTipInner, .axZmToolTipOuter, .axZmToolTipTitle) or just set a different class (toolTipTitleCustomClass and toolTipCustomClass options). An alternative can be found in the next tab -> "Expandable". If you do not like these both built in ways, you could always use your own method by defining your custom click event under Link / Event tab above!
Default popup - size and look
Width (toolTipWidth): px    Height (toolTipHeight): px
  fixed position (toolTipGravFixed)   autoflip (toolTipAutoFlip)
Left (toolTipAdjustX): px    Top (toolTipAdjustY): px
px - from all edges
- click    - mouseover    - hide time if mouseover (toolTipHideTimout)
e.g. axZmToolTipTitleCustom (try it)
e.g. axZmToolTipInnerCustom (try it)
(use transparent PNG in toolTipCustomClass for only backgound opacity)
- title needs to be defined too (title div is handle)
Default popup - close icon and overlay
   offset (toolTipCloseIconOffset):
Show: (toolTipOverlayShow):    Close on click (toolTipOverlayClickClose):
Opacity (toolTipOverlayOpacity):    Color (toolTipOverlayColor):
Expandable contents
Here you can enter title and description to show them in a different way than Default "Popup" does. Besides HTML or your text you could also load external content in iframe! The prefix for the source is "iframe:"

e.g. to load an external page simply put something like this in the descripion:
iframe://www.some-domain.com/123.html

To load a YouTube video you could put this (replace eLvvPr6WPdg with your video code):
iframe://www.youtube.com/embed/eLvvPr6WPdg?feature=player_detailpage

To load some dynamic content over AJAX use "ajax:" as prefix, e.g.
ajax:/test/some_content_data.php?req=123
Alt title
This is a virtual "alt" title which appears when the user hovers a hotspot with the mouse pointer. You can style it as according to your needs. Best assign a custom class to it.
Left (altTitleAdjustX): px    Top (altTitleAdjustY): px
Sticky label - contents and default position
Sticky label is similar to "Alt title" but it is always present. If you set labelGravity option below to "center" it will cover the hotspot. In this case you could remove the hotspot image in the "Hotspot appearance" tab and use only this sticky label as your hotspot.
Sticky label - position & look
px
Left (labelOffsetX): px    Top (labelOffsetY): px

e.g. axZmHotspotLabelFlat, default is axZmHotspotLabel
Sticky label - connecting line
px (set at least to 1 to enable)
px
Sticky label - individual positions for 360/3d
Since this "sticky" label is always visible you might want to place it differently depending on frame series. If so, select* frames in question, define the position and click "Apply" button. For frames where you do not define any custom positions, the default one from left tab will be applied. If you click on the frame number the player will spin to that frame.

* Selecting can be also done as you would do it on desktop with Shift, Strl keys and selection...
px
Left (labelOffsetX): px    Top (labelOffsetY): px
px
   for selected frames below
Draft label - contents and default position
Draft label is similar to "Sticky label". It is connected to the hotspot with a line. Unlike "Sticky label", this label is positioned not relative to hotspots position but absolute to entire canvas. Basically it is positioned same way as regular "point" hotspot so it stays on same position where it is placed also in responsive environments. You can choose one position for all frames, set a position for a series of frames or edit each position in each frame individually. The connection line instantly connects the hotpot with the label. Once everything is set up you could remove the icon and css for the actual hotspot as the connection line will point to it. Connection line is compatible with IE < 9.
Left (draftPosLeft): %    Top (draftPosTop): %
  
Connecting line settings
- straight    - corner   
Width (draftLine): px    Color (draftLineColor):

Draft label settings
draftOffsetX: px    draftOffsetY: px

default is axZmHotspotLabelR
Draft label - individual positions for 360/3d
"Draft label" behaves similar to a hotspot of type point. The default position can be set in the most left tab. If you want to vary the position across different frames, you can do it here. Select* frames in question - thumbs below, define the position and press "Apply" button. If you want to have label position relative to hotspot position, then use the "batch positioning" functionality below. Note, that you have to select frames in question too. This relative position will not adjust instantly if you move the actual hotspot somewhere else, so make sure that the hotspot positions are final or repeat batch positioning after you move the hotspot.

* Selecting can be also done as you would do it on desktop with Shift, Strl keys and selection...
Left (draftPosLeft): %    Top (draftPosTop): %
  
   for selected frames below
Batch positioning
Set positions of the below selected frames relative to hotspot positions. Negative values accepted. Also no value for either Left or Top is accepted too! This way you can set the positions relative only to e.g. Top and leave Left as it was defined previously here or by default value (e.g. if you set the default position to somewhere at right and define only Top offset, then the label will "slide" only vertically because Left offset does not change). Please note that the hotspot positions have to be already set precisely!
Left: %    Top: %
 
Mainly for rectangles
Do not use " (double quotation marks) in html tags. Use ' instead! set Lorem
e.g. axZmHotspotTextCustom (try it)
e.g. {"color":"black","height":"100%","width":"100%"}
Link and other events (JavaScript)
For click, mouseover etc. events - if you are using jQuery functions, do not write e.g. $.fancybox(...); write jQuery.fancybox(...); instead!!!
e.g.
jQuery.fancybox(
	[{
		'href': '/path/some/image1.jpg',
		'title': 'Description 1 image'
	},{
		'href': '/path/other/image2.jpg',
		'title': 'Description 2 image'
	}], {
	'padding': 0,
	'transitionIn': 'none',
	'transitionOut': 'none',
	'type': 'image',
	'titlePosition': 'over',
	'changeFade': 0
});
									
Load a different 2D / 360 or 3D content
You do not need to edit html / source code of this file in order to load a different 2D / 360 or 3D content into the editor. Just enter a local path into one of the fields below and press "LOAD" button. Press "GET" button to see what is currently loaded.
or
(optional)
  
How does it work:
  1. For 2D (single image or gallery with more images) please enter local path(s) to the image(s), e.g.
    "/pic/zoom/animals/test_animals1.png"
    or image set with image paths separated with vertical dash e.g.
    "/pic/zoom/animals/test_animals1.png|/pic/zoom/animals/test_animals2.png"
    If you want to load all images from a folder please just enter the path to this folder e.g.
    "/pic/zoom/animals"
    • For 360 (single row 360 object) please enter only the path to the folder where your 360 images are located e.g.
      "/pic/zoom3d/Uvex_Occhiali";
    • For 3D (multi row turnable object) please enter the path to the folder where subfolders with each row of 3D are located.
      On https://www.ajax-zoom.com/examples/example33.php this could be
      "/pic/zoomVR/nike"
      (not provided with the download package)
  2. Hotspot file path is the path to the file with hotspot configurations and positions, e.g.
    "/pic/hotspotJS/eos_1100D.js"
    You can create such a file in the previous tab "Save / Edit JSON"
Notes:

When you hit the "LOAD" button the parameters entered are passed to the function "changeAxZmContentPHP" located in "/axZm/extensions/jquery.axZm.hotspotEditor.js", which basically just reloads the player same way it is loaded when the page is opened.

There are also different ways of loading and saving hotspot configuration parameters besides loading a static JavaScript file. For example you could point to /some/dyn_language/file.do?hotspotID=123 which would return the JSON object stored in a database. If you use the API function jQuery.fn.axZm.loadHotspotsFromJsFile then you have to reference jQuery.axZm.hotspots variable to the returned JSON object from your /some/dyn_language/file.do (the return of this file is expected to be JavaScript - without script tags).

Alternatively define jQuery.axZm.hotspots wherever after AJAX-ZOOM is initialized, e.g. onBeforeStart callback (or later at any time) and "manually" init the hotspots with jQuery.fn.initHotspots()

Taking the above one step farther you can also build applications which will set hotspots dynamically depending e.g. on users choice or action. example34 shows such an application, where hotspots are created dynamically and highlight choosen words in the text (saved as image).

Import, edit, apply entire JSON for all hotspots manually
The code in the textarea below is what has been produced by this hotspot editor.
Here you can adjust it manually if needed. Do not forget to press "Apply" button after your changes!
  - with defaults   - positions as image names   - do not format


- keep draggable (will not affect final JSON)
Save to JS file
(can be set inside '/axZm/saveHotspotJS.php')
- keep linebreaks, tab stops etc.
- creates backup of the current js file if present with a timestamp in file name (recommended)
- instantly update / import JSON settings before saving
.js
On default all files will be saved into "/pic/hotspotJS" folder. This saving path is adjustable directly in "/axZm/saveHotspotJS.php" file. Saving JSON data to a JavaScript file is one of the possibilities to initialize created hotspots with any other implementation / example over AJAX-ZOOM "onLoad" callback. See also under About -> Code example tab.