
How to add an HTML element to the AJAX-ZOOM viewer
While adapting AJAX-ZOOM, developers often ask the question about adding non-standard HTML elements to the AJAX-ZOOM viewer. That is not complicated, and many AJAX-ZOOM examples and extensions take advantage of that procedure within the initialization code by using the AJAX-ZOOM callbacks/hooks. In this blog post, this procedure is described in great detail separately. It is also helpful for non programmers.
You can add any HTML element to the AJAX-ZOOM viewer by appending it to the layer with the ID axZm_zoomLayer.
The element must have certain CSS declarations and values:
- It must be positioned absolute,
position: absolute; - It must have a zIndex, e.g.
z-index: 5; - You can define width and height as pixel or percentage values. However, you do not need to.
- You should specify the position, e.g. you should use at least two of the four declarations: left, right, top, and bottom. You can define them as pixel or percentage values.
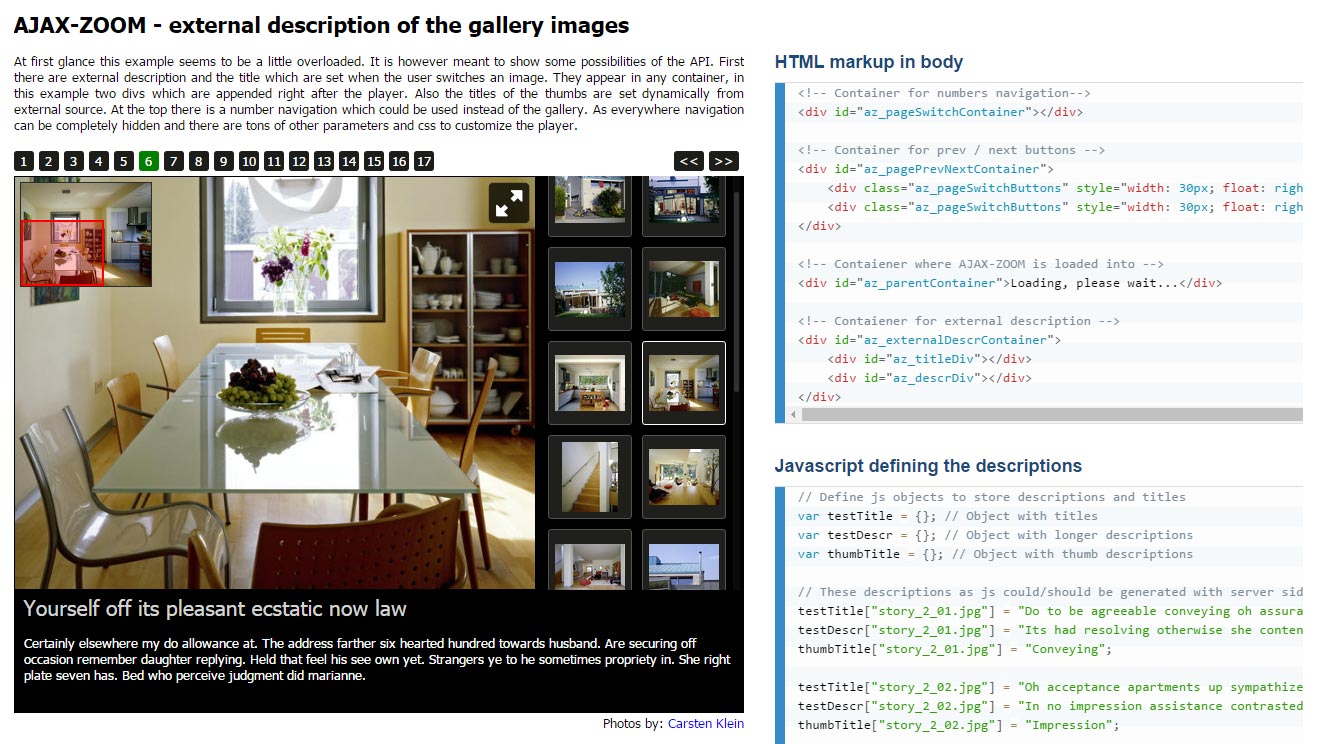
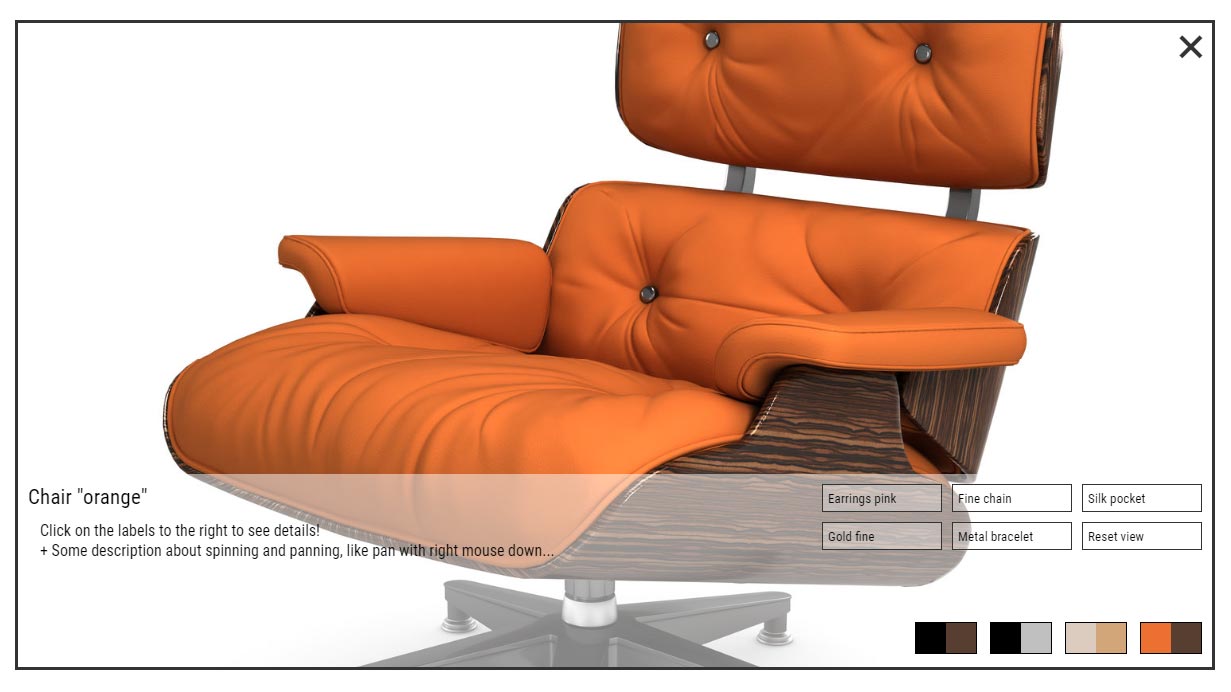
The intended result meant to be shown here is the semi-transparent box at the bottom-left of the viewer with red text in it. The AJAX-ZOOM instance loads flat images and adds a gallery, but you can apply the same method to your 360 product views in the same. Since this is a gallery and the user can switch between the images, the content of the separate HTML element is additionally changed as an example by the custom code.
To meet the above requirements regarding the CSS declarations, you can use a CSS class or inline "style" attribute.
Following we are using the .myAjaxZoomCssClass CSS class definition that you can name as you wish.
You could also define an ID and reference it in your CSS declaration.
.myAjaxZoomCssClass {
	position: absolute;
	box-sizing: border-box;
	/* Make it "invisible" to mouse events */
	pointer-events: none;
	z-index: 5;
	left: 5px;
	bottom: 5px;
	max-width: 50%;
	padding: 5px 10px 5px 10px;
	/* Semi-transparent background color */
	background-color: rgba(255,255,255,0.5);
	font-size: 14px;
	color: red;
	font-weight: bold;
}
With a CSS class or ID in contrast to inline "style" attribute, you have the advantage of being able to make that CSS conditional, e.g., depending on screen resolution by using any CSS media queries. Besides, you can make it conditional depending on the viewer being placed within the layout or at full-screen. For example, if you need to have a different CSS for the full-screen view, you can use this CSS selector:
body > #zFsO .myAjaxZoomCssClass {
	height: 20%;
}
and even combine it with CSS media queries.
Creating or selecting an element to append by using jQuery
Using jQuery, you can easily create a container like this:
window.myAjaxZoomContainer = jQuery("<div />")
.addClass("myAjaxZoomCssClass")
.html("Some text");
The above creates a div HTML element, adds myAjaxZoomCssClass CSS class to it and inserts some text in it.
If there is already an element in your HTML, you can select or clone in before appending it to the viewer. If you select it without cloning, it will move when you append it. If you clone, the selected element remains where it was and a copy of it appends to AJAX-ZOOM viewer.
// Select an element to move it
window.myAjaxZoomContainer = jQuery('.myAjaxZoomCssClass:eq(0)');

// Or make a copy that you want to append to the viewer
window.myAjaxZoomContainer = jQuery('.myAjaxZoomCssClass:eq(0)').clone();
Appending a HTML element to AJAX-ZOOM viewing area by using jQuery and the "onLoad" AJAX-ZOOM callback
Create HTML container for the viewer.
		<div class="embed-responsive" style="padding-bottom: 60%; clear: both;">
			<!-- Placeholder for AJAX-ZOOM player -->
			<div id="axZmPlayerContainer" class="embed-responsive-item" style="max-height: 70vh; max-height: calc(100vh - 100px); ">
				Loading, please wait...
			</div>
		</div>
Now, the AJAX-ZOOM viewer needs to be already initialized before you can append something to it.
Therefore, it is best to use the AJAX-ZOOM “onLoad” callback to select or create your custom element and append it to the viewer.
If you are dealing with the raw AJAX-ZOOM viewer, your initialization code can look similar to the following.
Please pay attention to the ajaxZoom.onLoadFunc function.
It is the place where the above explanations come together.
// Define some variable to reference AJAX-ZOOM related values
window.ajaxZoom = {};

// Path to the /axZm/ folder; adjust the path in your implementaion
ajaxZoom.path = "../axZm/";

// Define the ID of the responsive container
ajaxZoom.targetID = "axZmPlayerContainer";

// Paths to the images
ajaxZoom.zoomData = [
"/pic/zoom/boutique/boutique_006.jpg",
"/pic/zoom/boutique/boutique_005.jpg",
"/pic/zoom/boutique/boutique_001.jpg",
"/pic/zoom/boutique/boutique_003.jpg",
"/pic/zoom/boutique/boutique_004.jpg"
];

// The "example" parameter in query string defines an options set, which differs from default values. To find in /axZm/zoomConfigCustom.inc.php
ajaxZoom.queryString = "example=23";

// Pass images as CSV that is separated by '|'; you could also use zoomDir parameter to load entire directory with images instead of using zoomData
ajaxZoom.queryString += "&zoomData="+ajaxZoom.zoomData.join("|");


// Create a function that is executed when the AJAX-ZOOM viewer loads. We will reference it in ajaxZoom.ajaxZoomCallbacks below!
ajaxZoom.onLoadFunc = function() {
	if (!window.myAjaxZoomContainer) {
		// Create a HTML container element that you want to append to the viewer
		window.myAjaxZoomContainer = jQuery("<div />")
		.addClass("myAjaxZoomCssClass")
		.html("Some text or image");

		// Append this HTML container element to AJAX-ZOOM viewer now!
		window.myAjaxZoomContainer
		.appendTo("#axZm_zoomLayer");

		// This is optional and just to show what can be done. Since onImageChange is not fired onLoad, we call it manually.
		ajaxZoom.onImageChangeFunc();
	}
};

// Create a function that executes when a user switches between the images. For a 360 product view, this would not work. This is optional and just to show what can be done. The below code gets the file name and places it as text into the custom HTML element.
ajaxZoom.onImageChangeFunc = function() {
	if (window.myAjaxZoomContainer && jQuery.axZm) {
		var fileName = jQuery.axZm.zoomGA[$.axZm.zoomID]['img'];
		window.myAjaxZoomContainer.html(fileName);
	}
}

// AJAX-ZOOM callbacks
ajaxZoom.ajaxZoomCallbacks = {
	onLoad: ajaxZoom.onLoadFunc,
	onImageChange: ajaxZoom.onImageChangeFunc
};

// Use jQuery.fn.axZm.openResponsive() API to trigger AJAX-ZOOM responsively
jQuery.fn.axZm.openResponsive(
	ajaxZoom.path,
	ajaxZoom.queryString,
	ajaxZoom.ajaxZoomCallbacks,
	ajaxZoom.targetID,
	true,
	false,
	false
);
The actual function that initializes the AJAX-ZOOM viewer is jQuery.fn.axZm.openResponsive that you can see in the above code.
For convenience and a better overview of the code, the argument values for this function are defined "outside" as variables.
Lastly, for the topic of this post,
it is important that the JavaScript object with callbacks ajaxZoom.ajaxZoomCallbacks
finds its way in the third argument of the jQuery.fn.axZm.openResponsive method.
However, not all AJAX-ZOOM examples
directly use jQuery.fn.axZm.openResponsive or jQuery.fn.axZm.openFullScreen
methods to trigger the viewer.
Many examples implement the AJAX-ZOOM "extensions".
Those extensions are wrapper functions that contain extended code and have a larger amount of defineable options.
If you want to inject your callback/hook in there,
you should check the documentation for that particular extension and find an option that is equivalent to the third argument of the
jQuery.fn.axZm.openResponsive above.
In most cases, the string contains "callback" or "clb" in the name of this option.
A few AJAX-ZOOM examples that directly relate to this topic
Comments (0)
Leave a Comment

To use the live support chat, MS Teams is required. If live support via MS Teams is not available immediately, please leave us a message or send an email using the contact form.
We respond to every inquiry or question related to the AJAX-ZOOM software!