
Shopware plugin ![]()
Shopware 5 Compatibility
[last tested with Shopware 5.7.15]
PHP 5.4 - 8.x
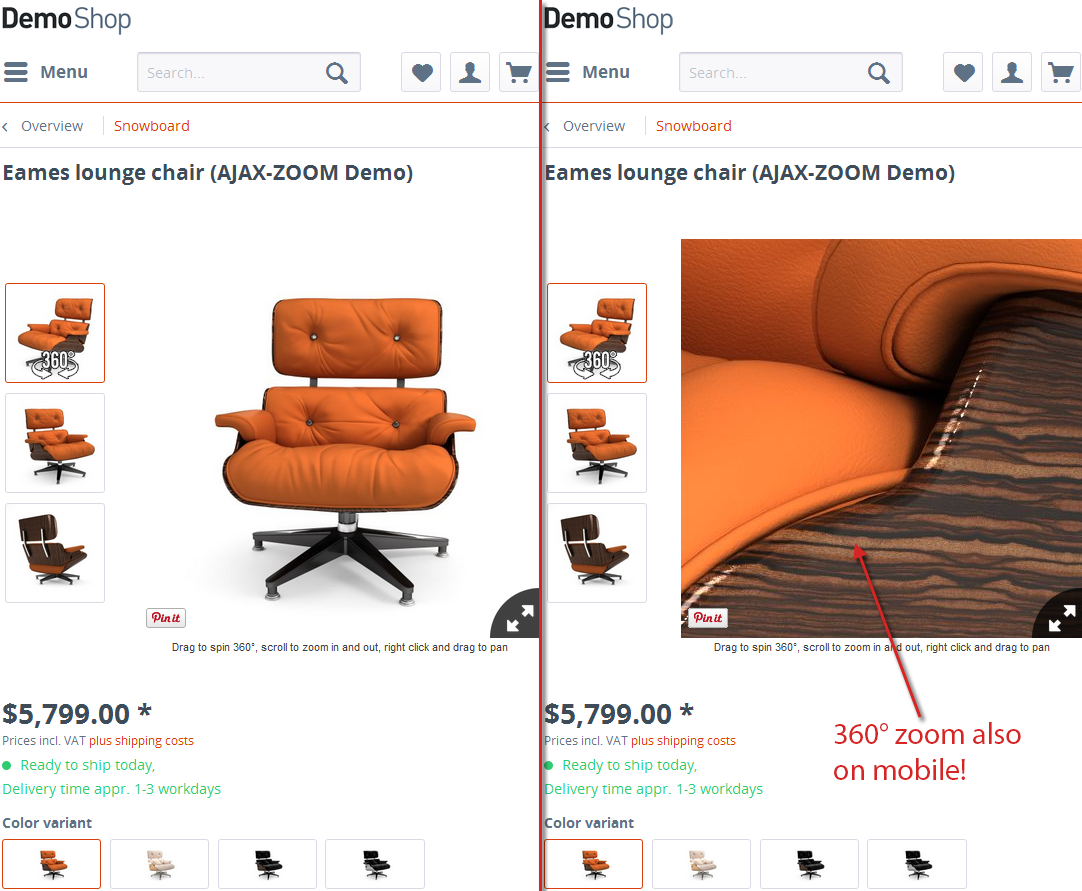
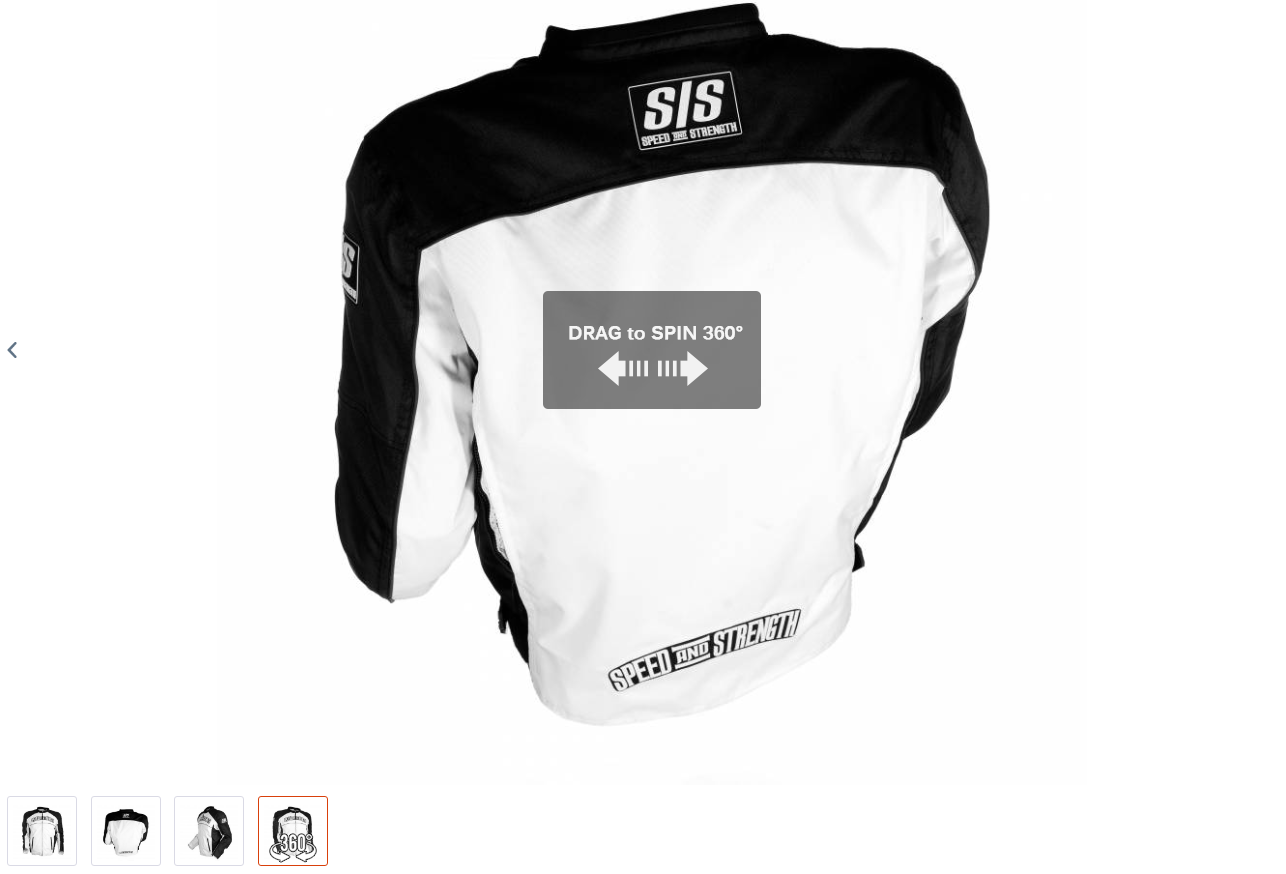
At the frontend, the AJAX-ZOOM module for Shopware 5 is based on responsive mouseover zoom + optional 360°. However, starting from the plugin's version 1.2.4, there is an exclusive option for Shopware 5 customers to inject only the AJAX-ZOOM 360-degree player directly into the default product image slider.
At the backend, administrators can upload several 360s or import them from ZIP files and folders, which were previously uploaded, e.g., via FTP.
Each 360° view can be configured with separate AJAX-ZOOM settings and attached to a properties combination. For standard images, there are no changes required.
General features
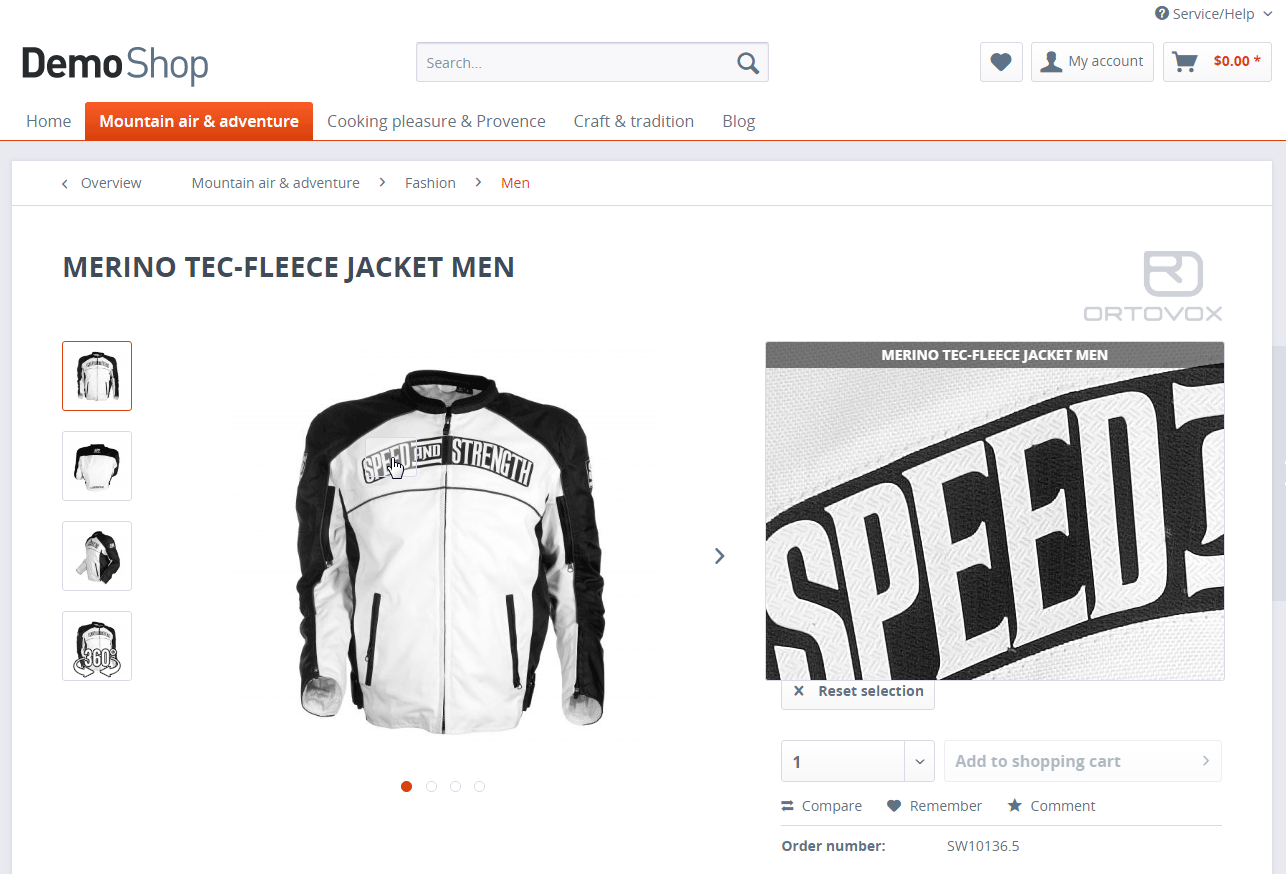
- Fully responsive mouseover area and flyout zoom window
- Adjustable to fit the size of any responsive elements on the page over smart jQuery like selector
- Adjustable for fixed or flexible image proportions
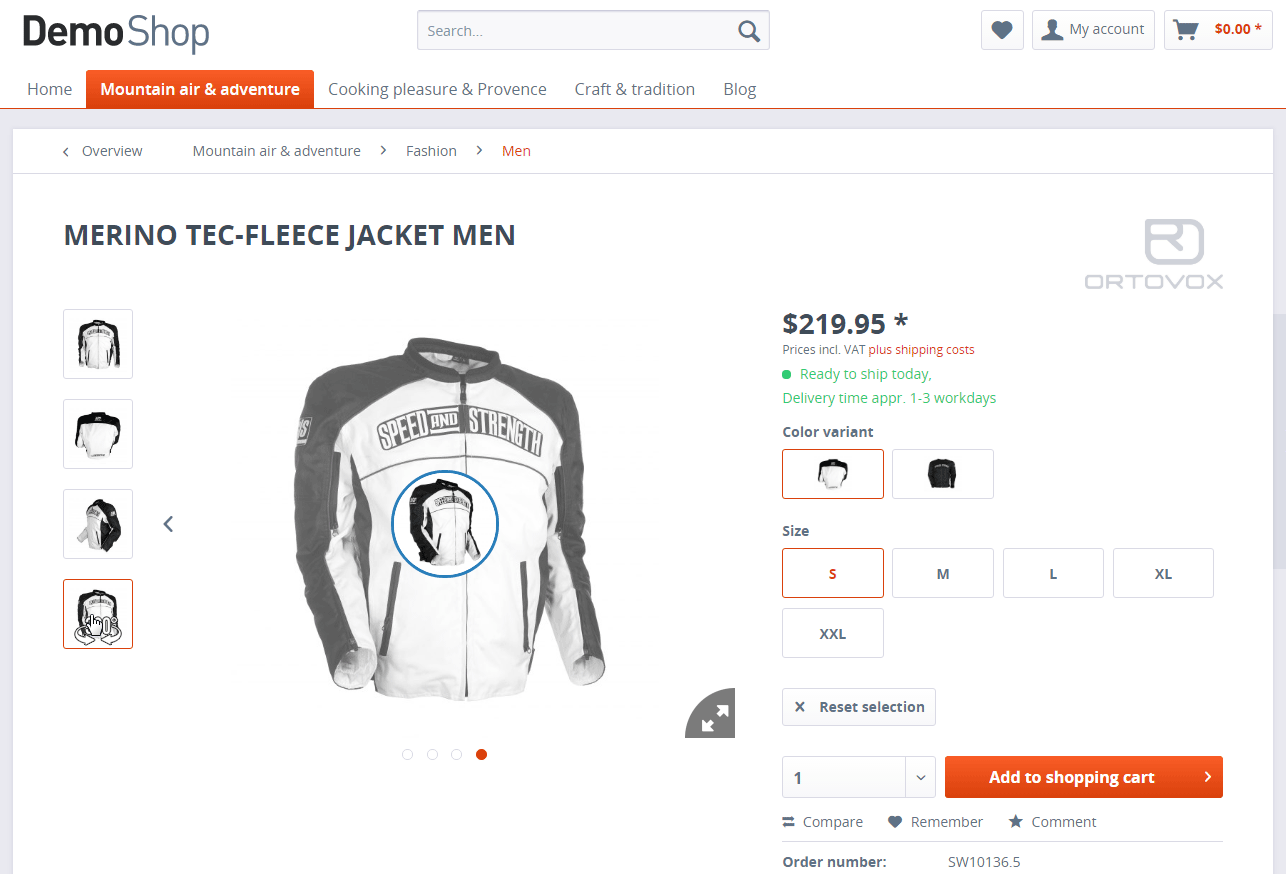
- Permanent or automatic inner zoom depending on resolution and responsive layout
- Support for Shopware images tied to product variations
- Works great on touch-enabled devices
- Optional 360°/3D support with (pinch) zoom and full-screen view
- Optional responsive thumbnails slider integration
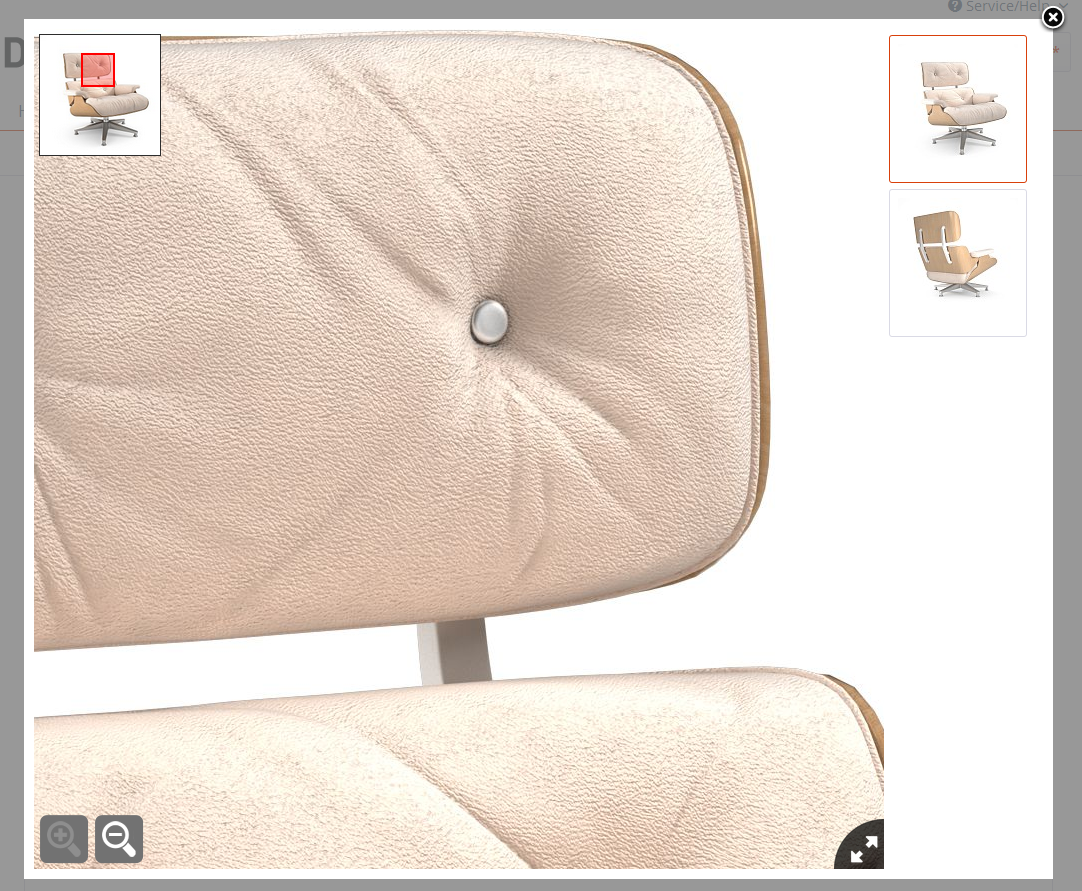
- Responsive modal or full-screen views on click with AJAX-ZOOM
- Fast "progressive" loading of high-resolution images
- Instant (on-the-fly) generation of all thumbnails
- 360-degree / 3D "Product Tour" with the editor at the backend
- Hotspots on 360/3D including hotspots configurator in the backend
- Multilanguage
- 100+ other options
- All components adjustable over Shopware plugin settings
- API for developers of all skill levels
- Continuous development and improvements, technical support
Backend screenshots
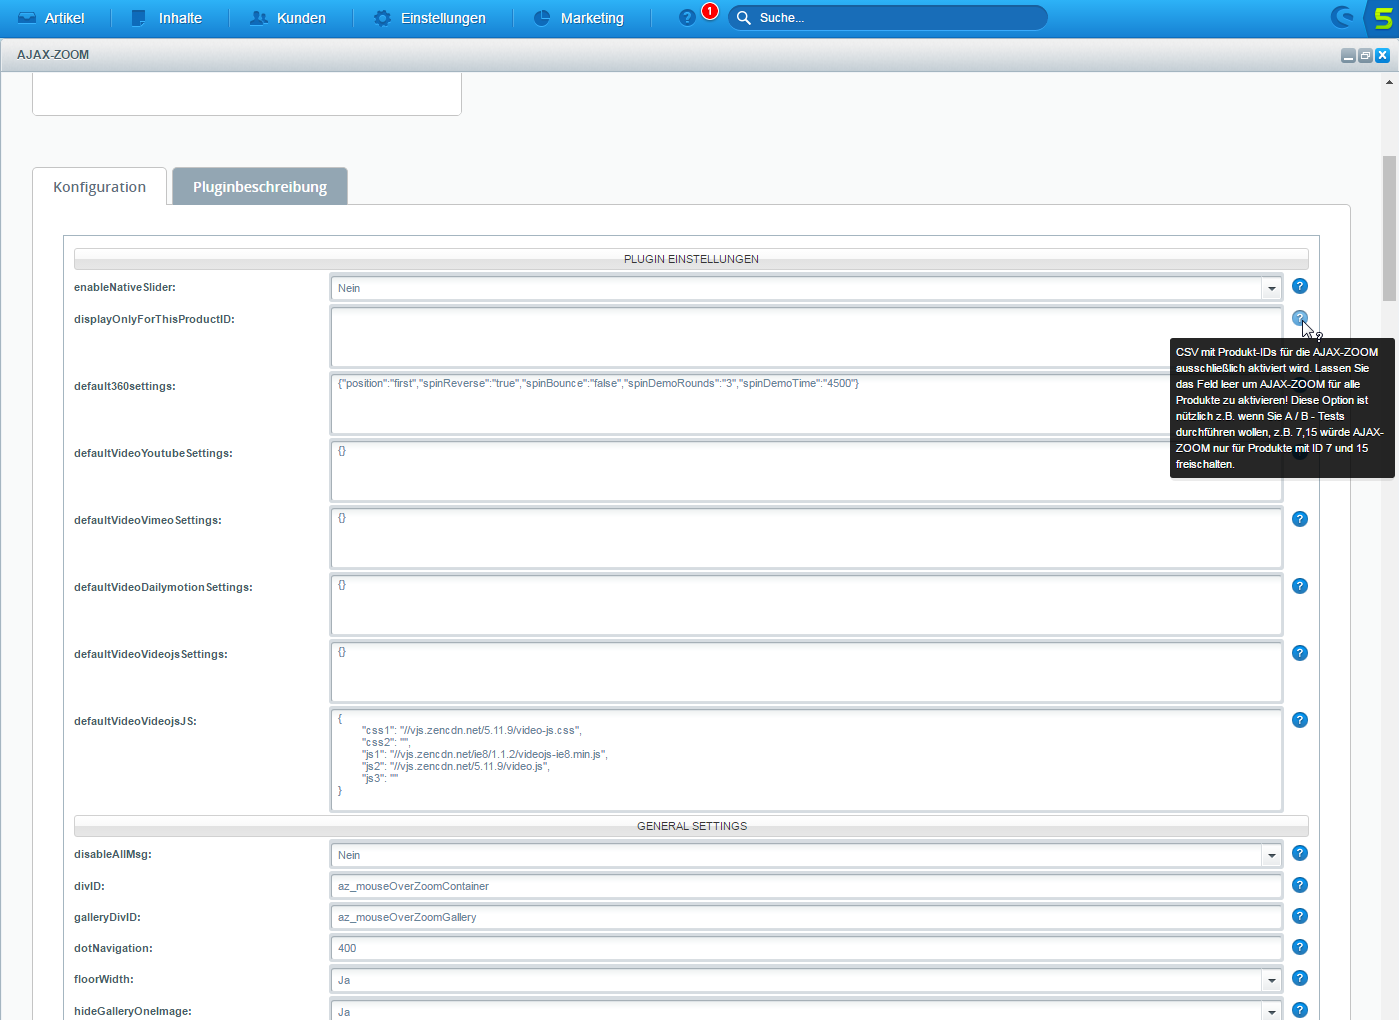
There are several options in the plugin configuration area for adjusting and fine-tuning the plugin's appearance. One of those options is especially interesting because it allows you to test the plugin without affecting the entire website. With the "displayOnlyForThisProductID", you can specify to show AJAX-ZOOM only for a few products and perform the tests you need.
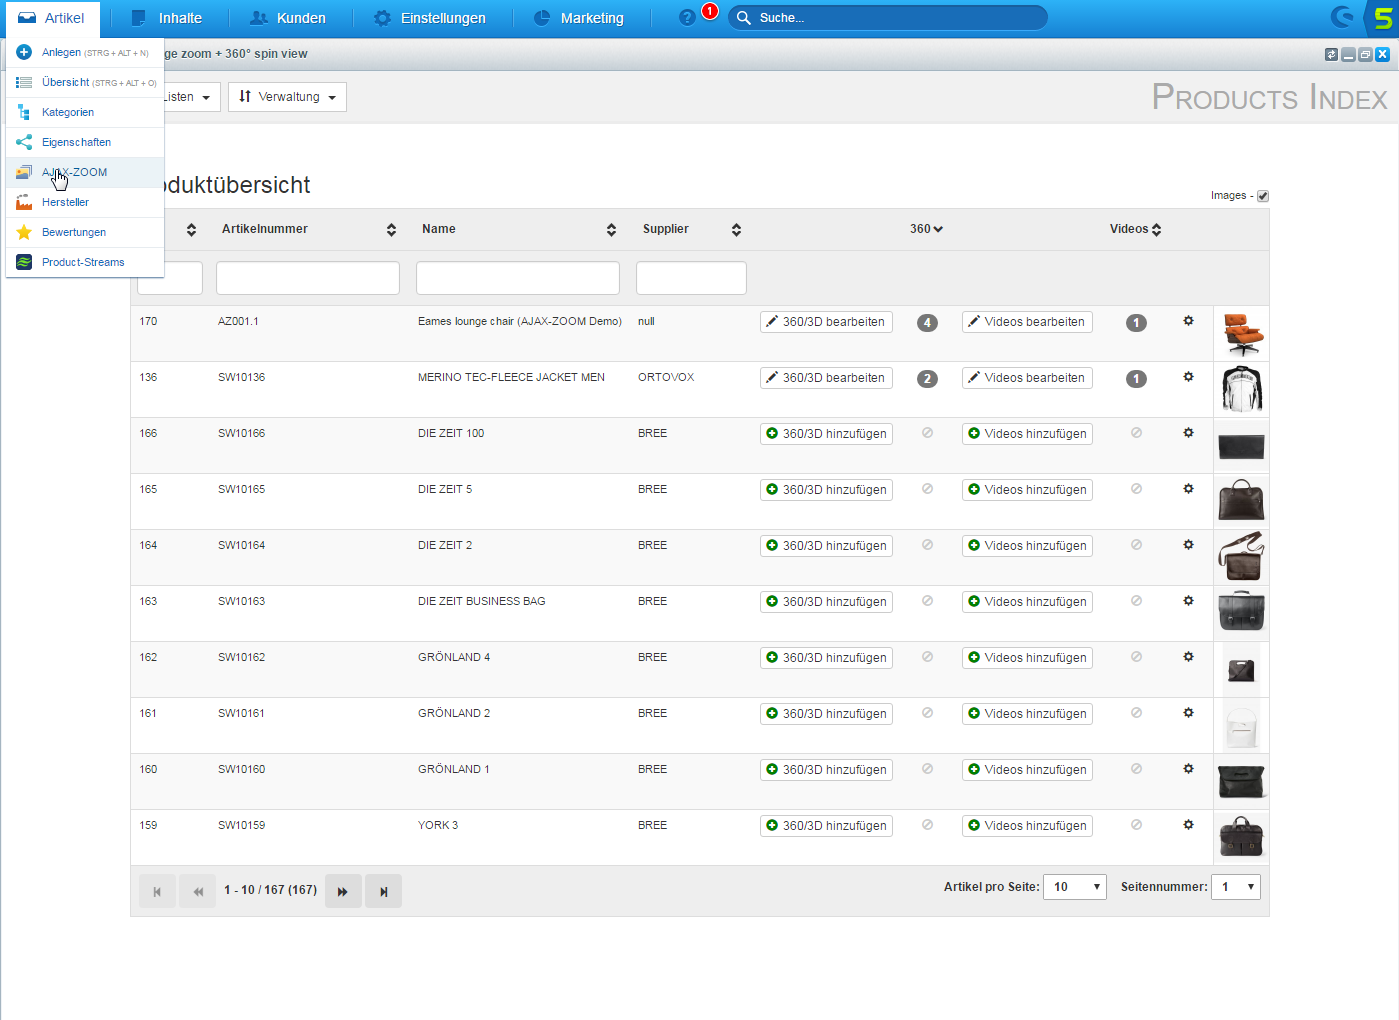
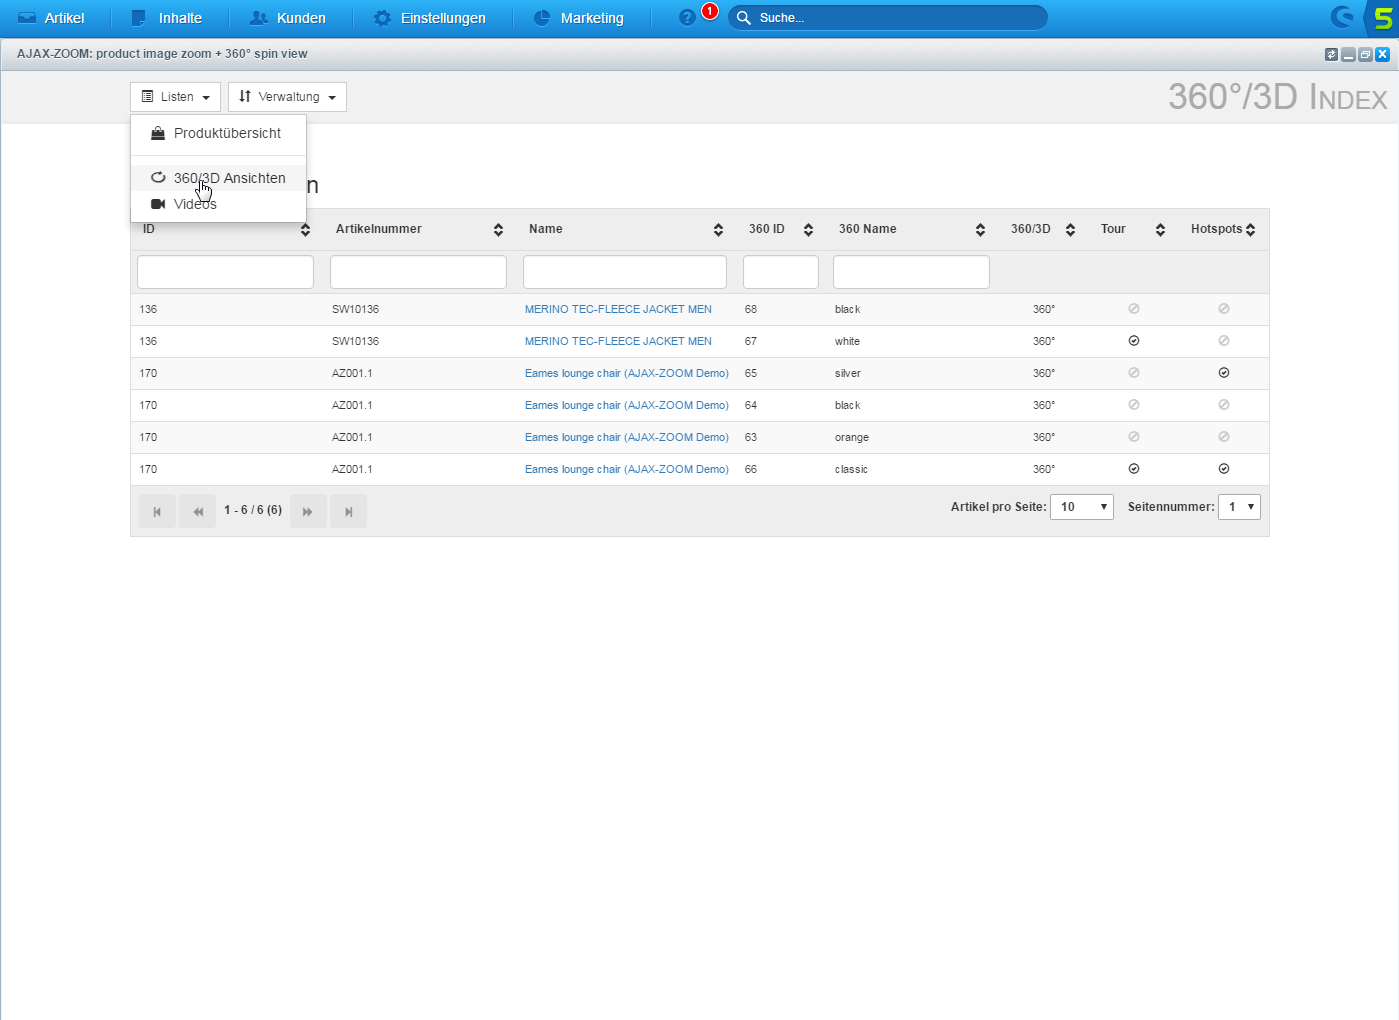
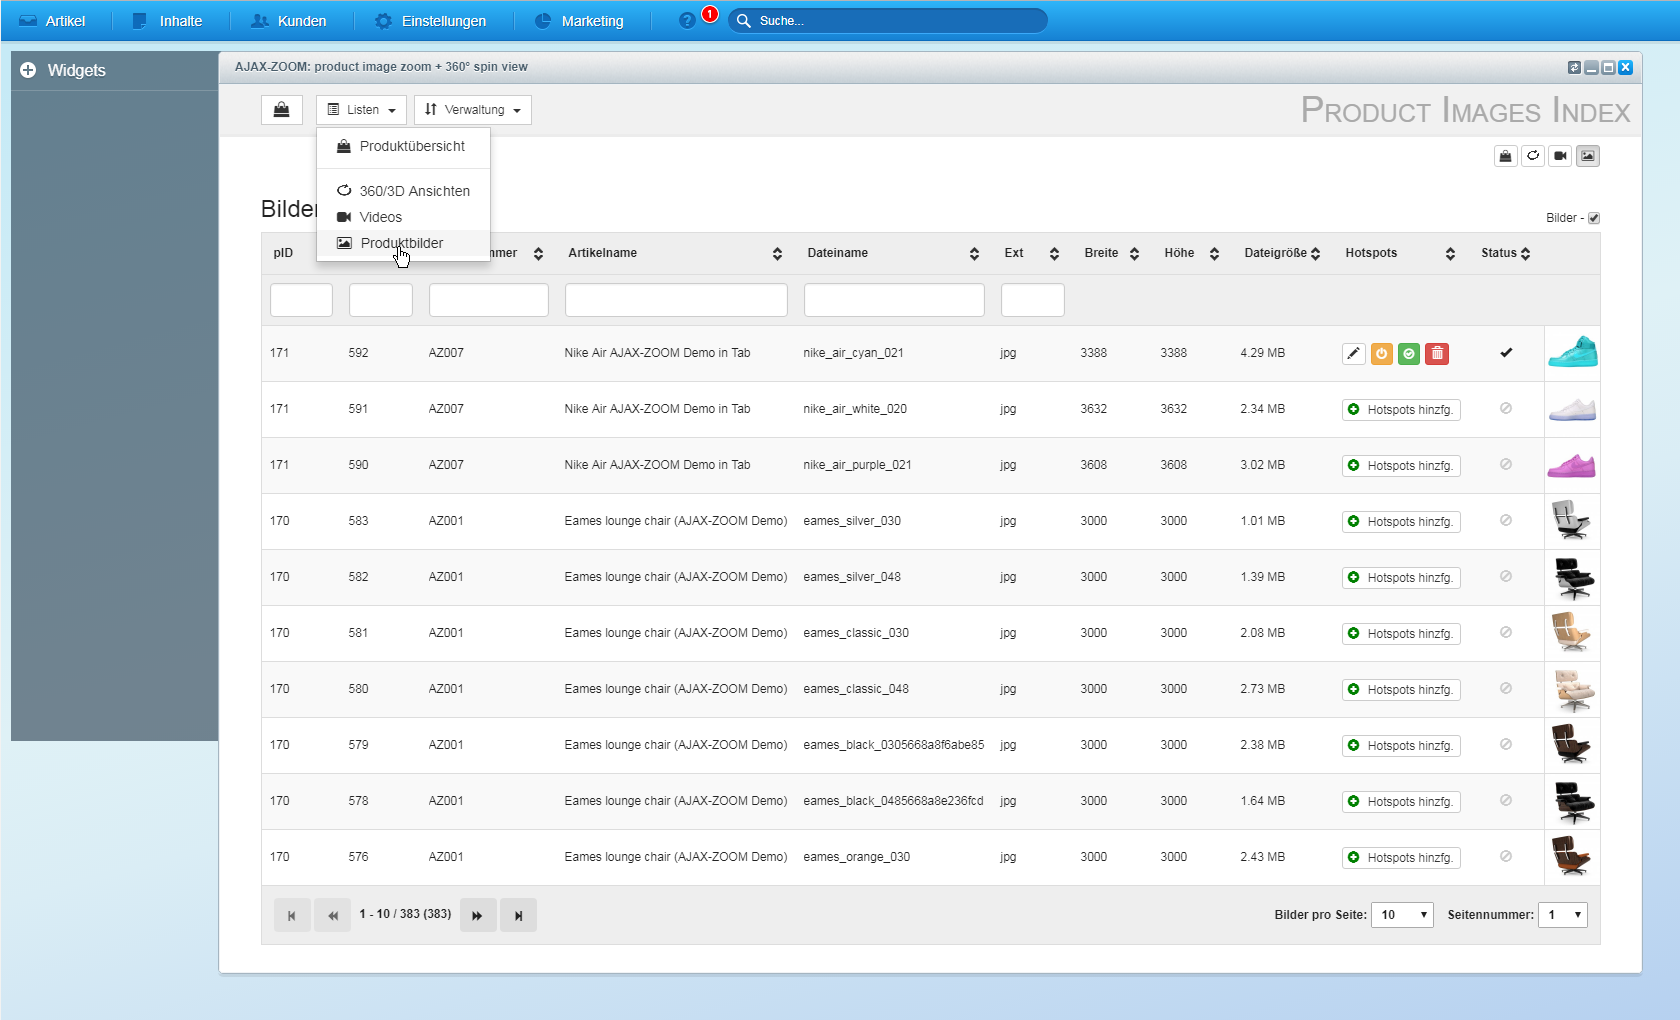
Under the menu Items -> AJAX-ZOOM, there is a dedicated list with all main articles where you overview the amount of 360-degree views and videos. Using the search field, you can quickly find the article you are looking for. Clicking on an article name takes you to the area where you can upload 360-views and videos.
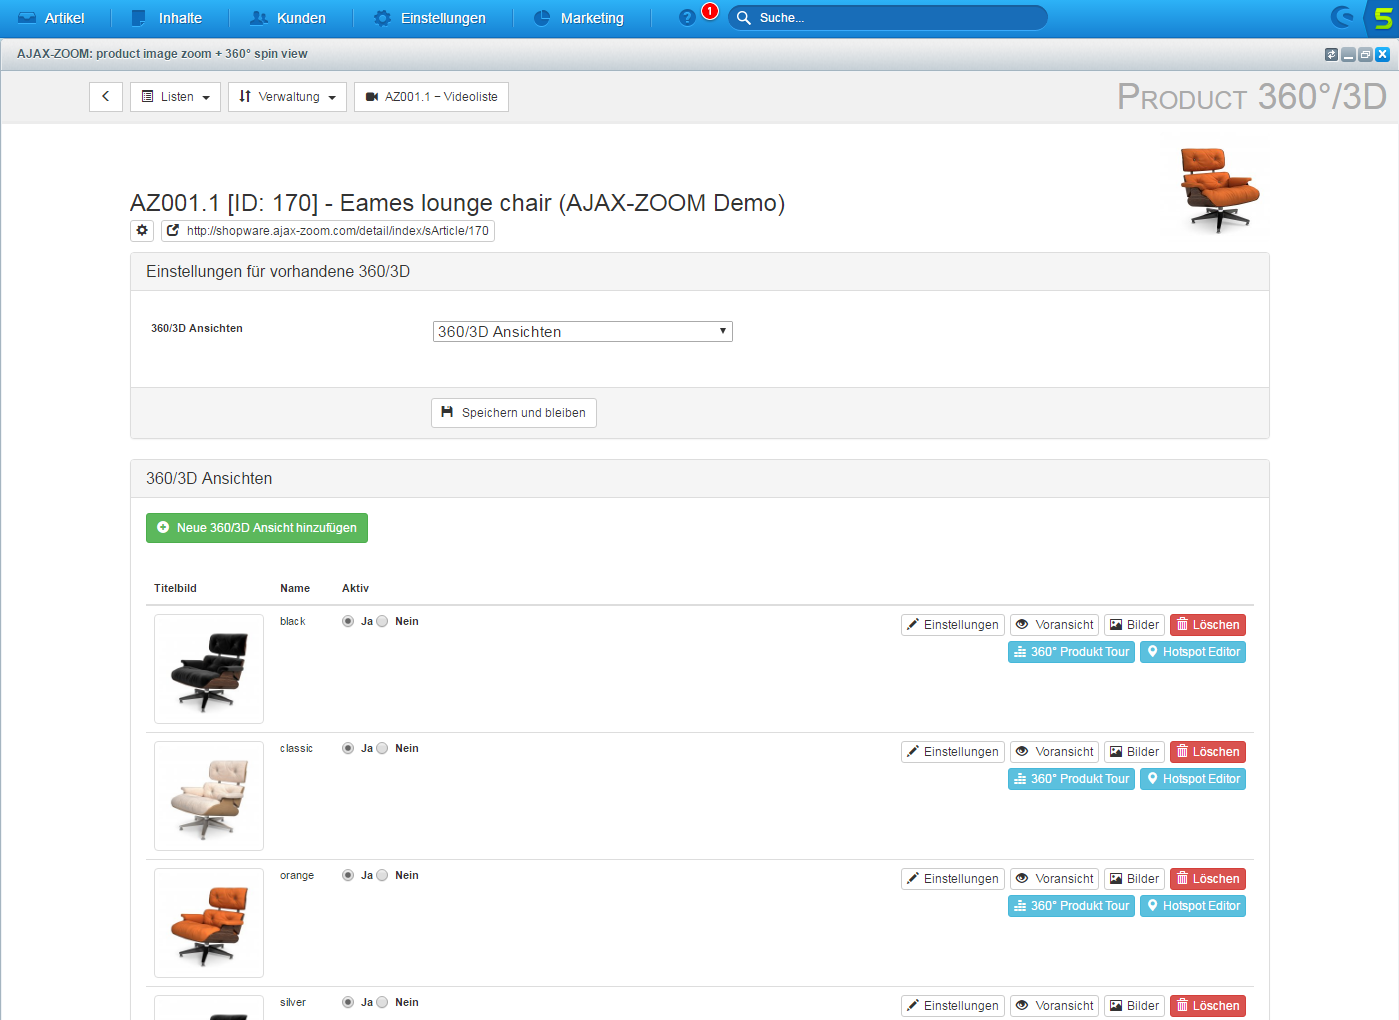
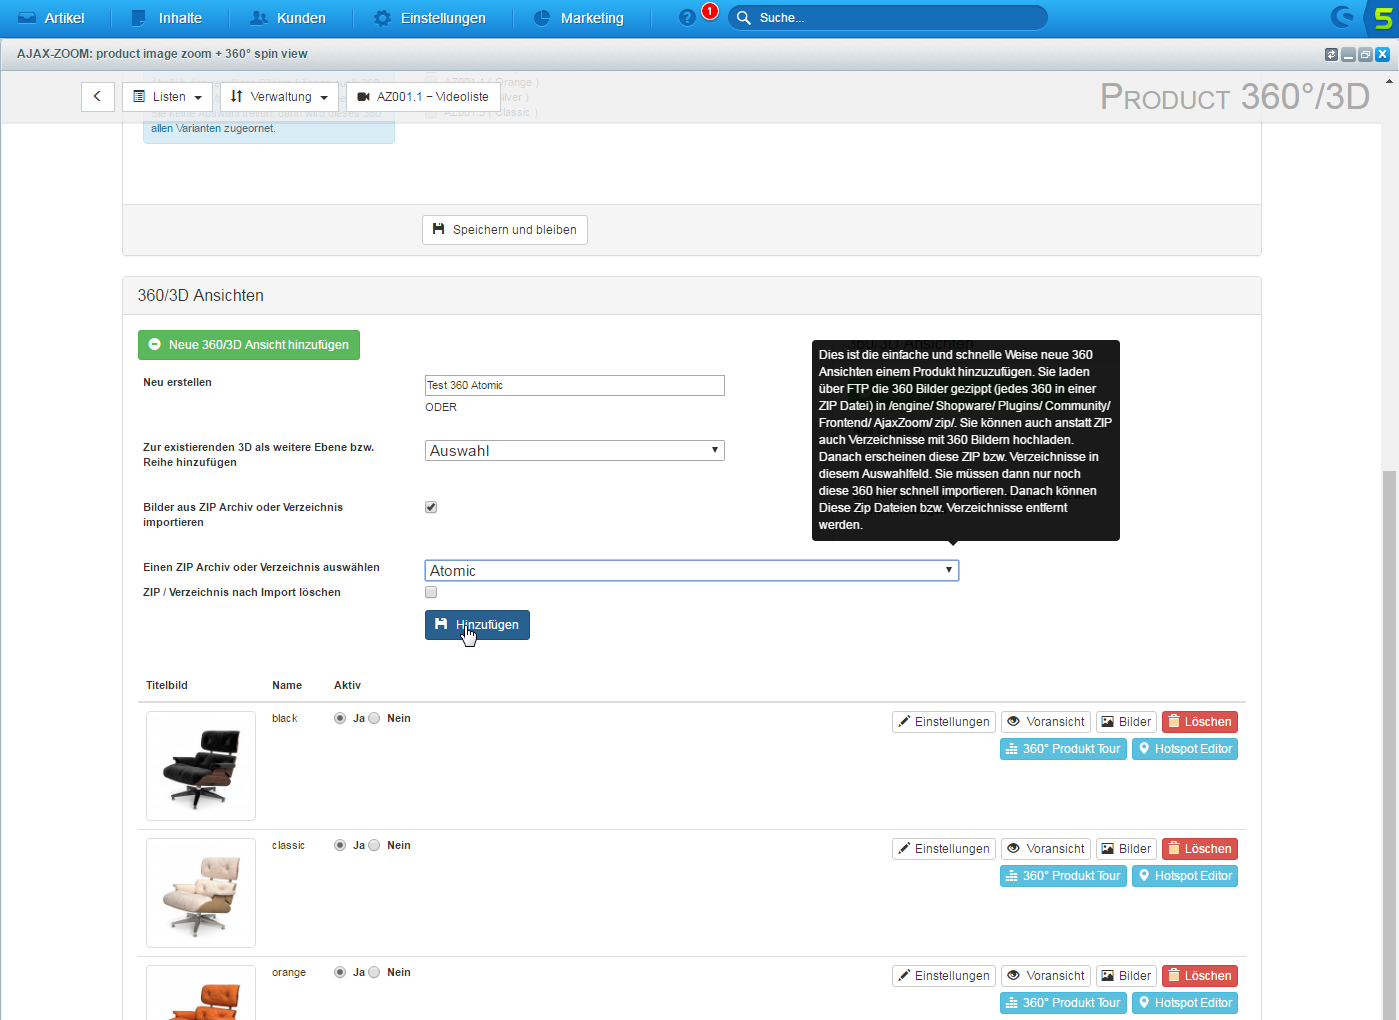
Creating a new 360/3D degree product view is very easy. While creating a new entry, you can immediately select a ZIP file that has been previously uploaded to a specific "ZIP" directory, e.g., via FTP. During the creation of the entry, the plugin unpacks the image files from the selected ZIP archive and places them within the plugin structure.
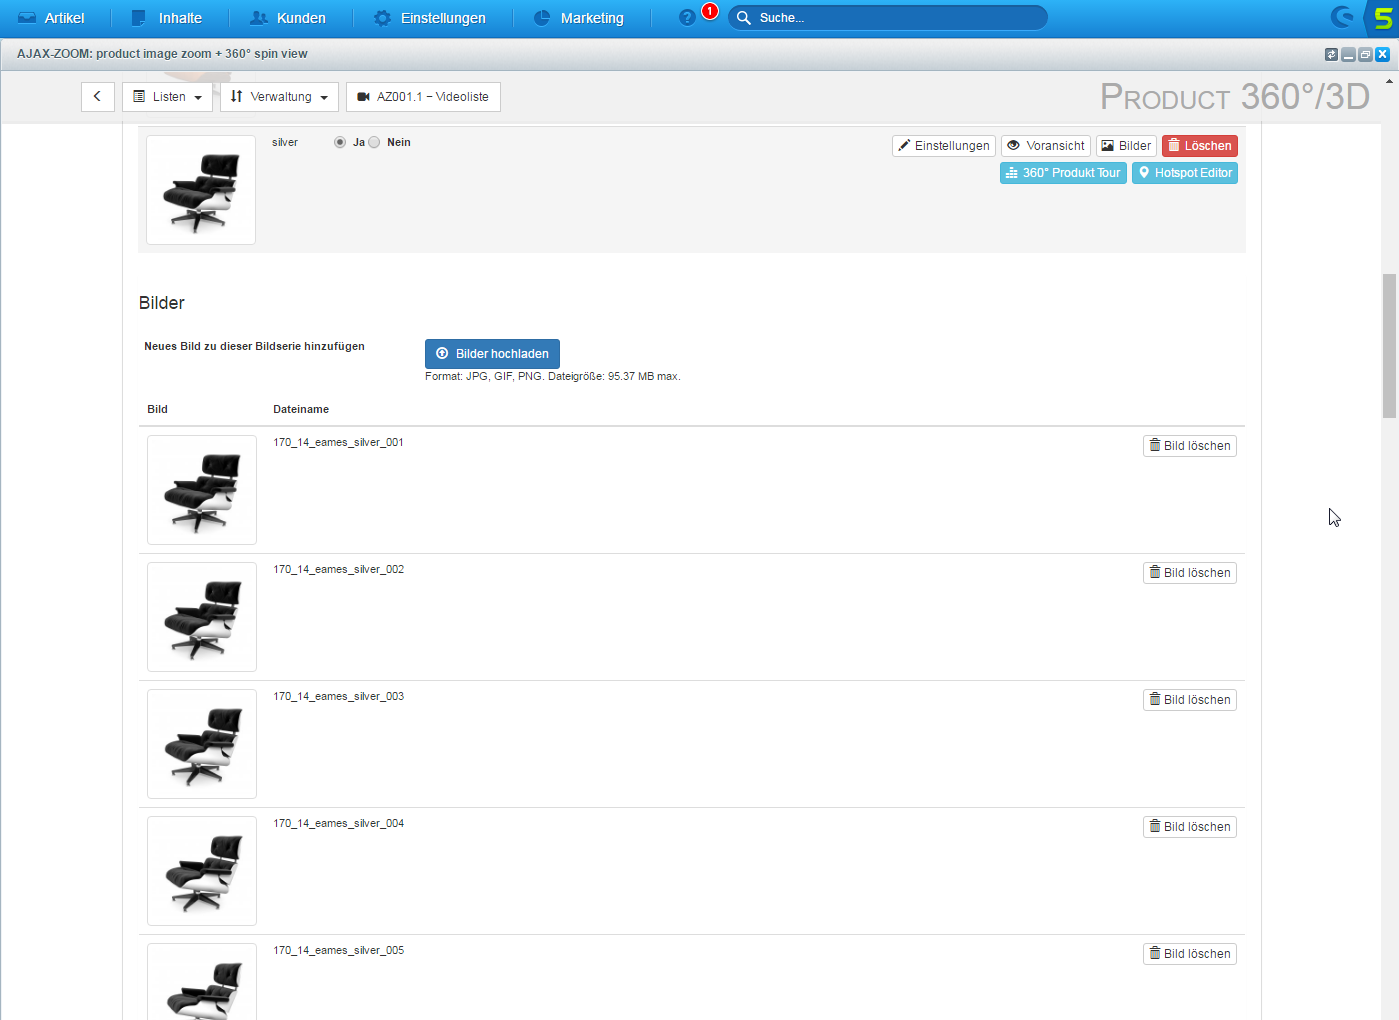
Alternatively, you can upload the images directly via the backend interface. The upload interface appears immediately after a new entry for the 360-item is created.
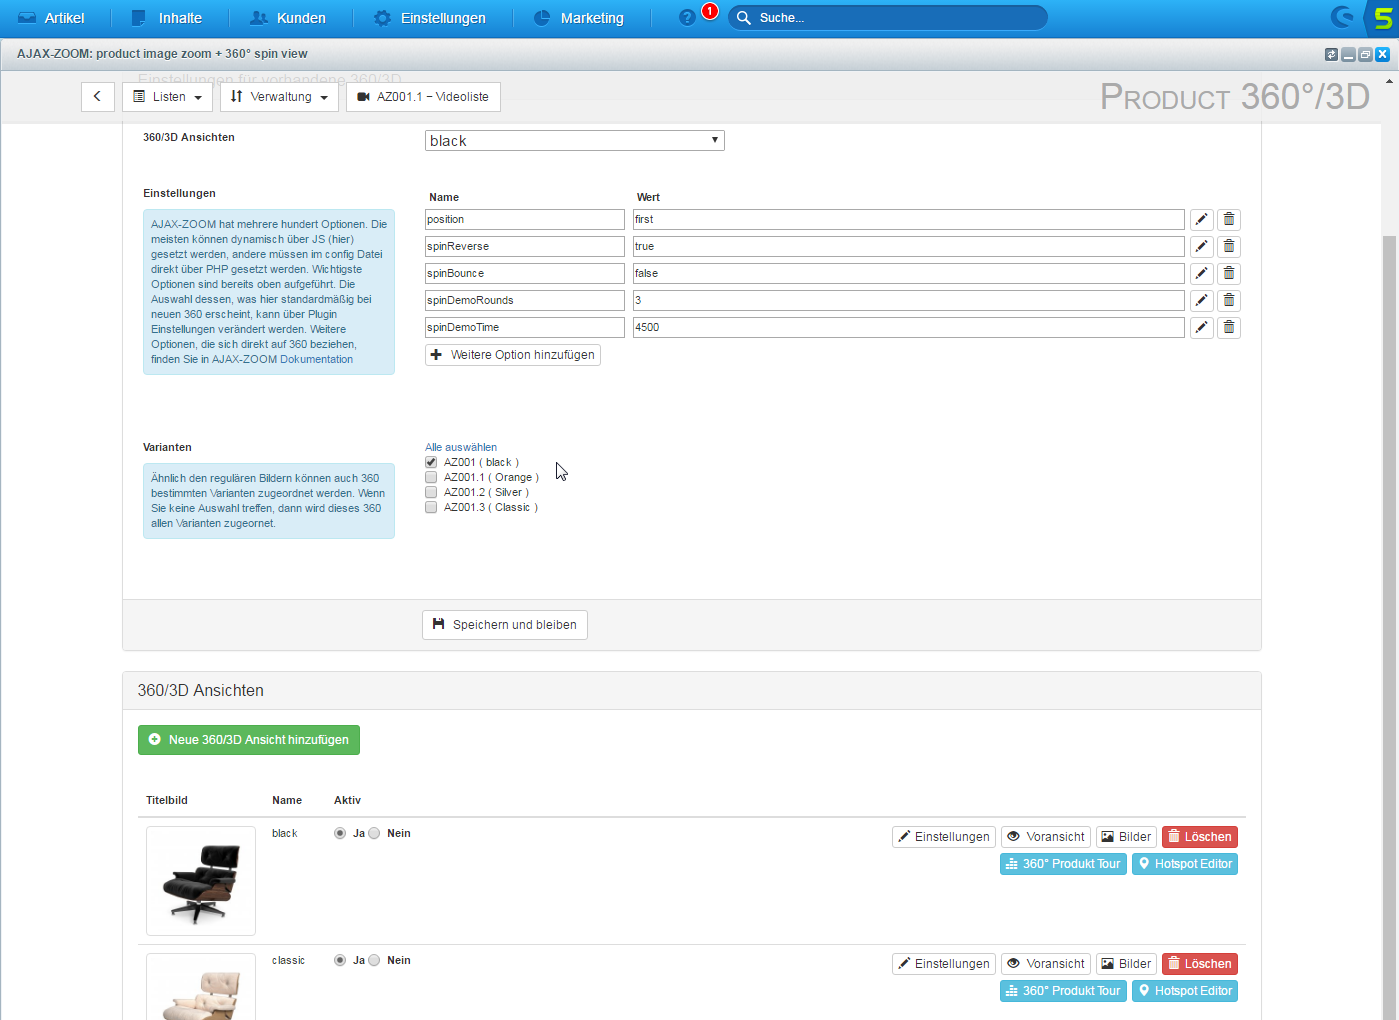
After creating a 360 and uploading the images, you can change or define several settings. For a product with variations, you have the option to assign a 360 only to specific variations. It is also possible to set nearly all settings of the AJAX-ZOOM player for each 360-degree object individually, create hotspots and product tours (see below).
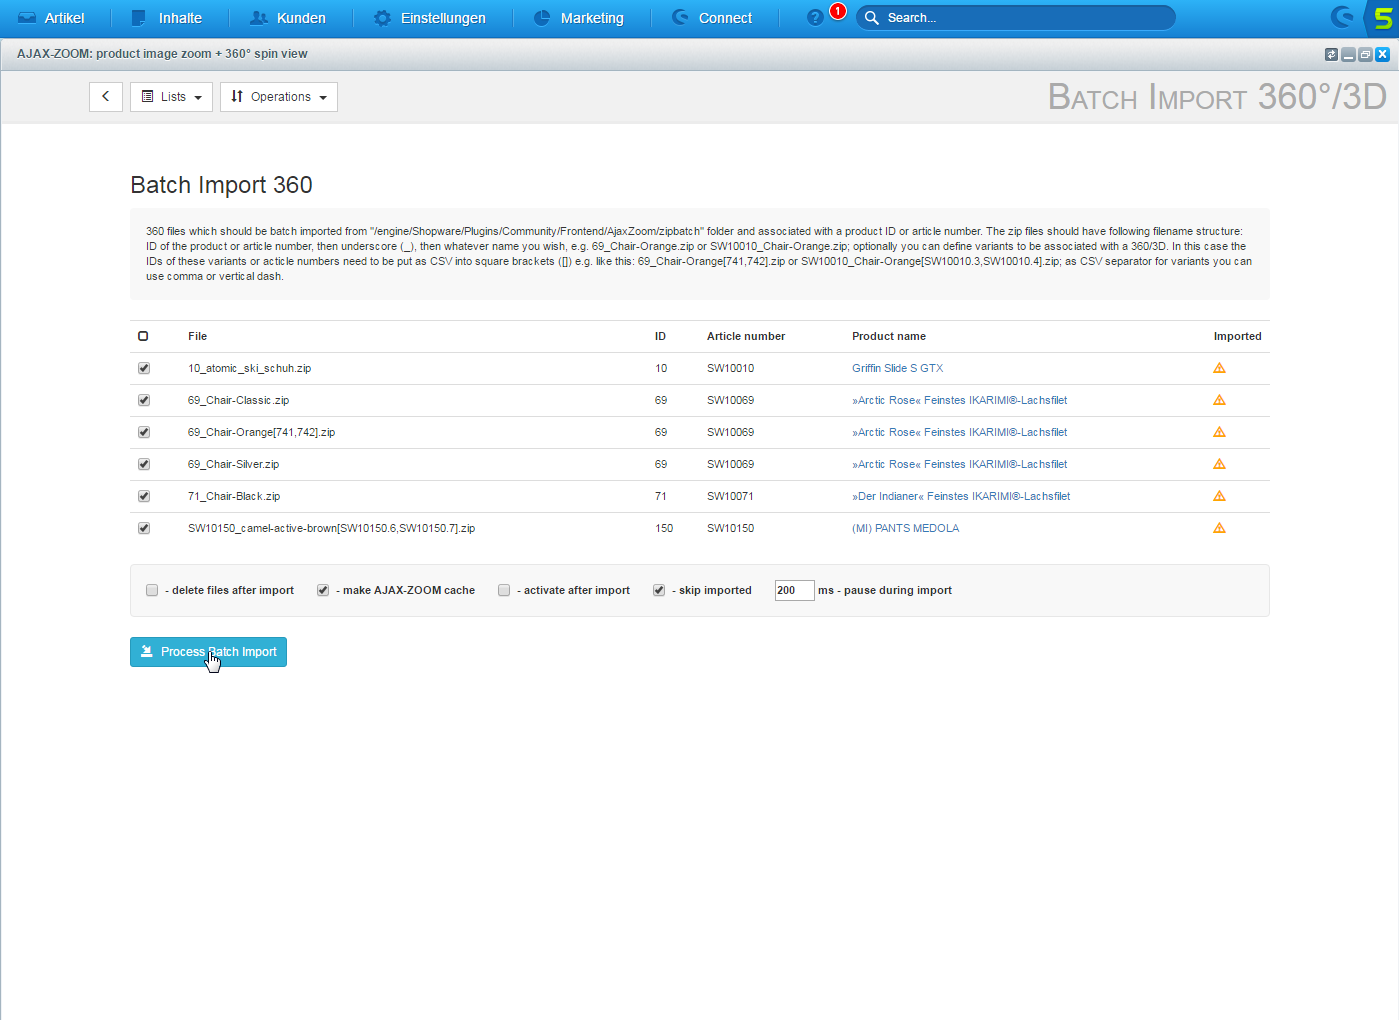
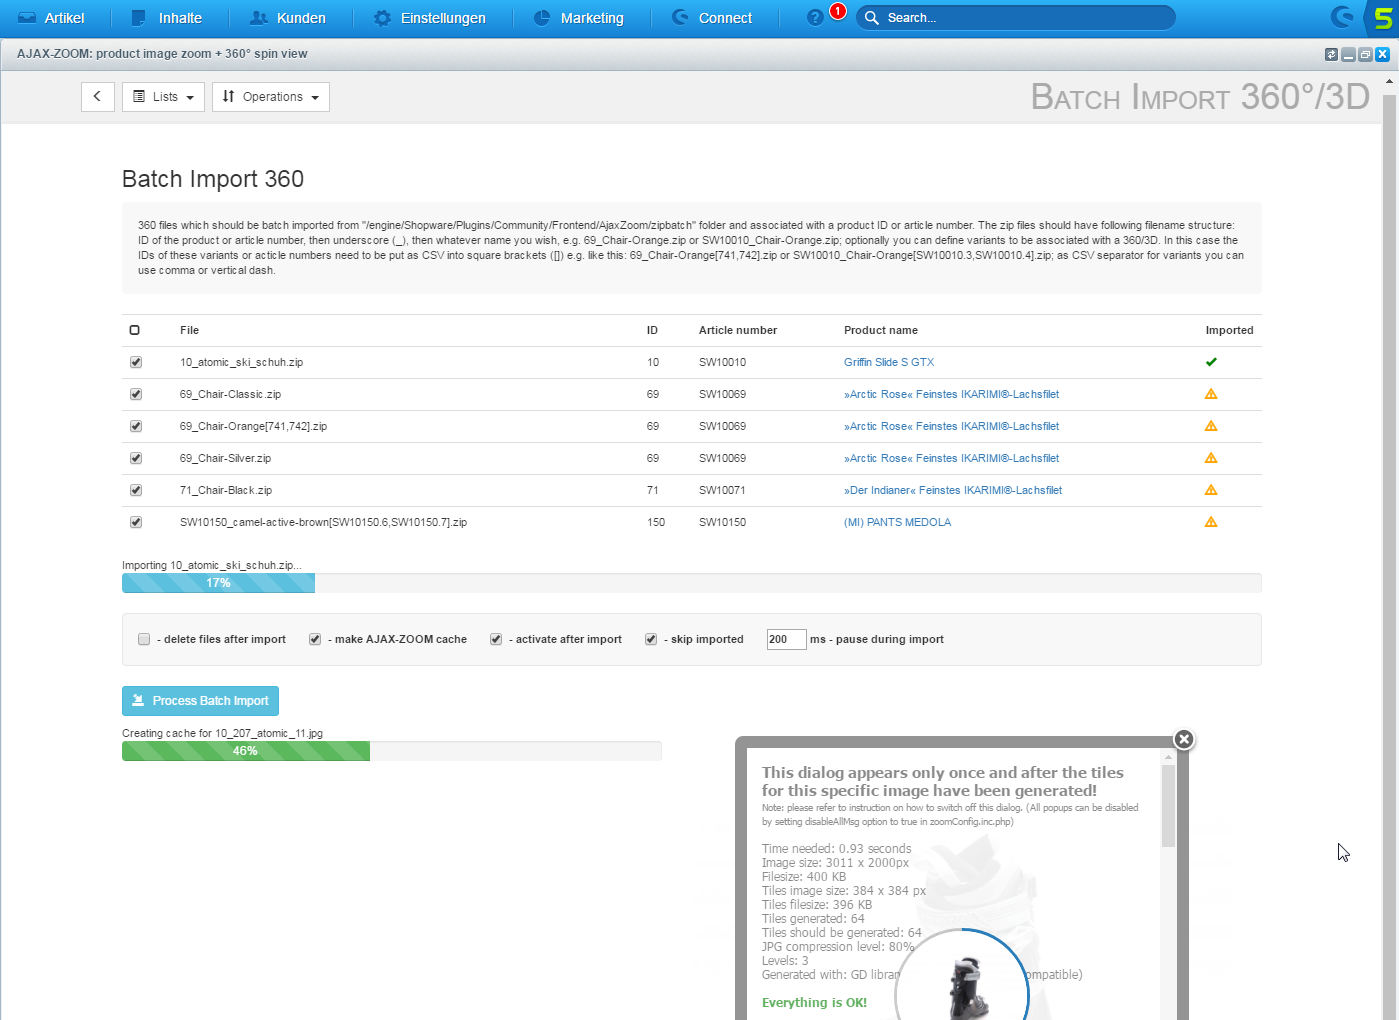
If from internal or external production of the 360-views, you have many 360 items available at once, you can use the 360-batch-import function of the plugin. Switch to Administration -> Batch Import 360. There, you find the convention of how the ZIP files with 360 images must be named to be automatically imported and assigned to the associated product numbers or IDs. This automation saves you enormous amounts of time and thus costs.
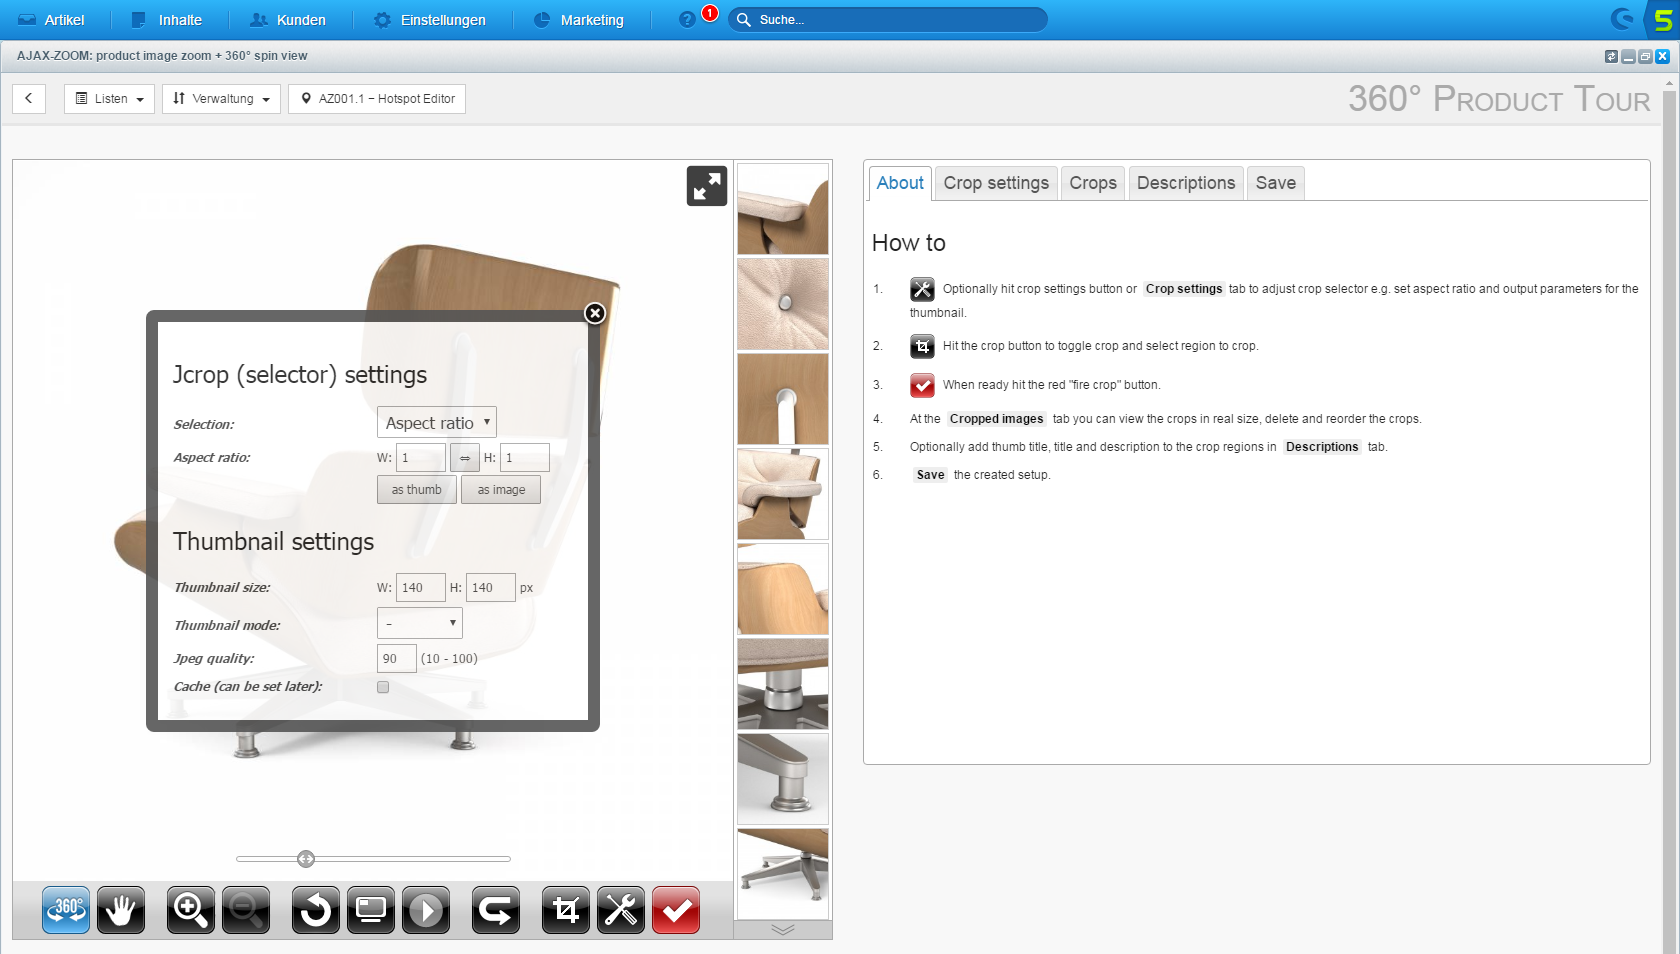
360-degree "Product Tour"
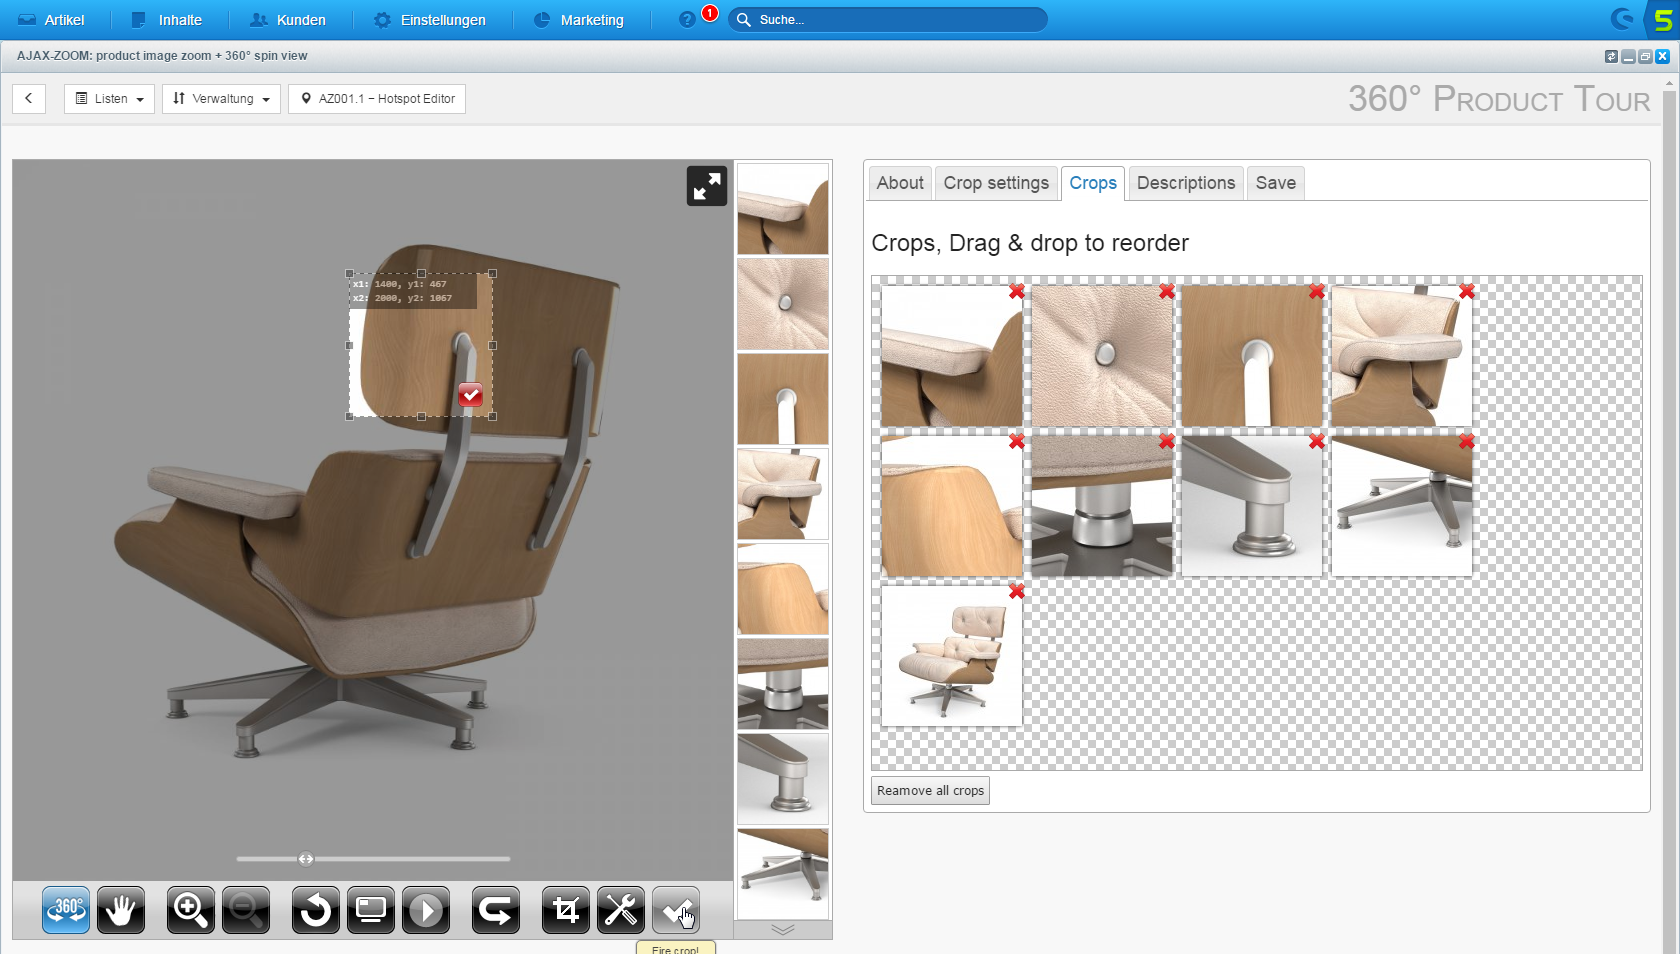
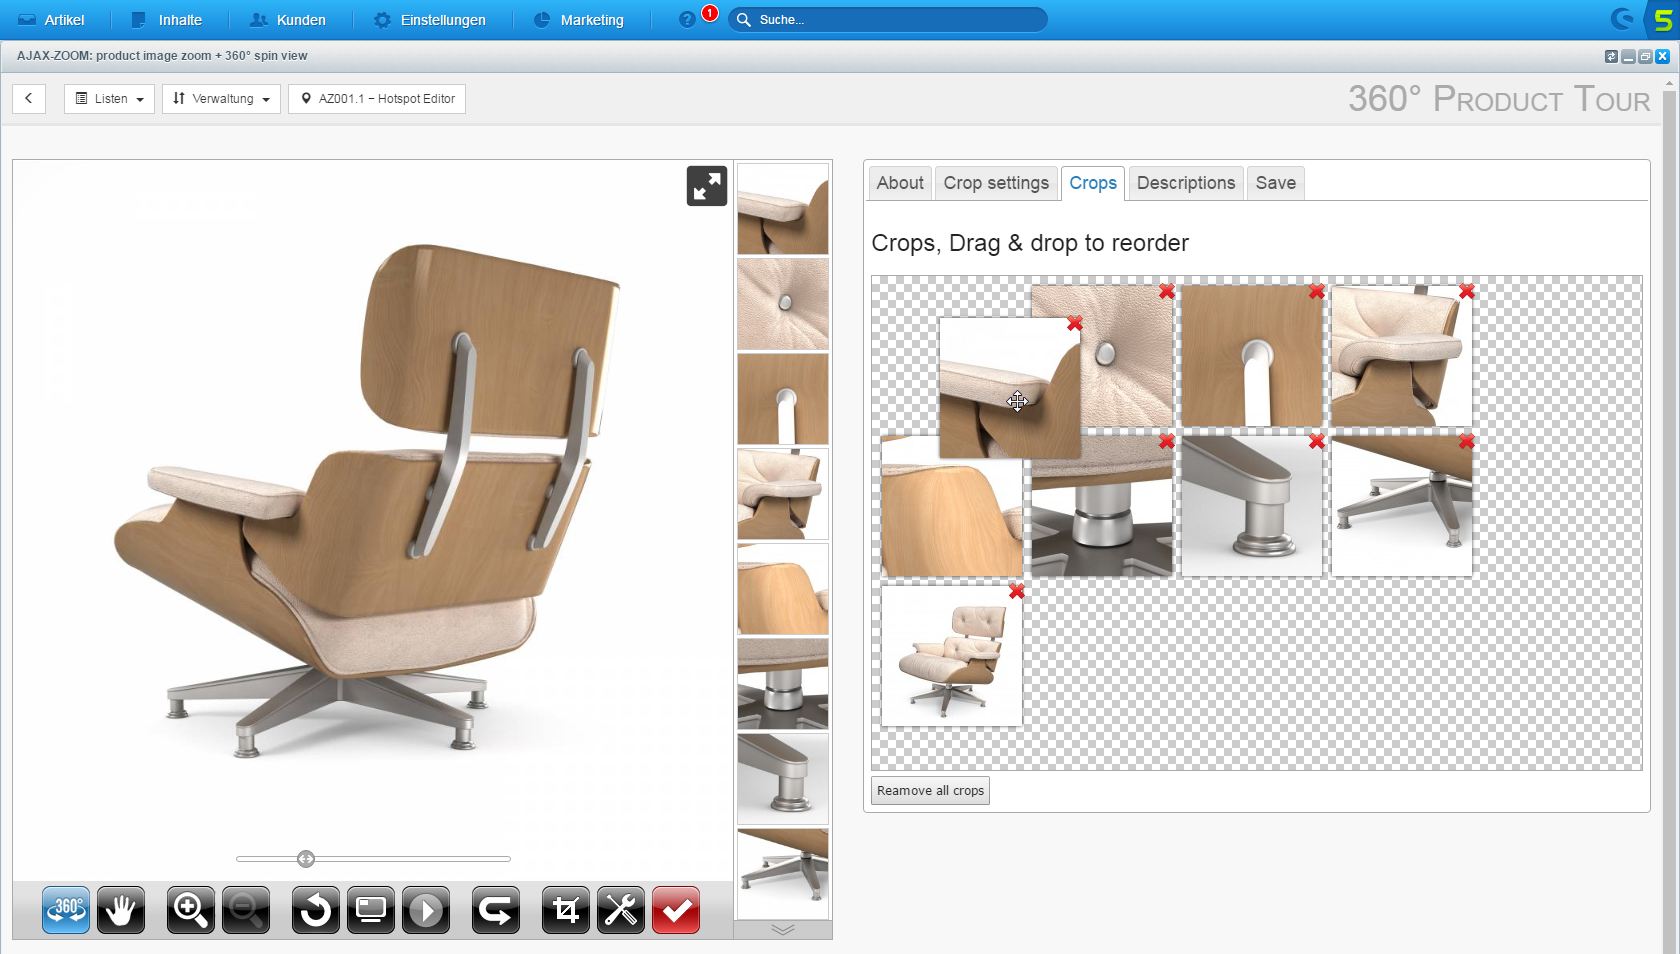
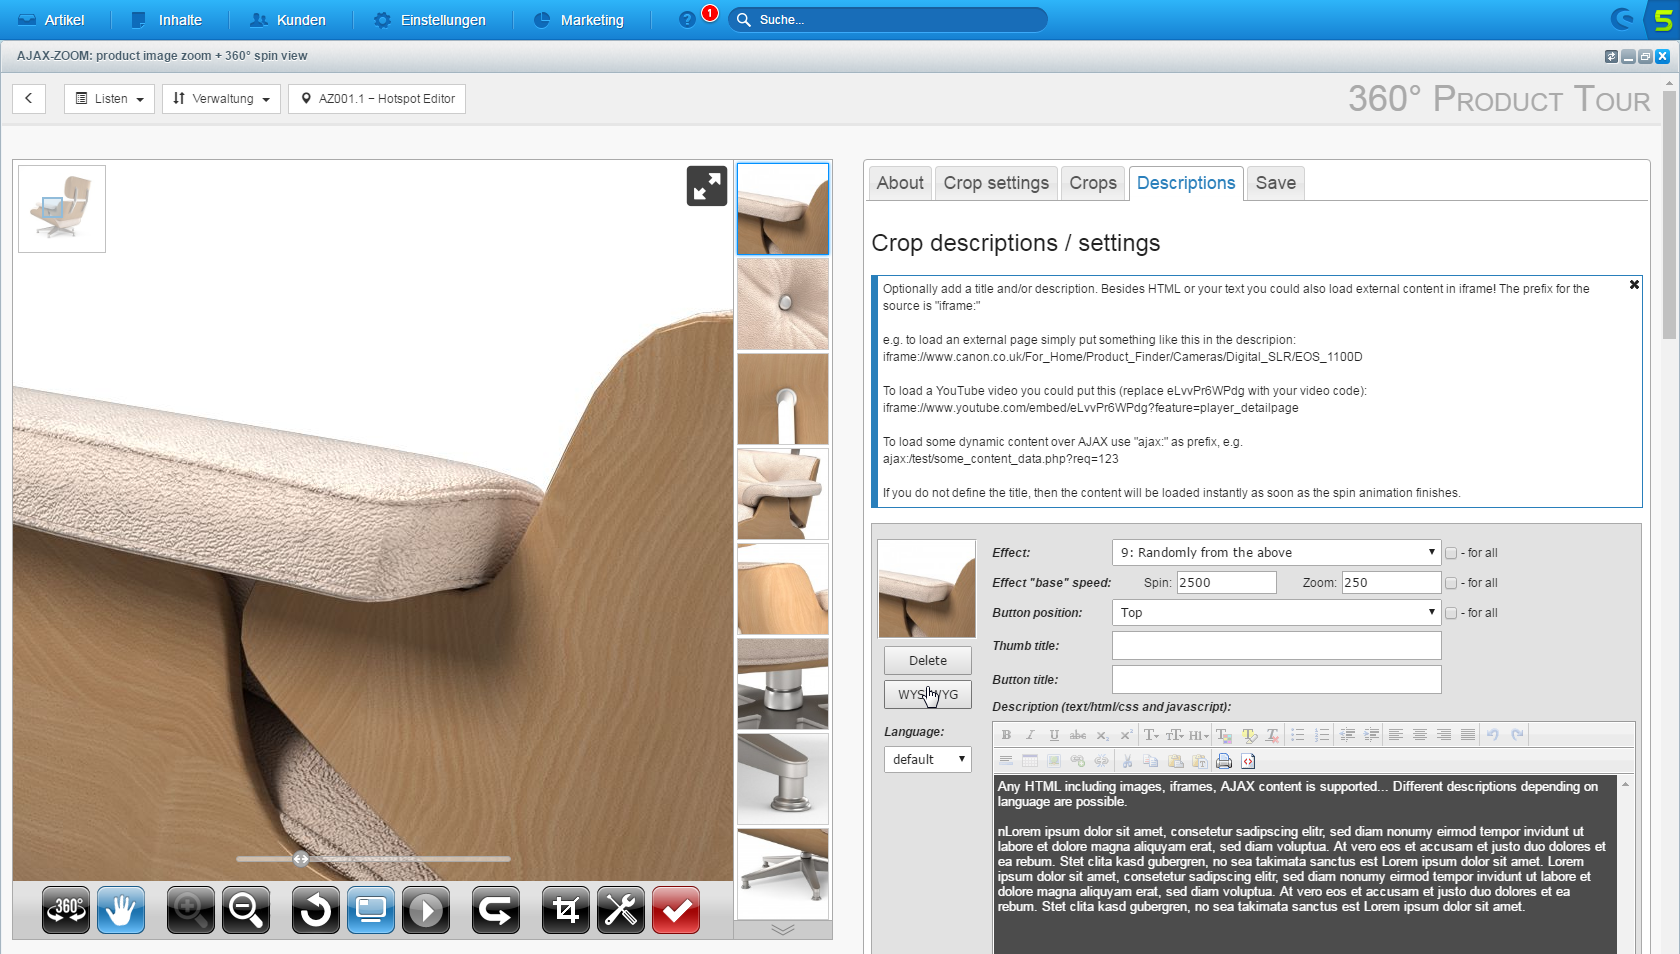
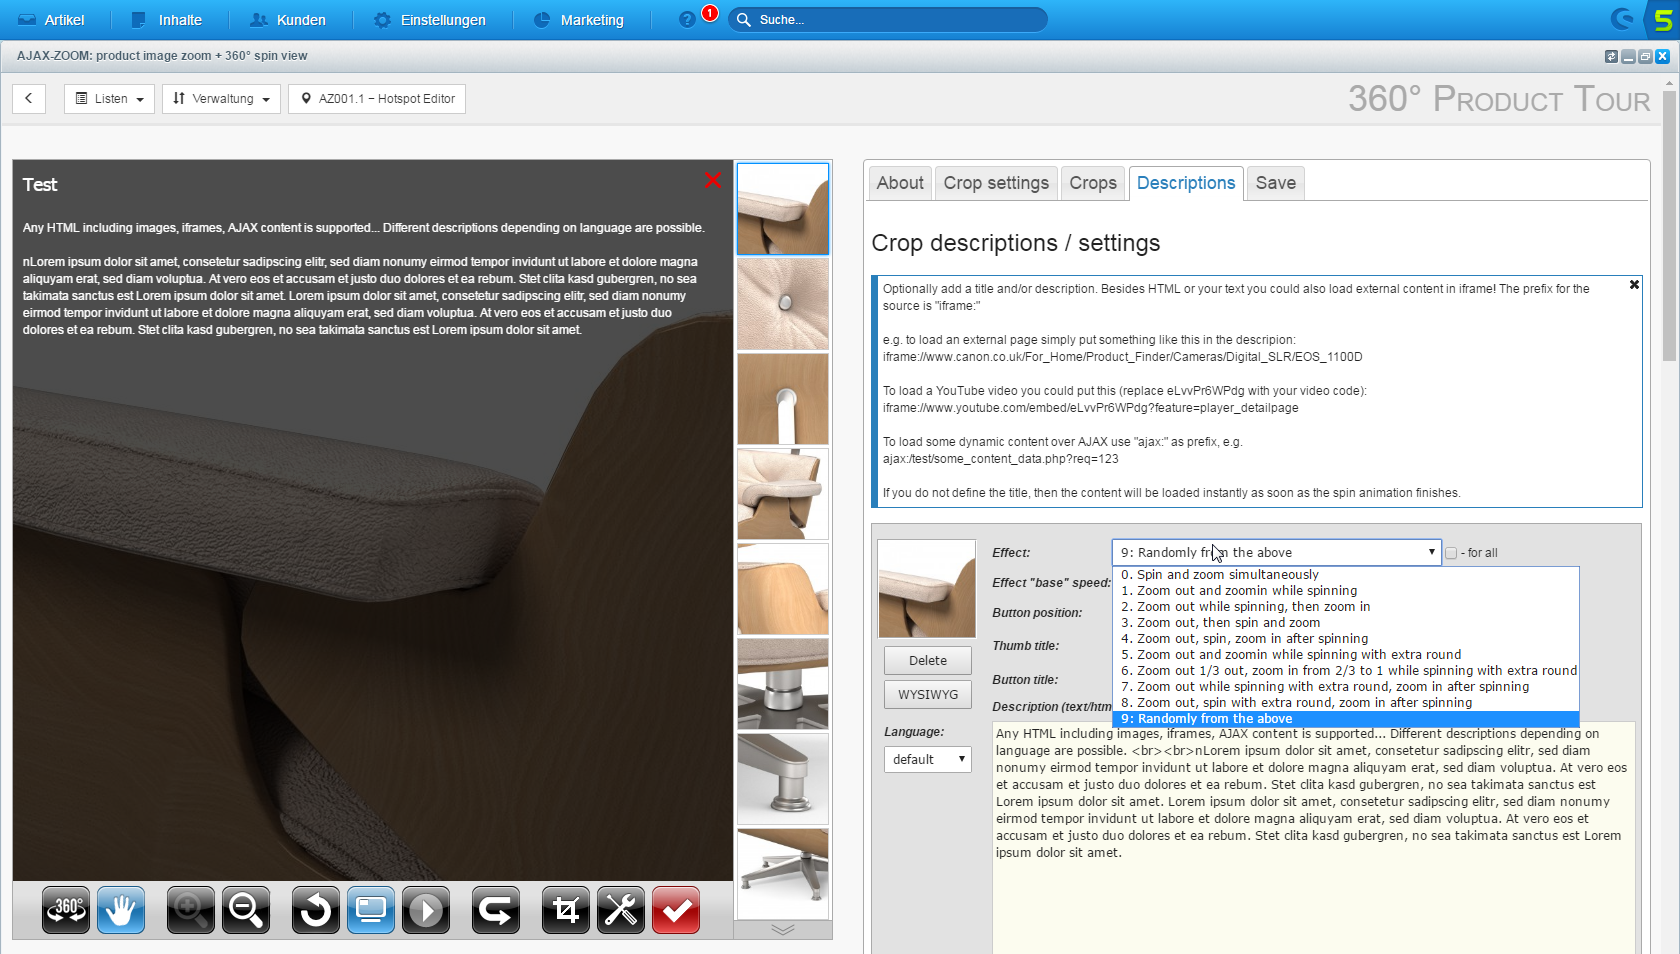
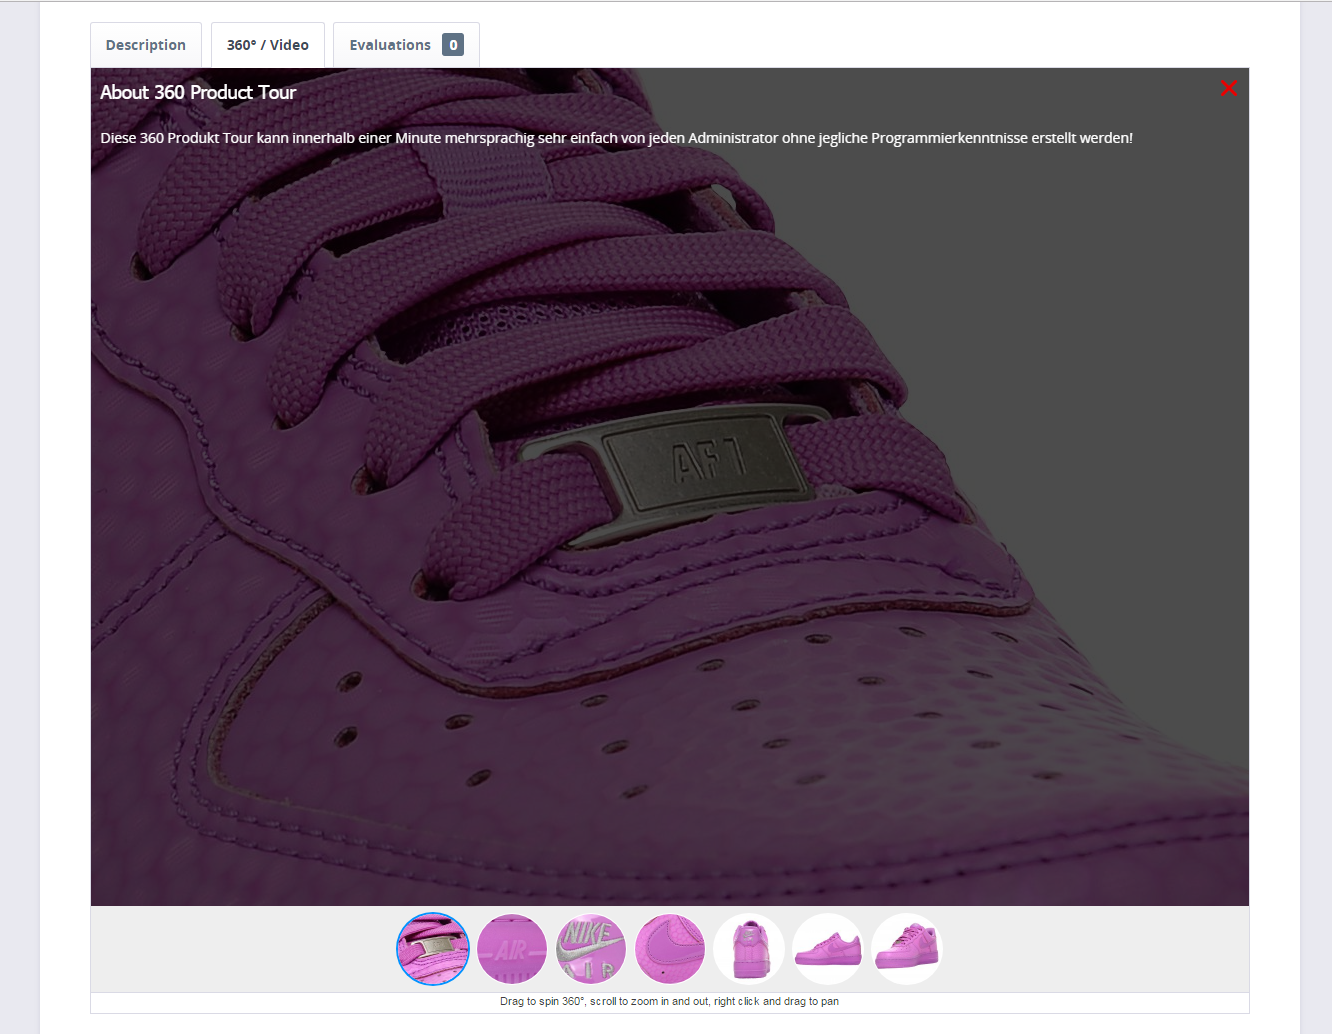
The 360 "Product Tour" Editor is straightforward to use. Select areas of interest in a 360/3D view and press the crop button. The editor automatically creates thumbnails of those areas and places them in the separate gallery slider. When the user clicks on a thumbnail, the player rotates and zooms that 360-view to the selected region. You can choose from several predefined animation options. At the front end, the thumbnail gallery looks a bit different than in the editor.
Furthermore, administrators have an option to provide multilingual titles and descriptions for the selected areas. The title automatically appears as an expandable button after the rotation and zooming animation ends. If a title is defined, the user can click on the button to expand it and see the full description. The description data may include HTML and, therefore, any content, including, e.g., YouTube videos, whereby the editor provides a shortcode for YouTube videos and iframes, so you don't need to write HTML for those.
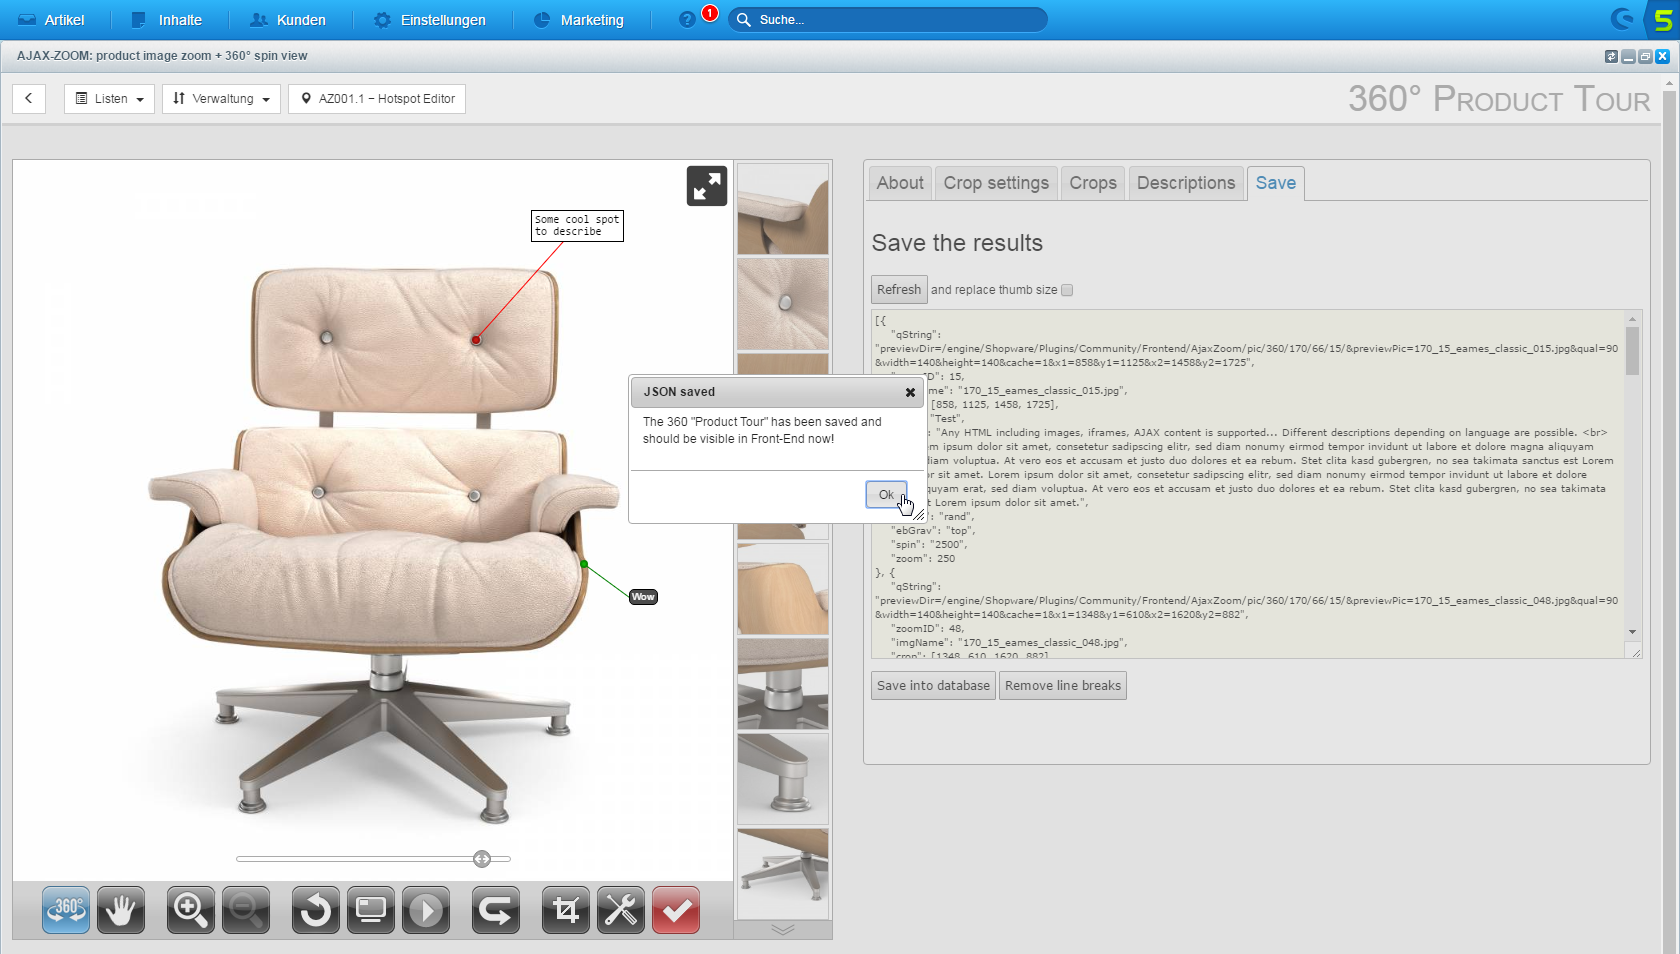
So if you quickly want to highlight anything on a 360-view, you can do it fast with the help of the "Product Tour" Editor. After a bit of practicing, it is a matter of seconds to create such professional presentations.
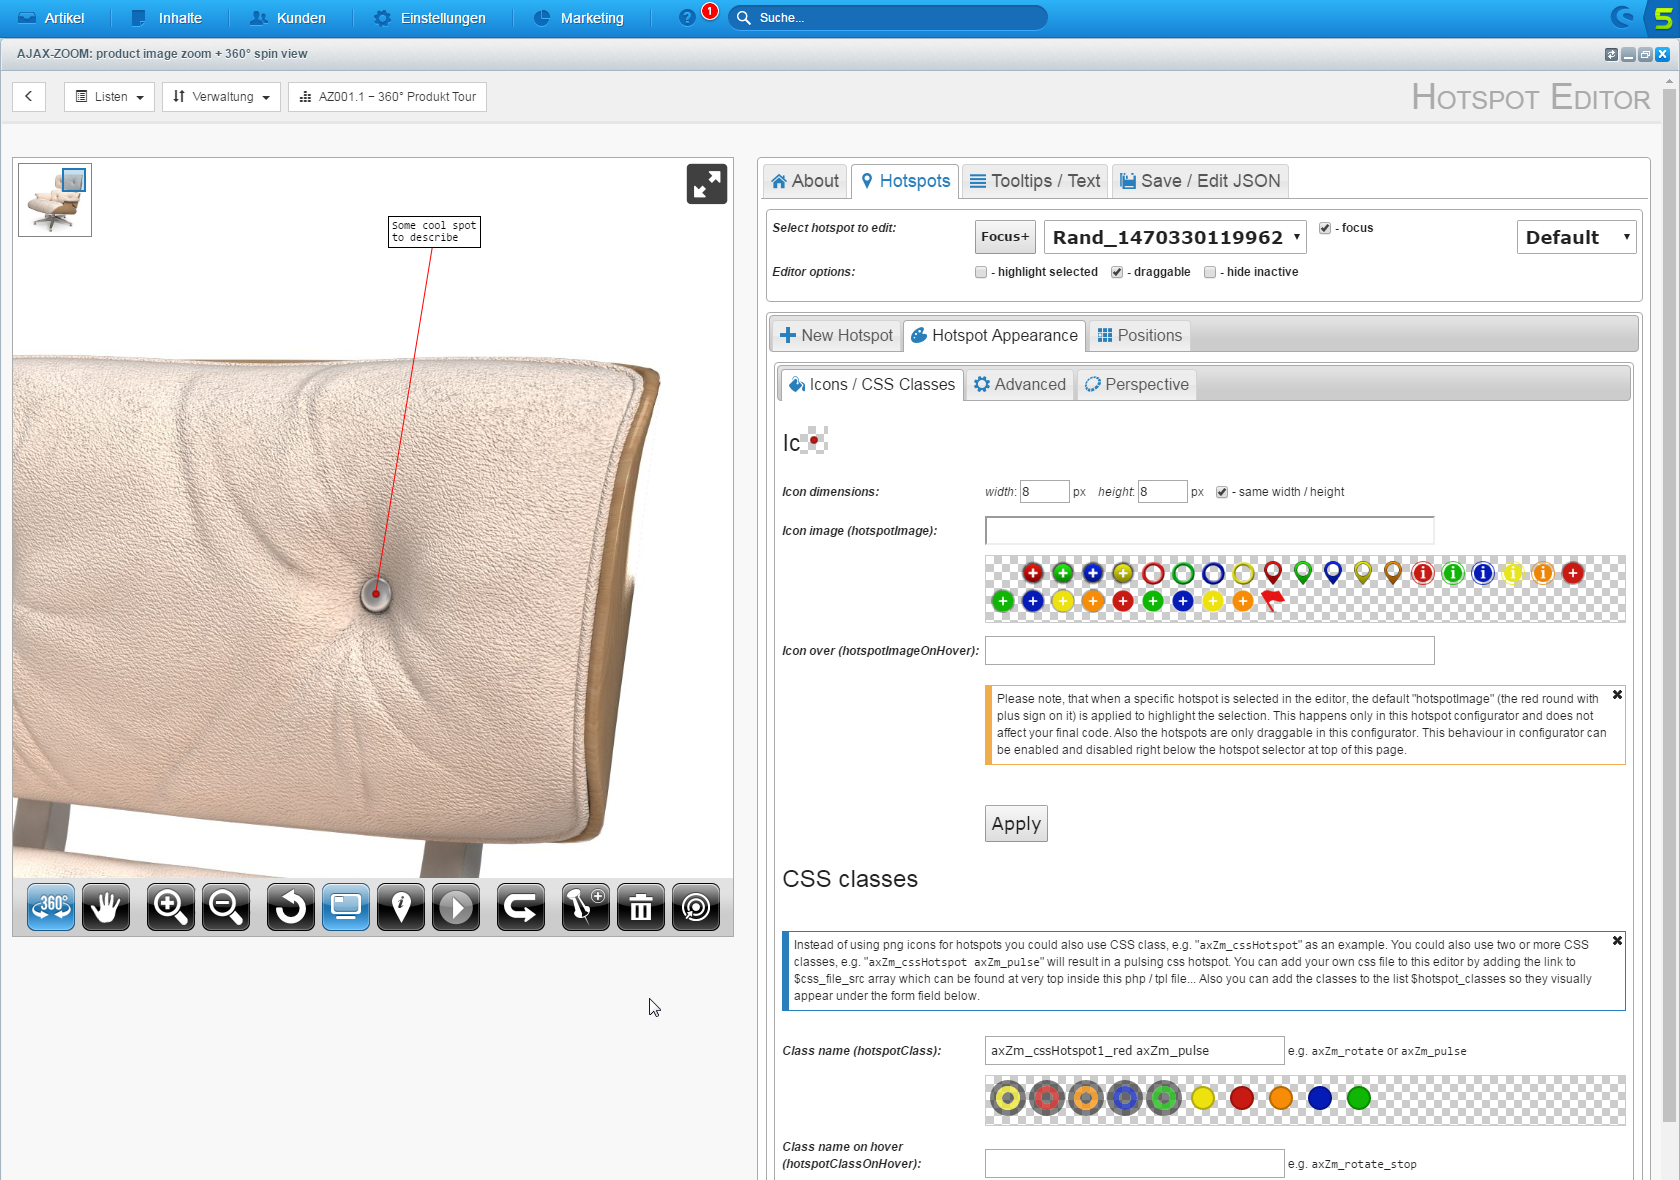
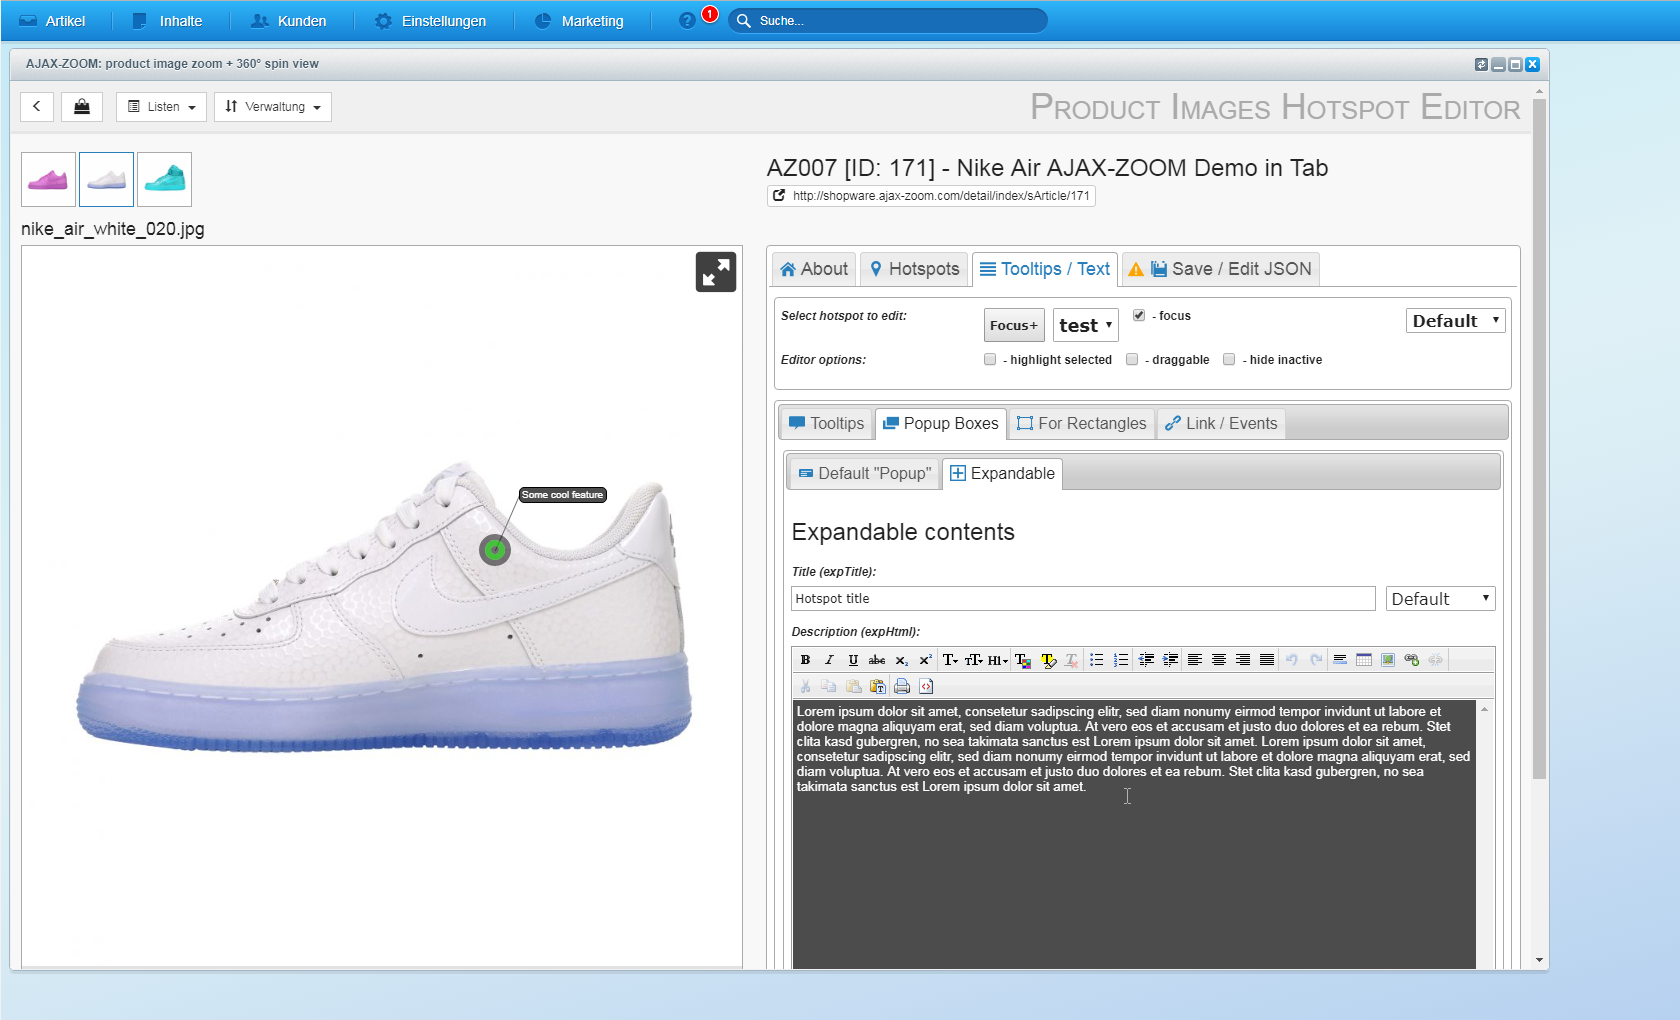
Hotspots editor - hotspots and the 360-degree "Product Tour" can be combined
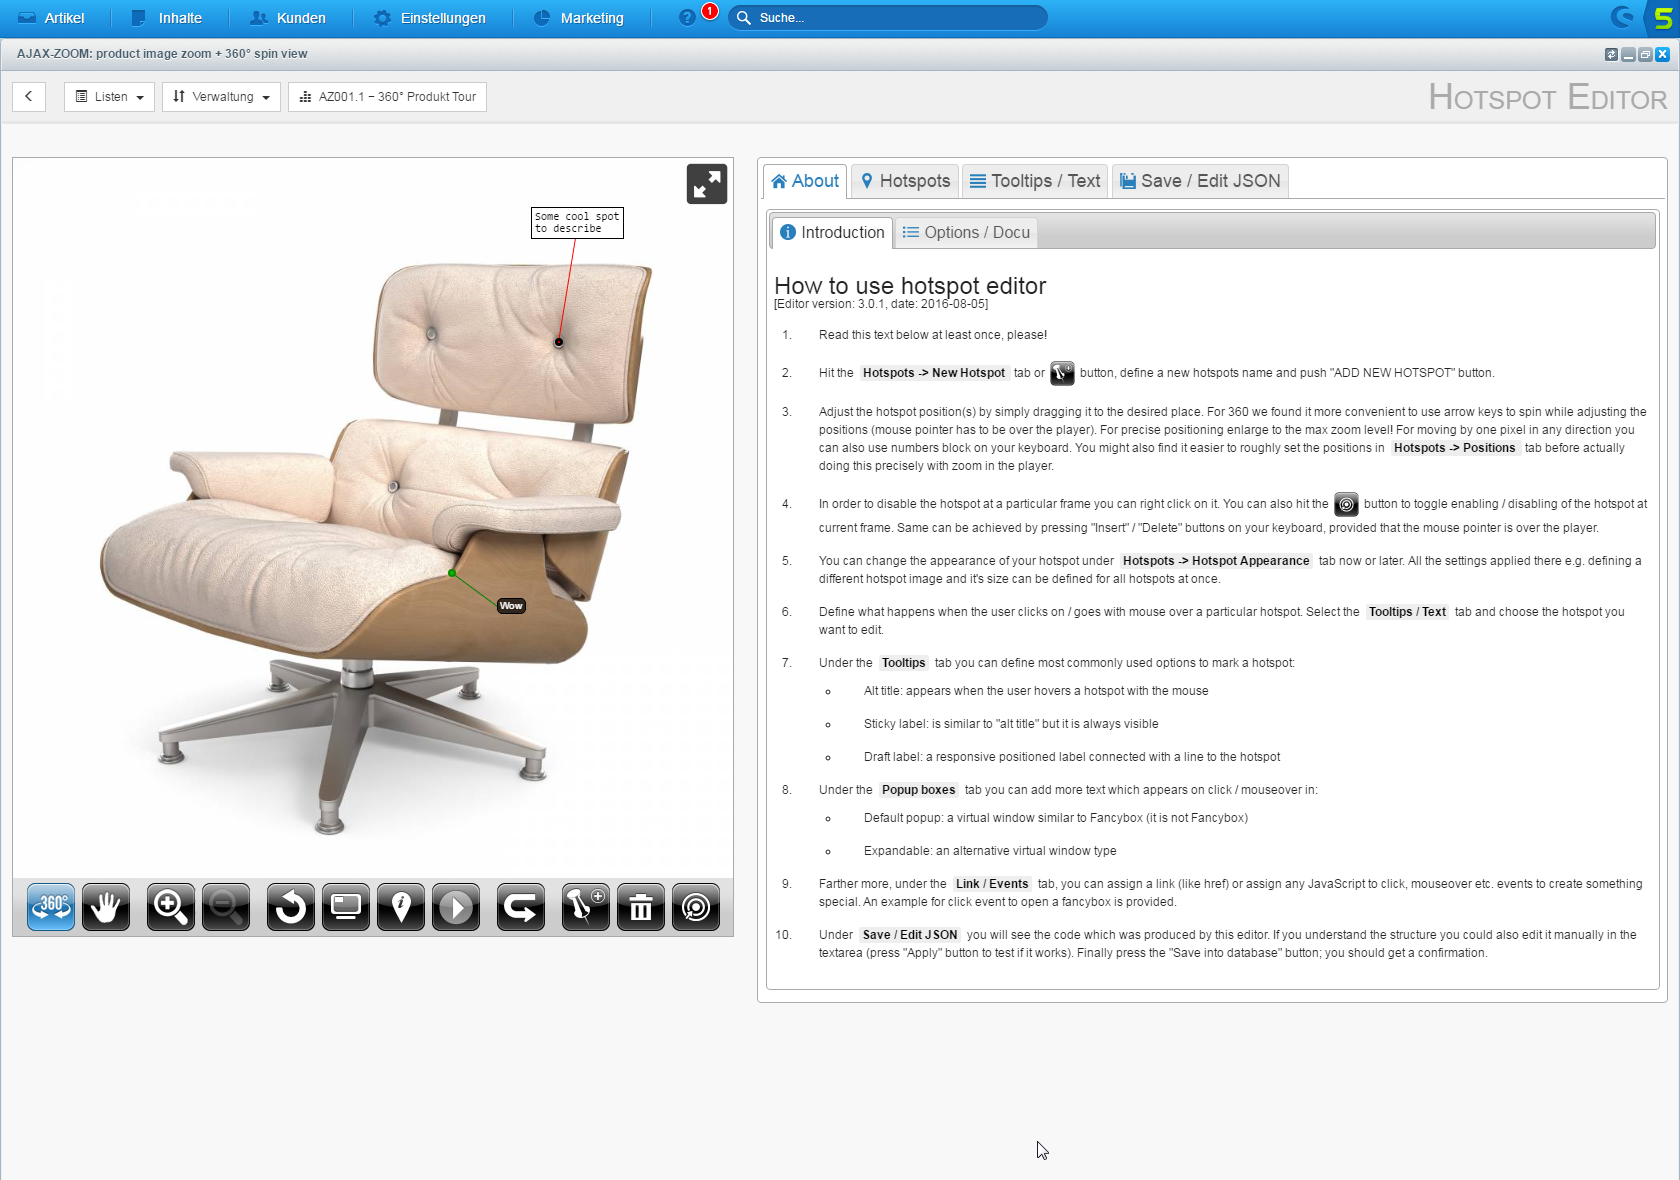
Compared to the "Product Tour", the operation of the hotspot editor is more complicated. That is because there are far more possibilities to design the hotspots. Anyway, it takes a lot of training to work with the editor without stress.
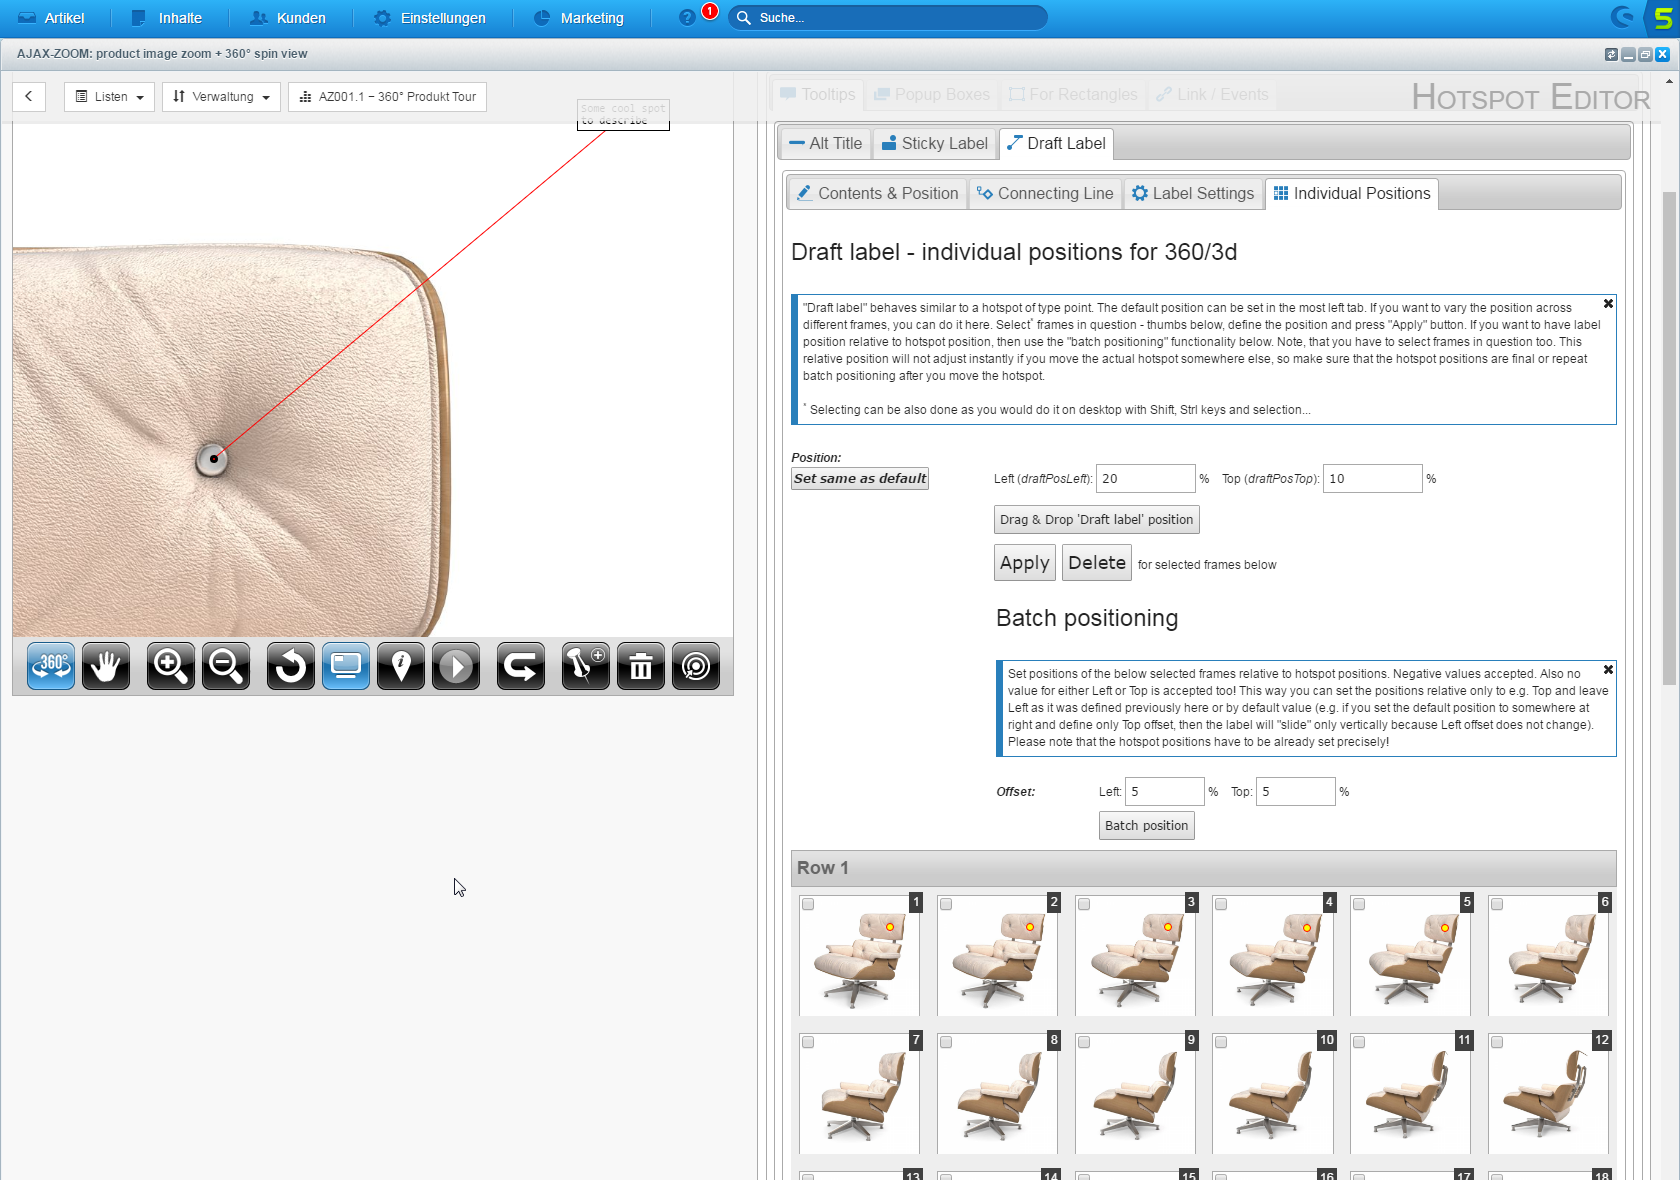
The hotspots are generally about defining the position of these markers in the image and providing them with interaction. For a 360-degree view, you first have to place a hotspot on individual frames of a 360 view. You can do this roughly by dragging and dropping via thumbnails overview, later positioning them in the AJAX-ZOOM Player, also using Drag & Drop. Then choose the look. Predefined are several PNG icons or CSS classes.
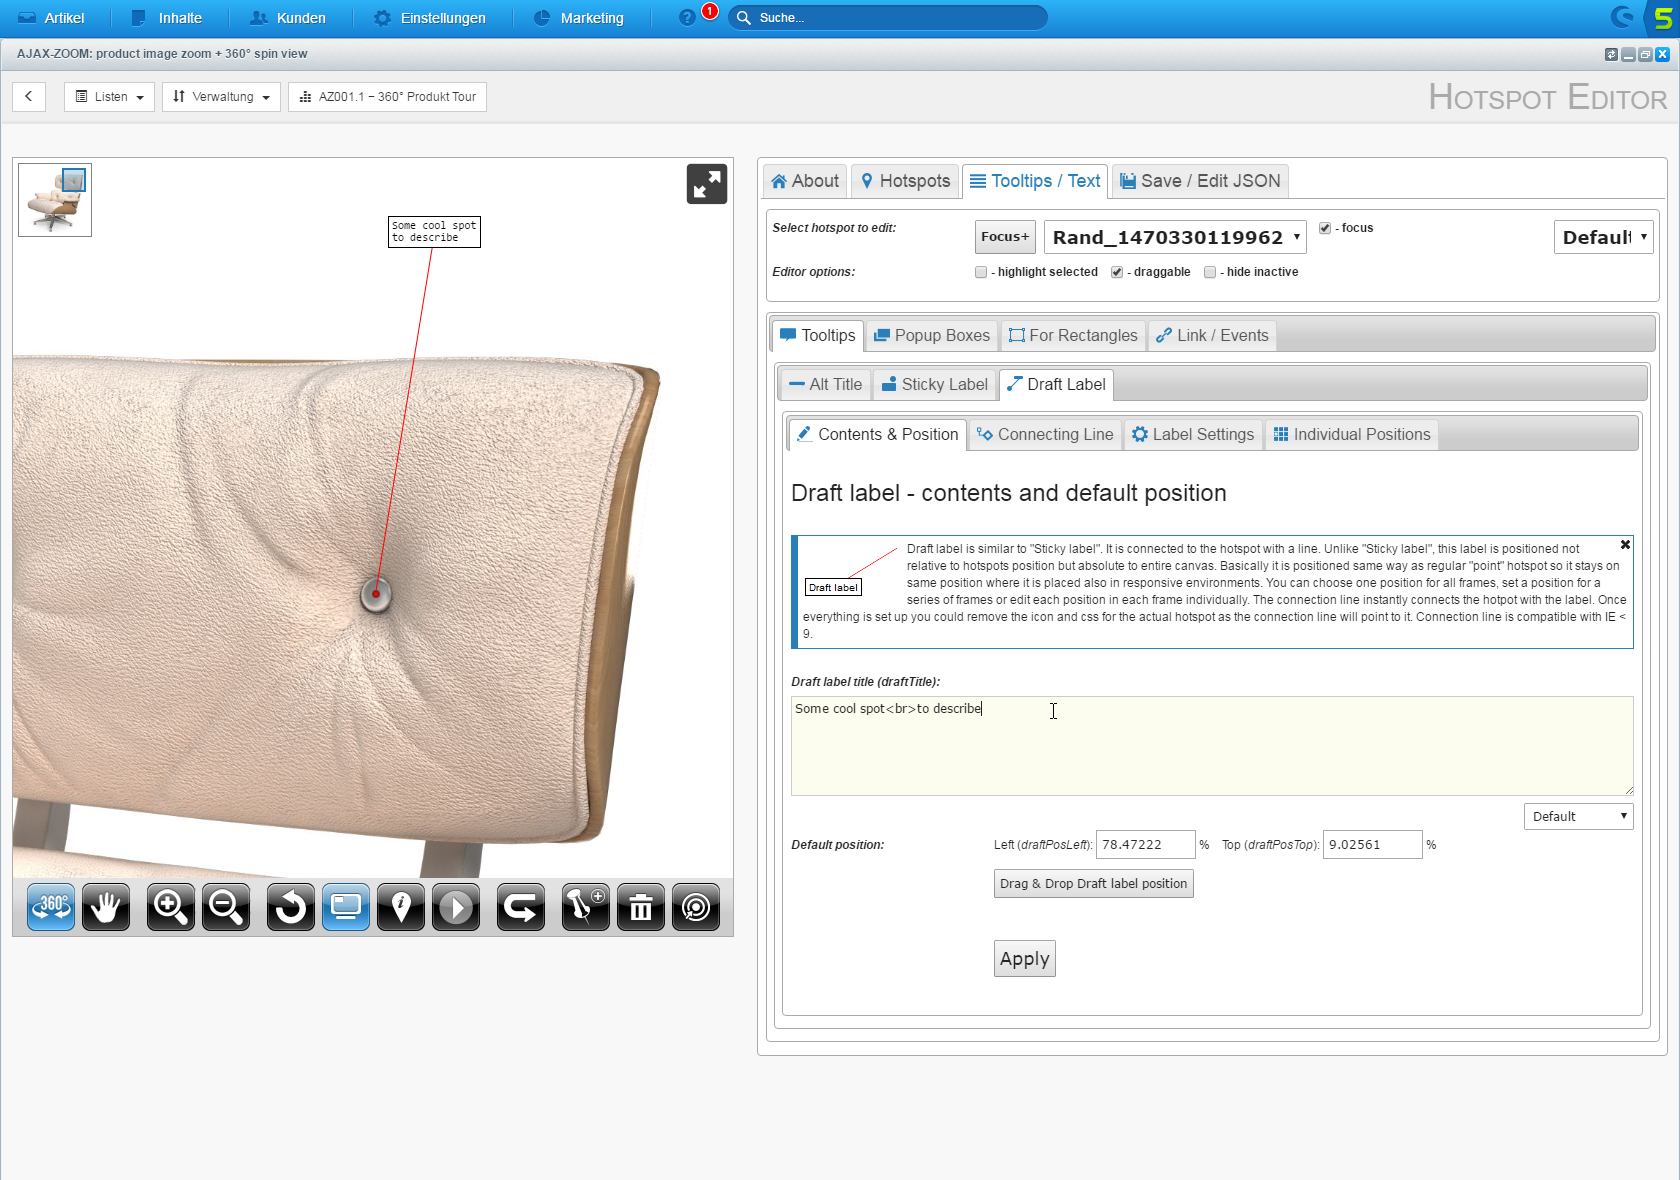
When the positioning is done, you can create a label and, if necessary, a connecting line between the hotspot and the label. There are many (many) predefined design options.
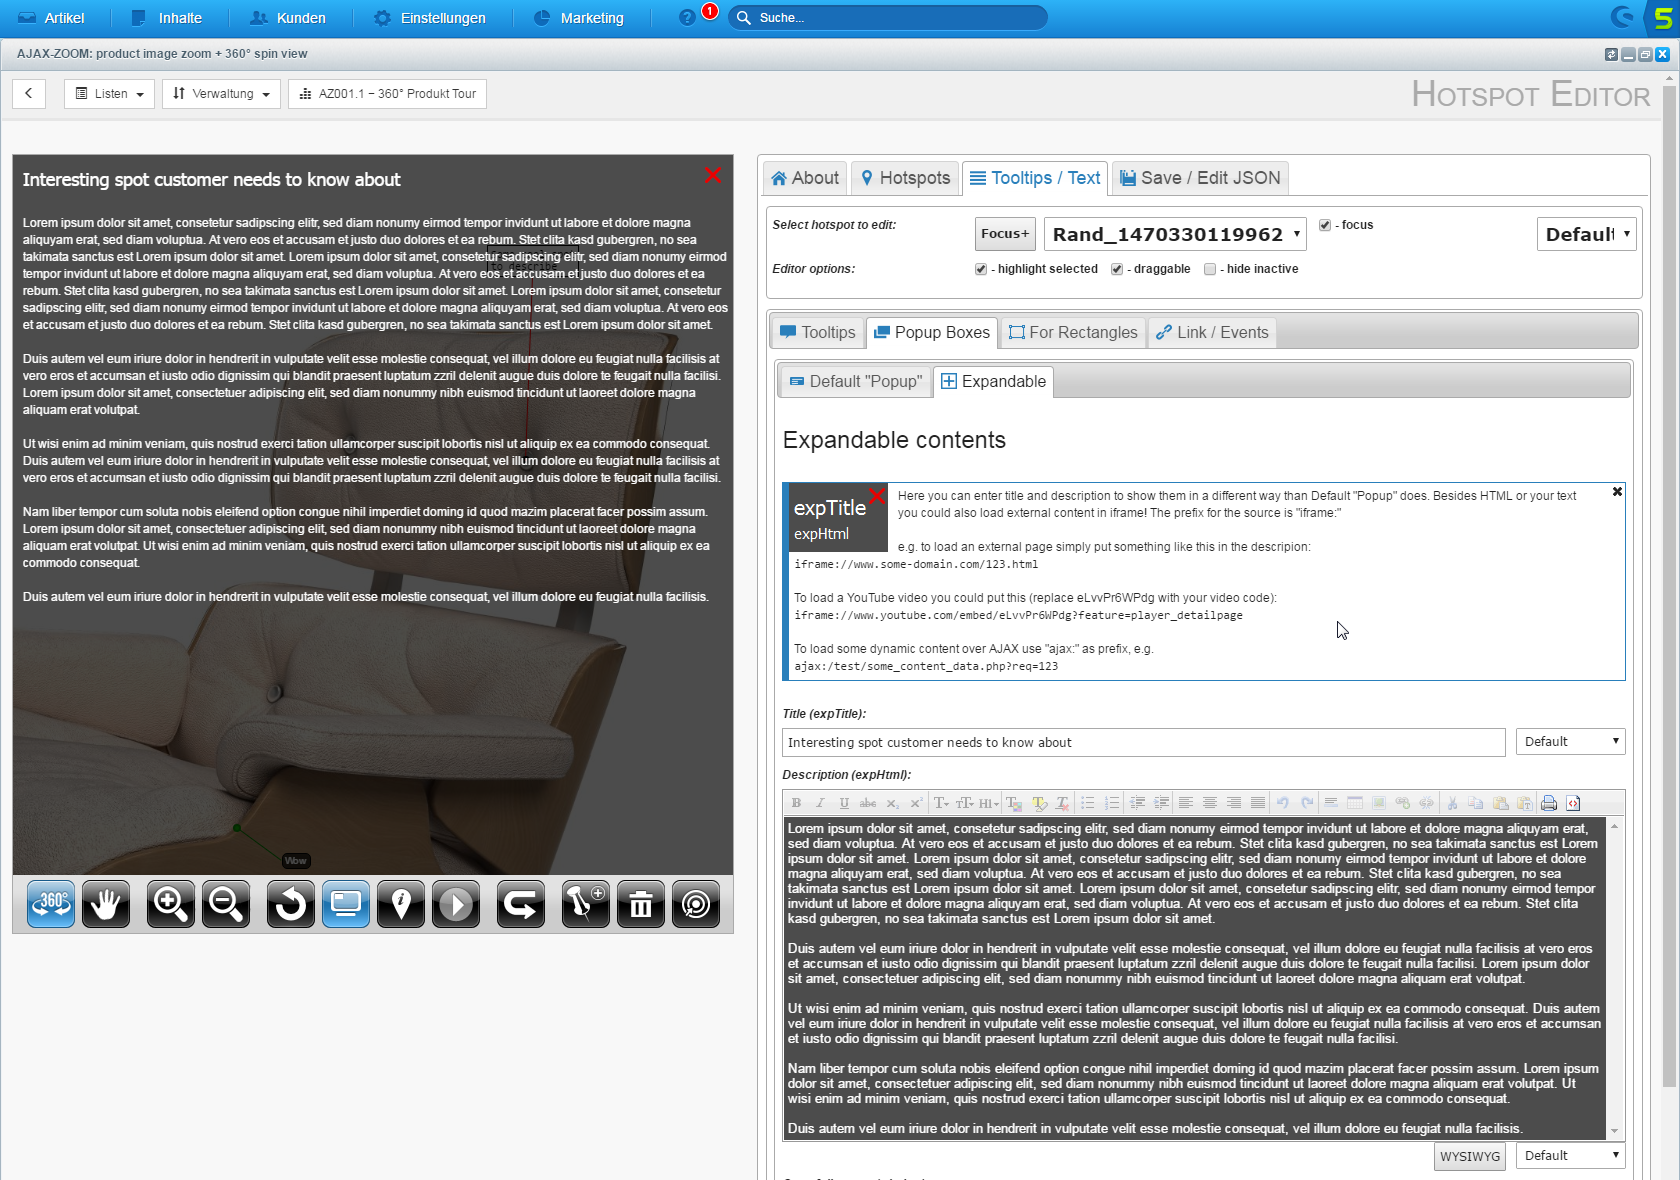
Finally, if you want something to happen when you click on a hotspot, you can set an interaction. There are predefined interactions like a link or, similar to the product tour, a layered window with multilingual definable content, YouTube videos, etc. You can also define your JavaScript function and let everything happen on click.
There are many other exciting features, such as displaying certain hotspots (groups) only at a specific zoom level - engaging in the context of the product tour, both working together very well.
If you are not under time pressure, you should look into the Hotspot Editor, and you will discover a variety of possibilities, which are limited only by your imagination. There is nothing comparable on the market.

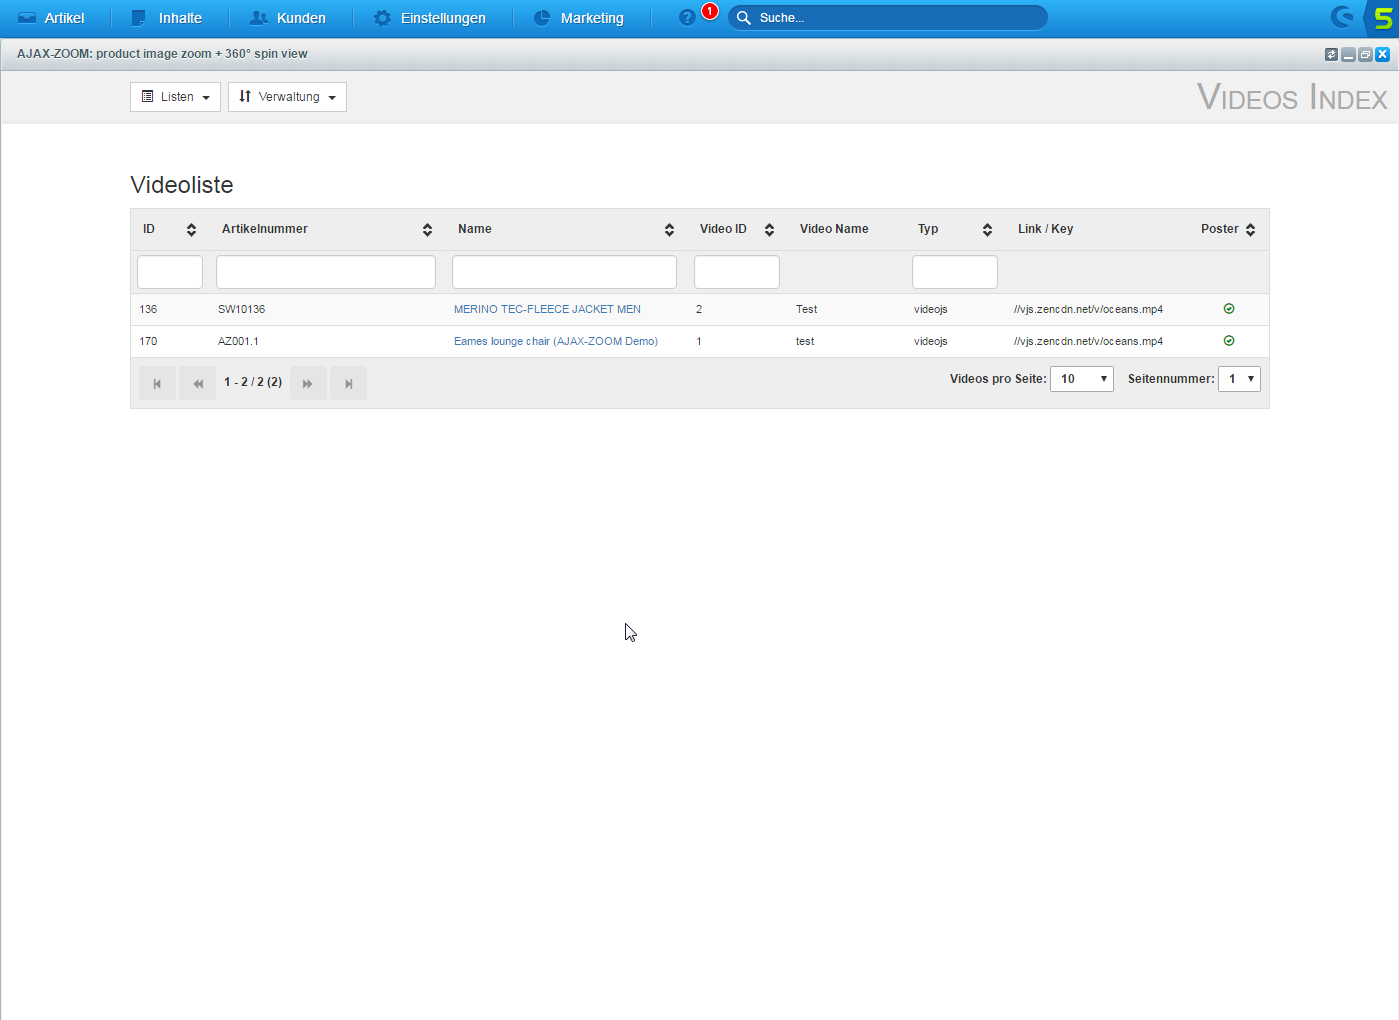
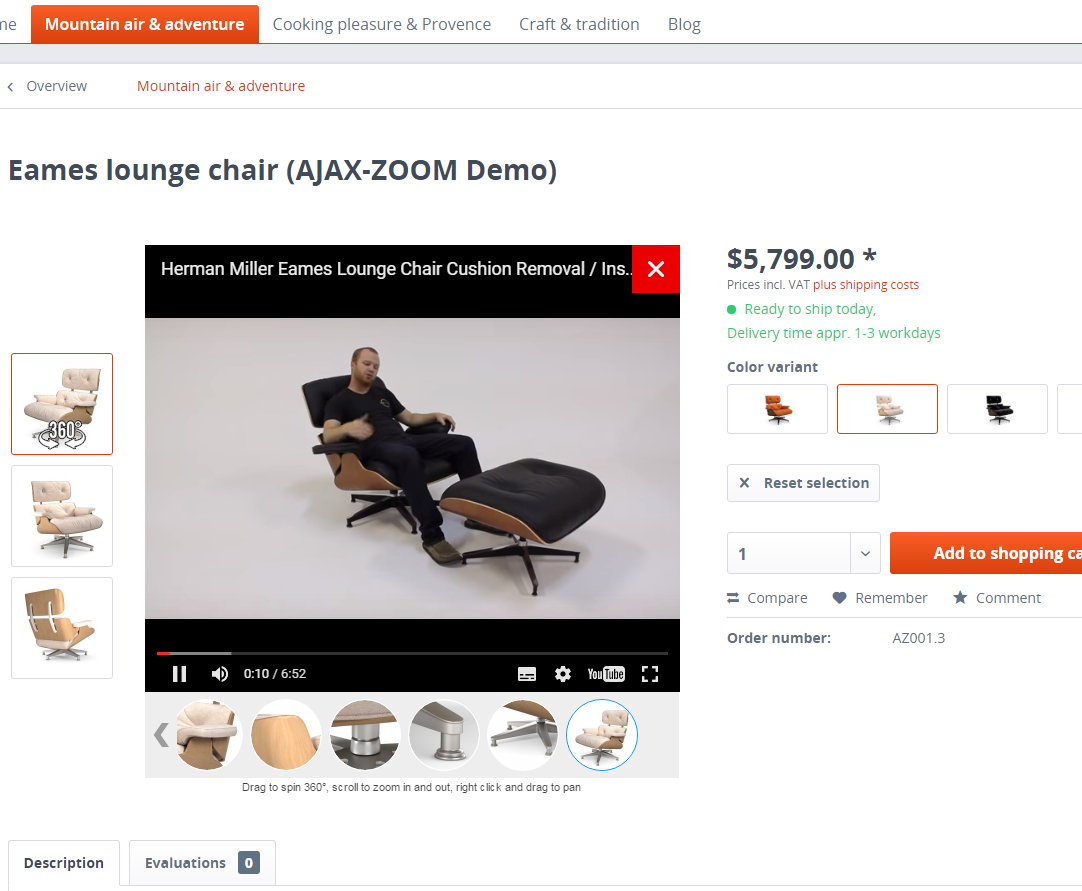
Video - HTML 5 (Videojs), Youtube, Vimeo, Dailymotion...
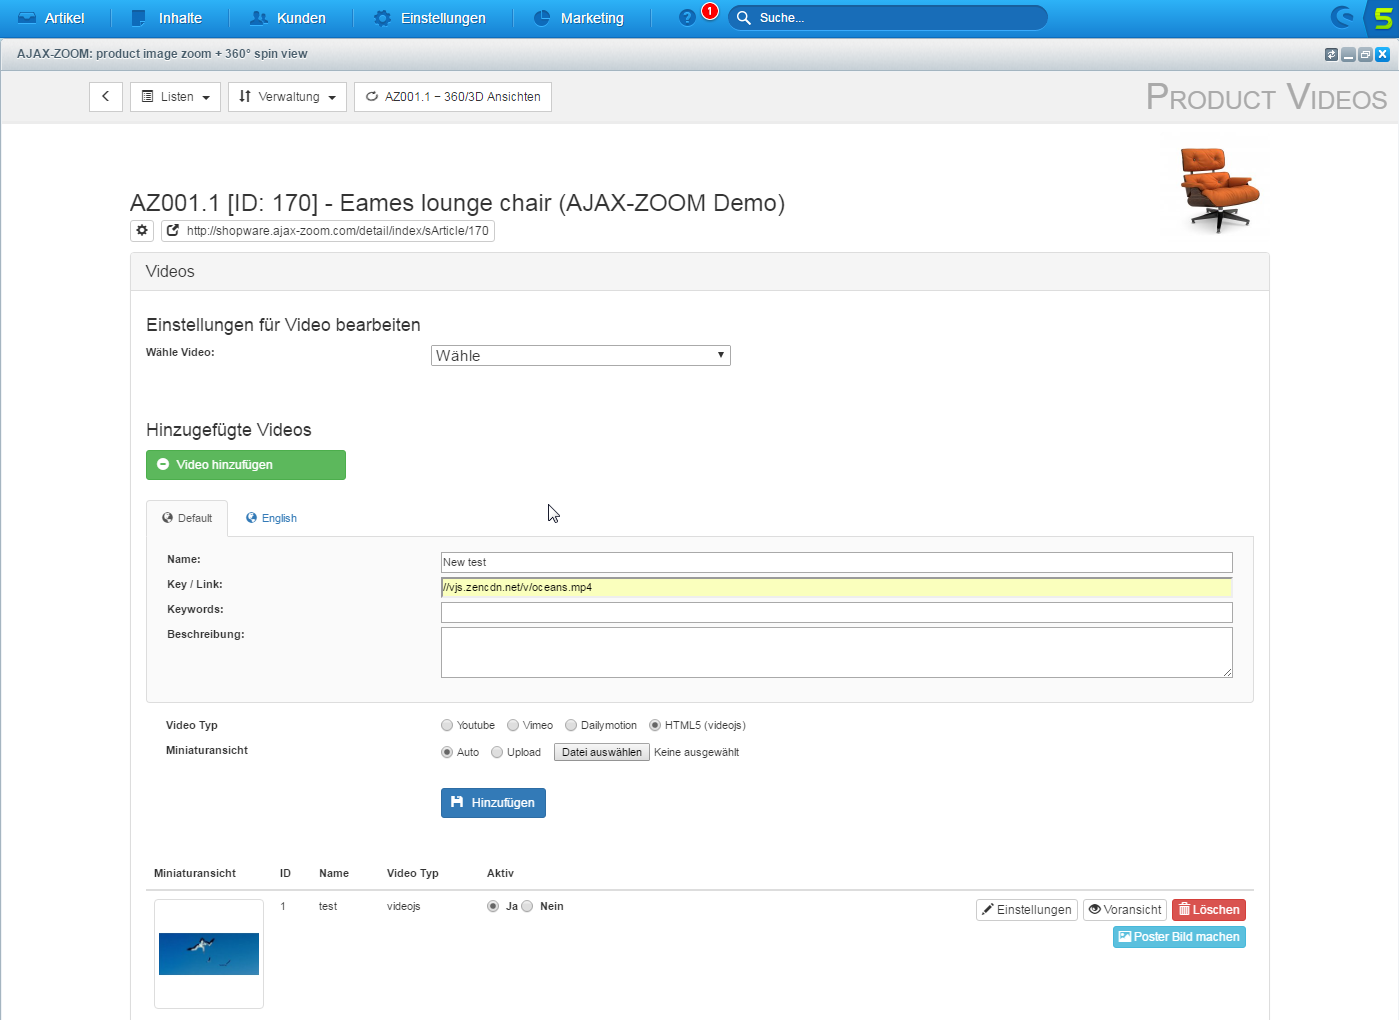
The AJAX-ZOOM plugin for Shopware has sophisticated management of videos. You can add videos in addition to or instead of 360-degree views. You can define videos from Youtube, Vimeo, Dailymotion, or link directly toMP4 files. As a cloud for MP4 sources, you can use, e.g., Vimeo. They offer it as a paid service.
The plugin gives an overview of all the videos and products to which these videos are linked. For each language, you can optionally define a different video source.
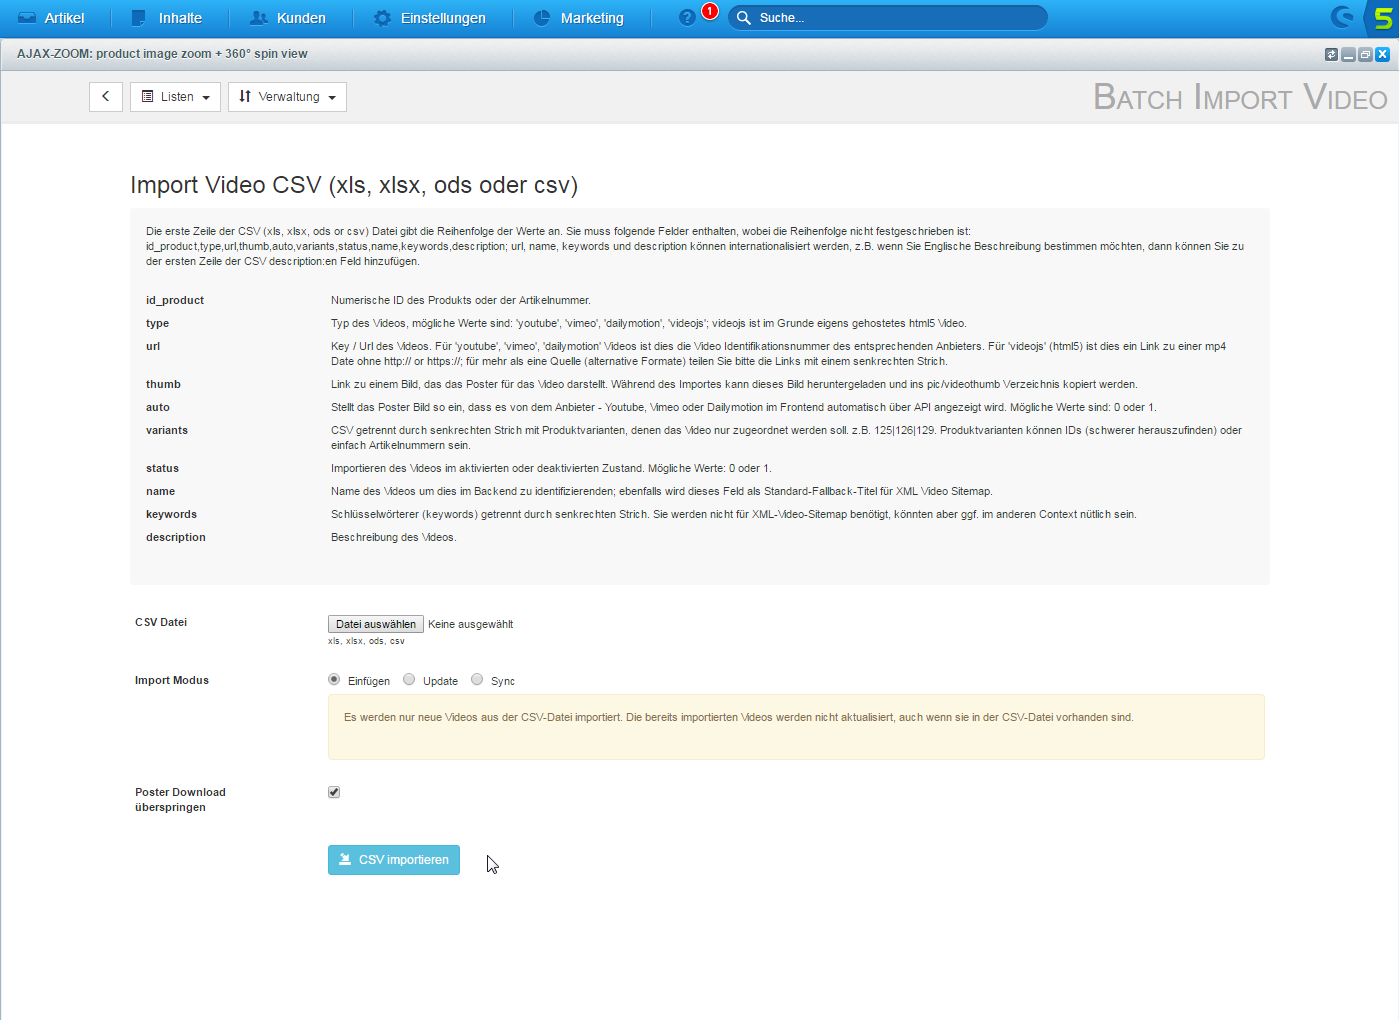
You can maintain the video data by adding and deleting them manually via the backend. Alternatively, you can create an Excel file with all the necessary data and synchronize it with the database. The corresponding functionality is built-in into the backend management too.
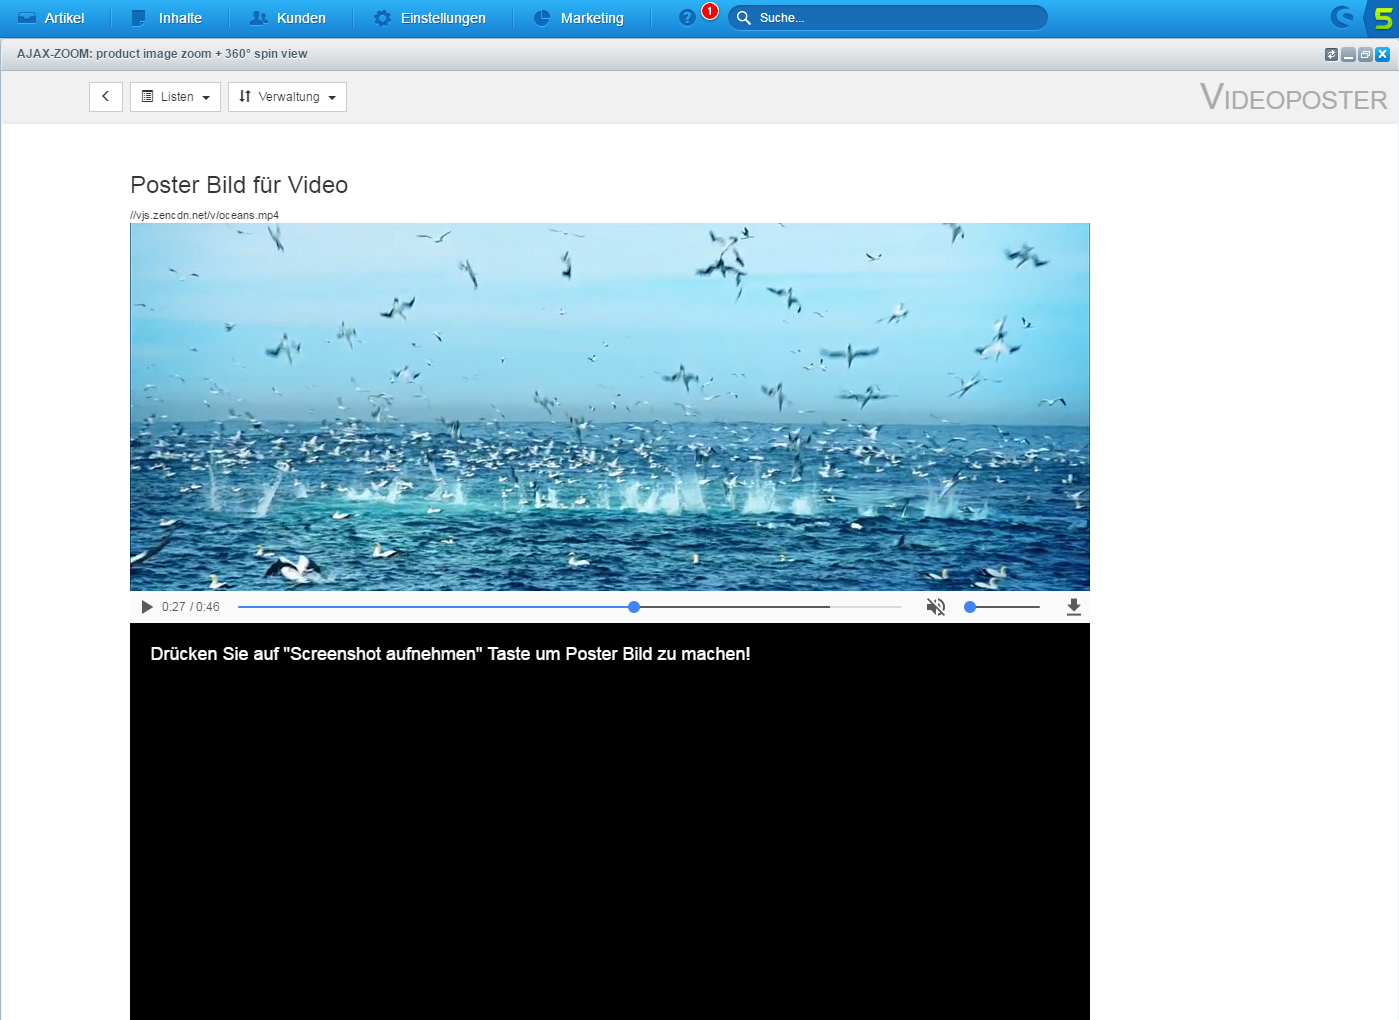
For each video, you can upload a preview image or interactively extract a frame from MP4 videos that you want to have as a preview image for the video.
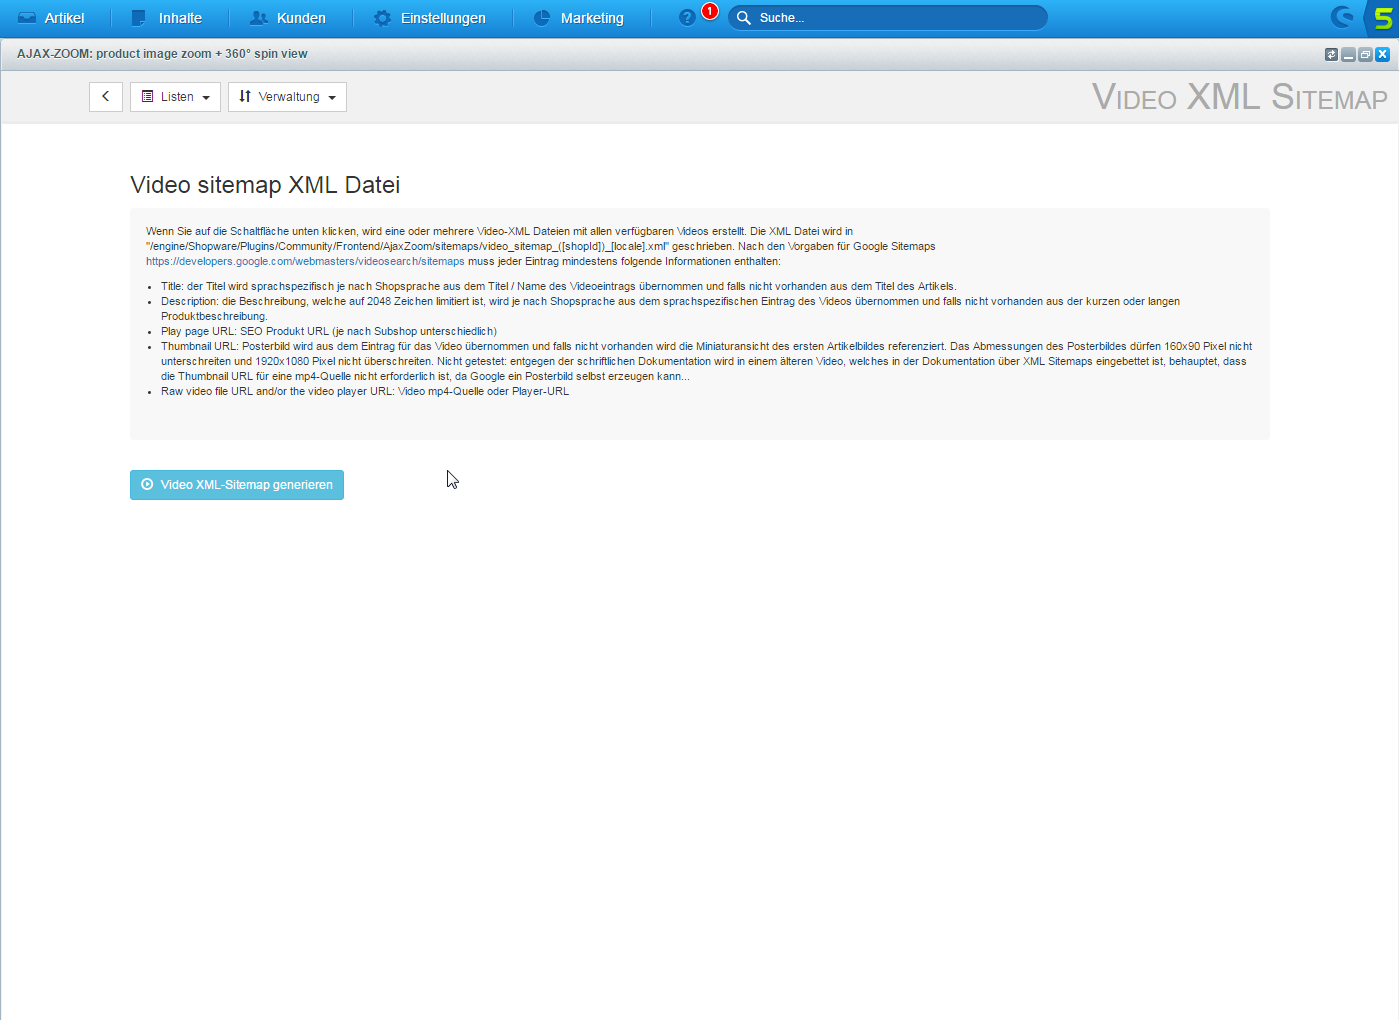
Lastly, it is possible to create an XML file from present data and submit it to Google manually or via a cronjob if video SEO matters.
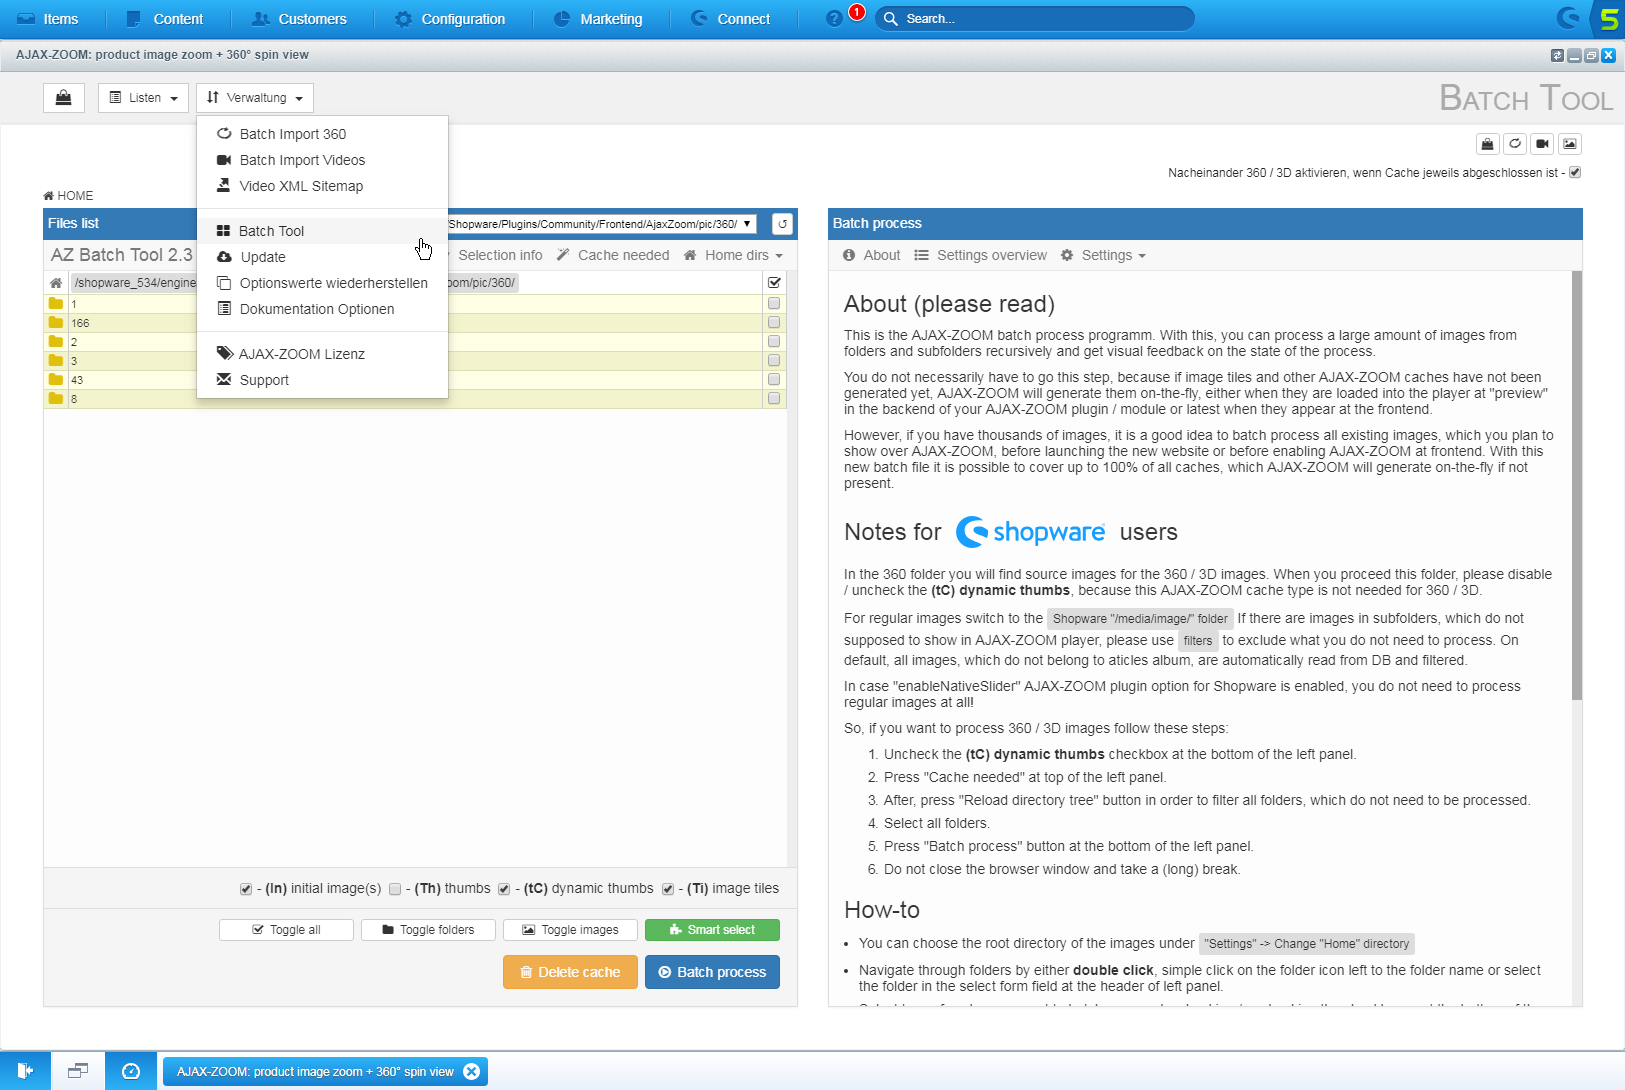
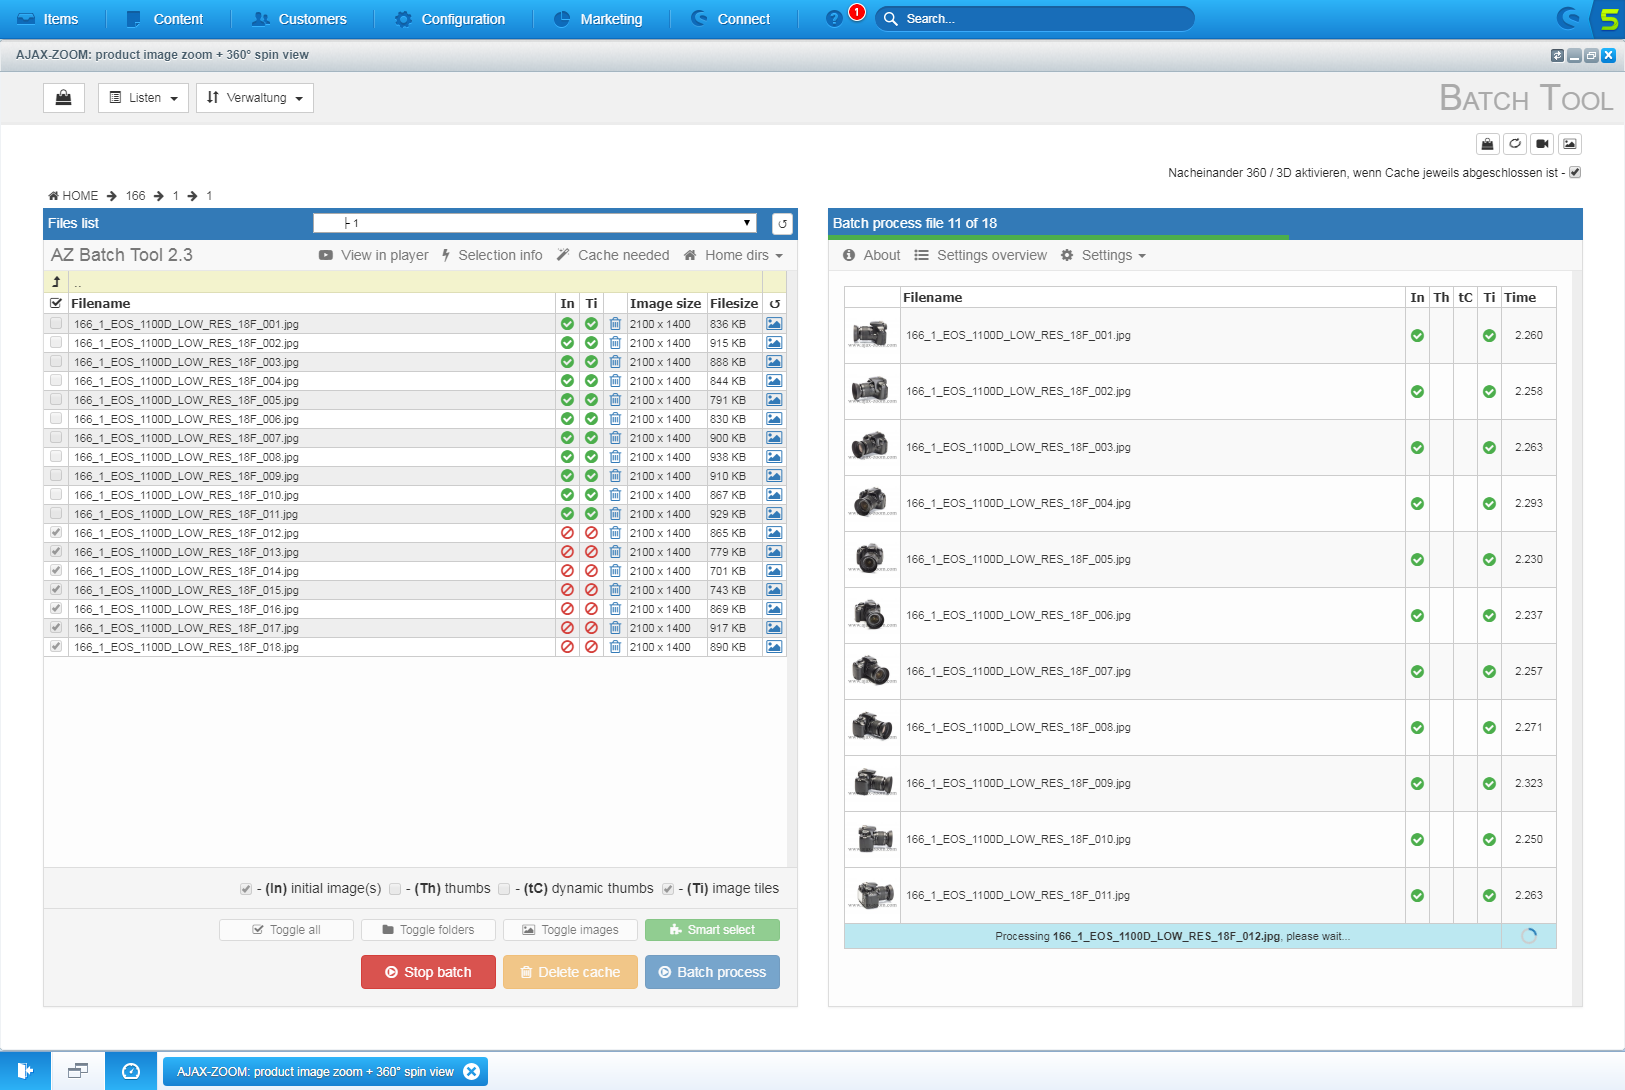
AJAX-ZOOM Batch Tool
You do not necessarily have to use the batch tool because if image tiles and other AJAX-ZOOM caches are not present, AJAX-ZOOM generates them on the fly. That can happen when images are loaded into the player as "preview" at the backend or appear on the product detail page.
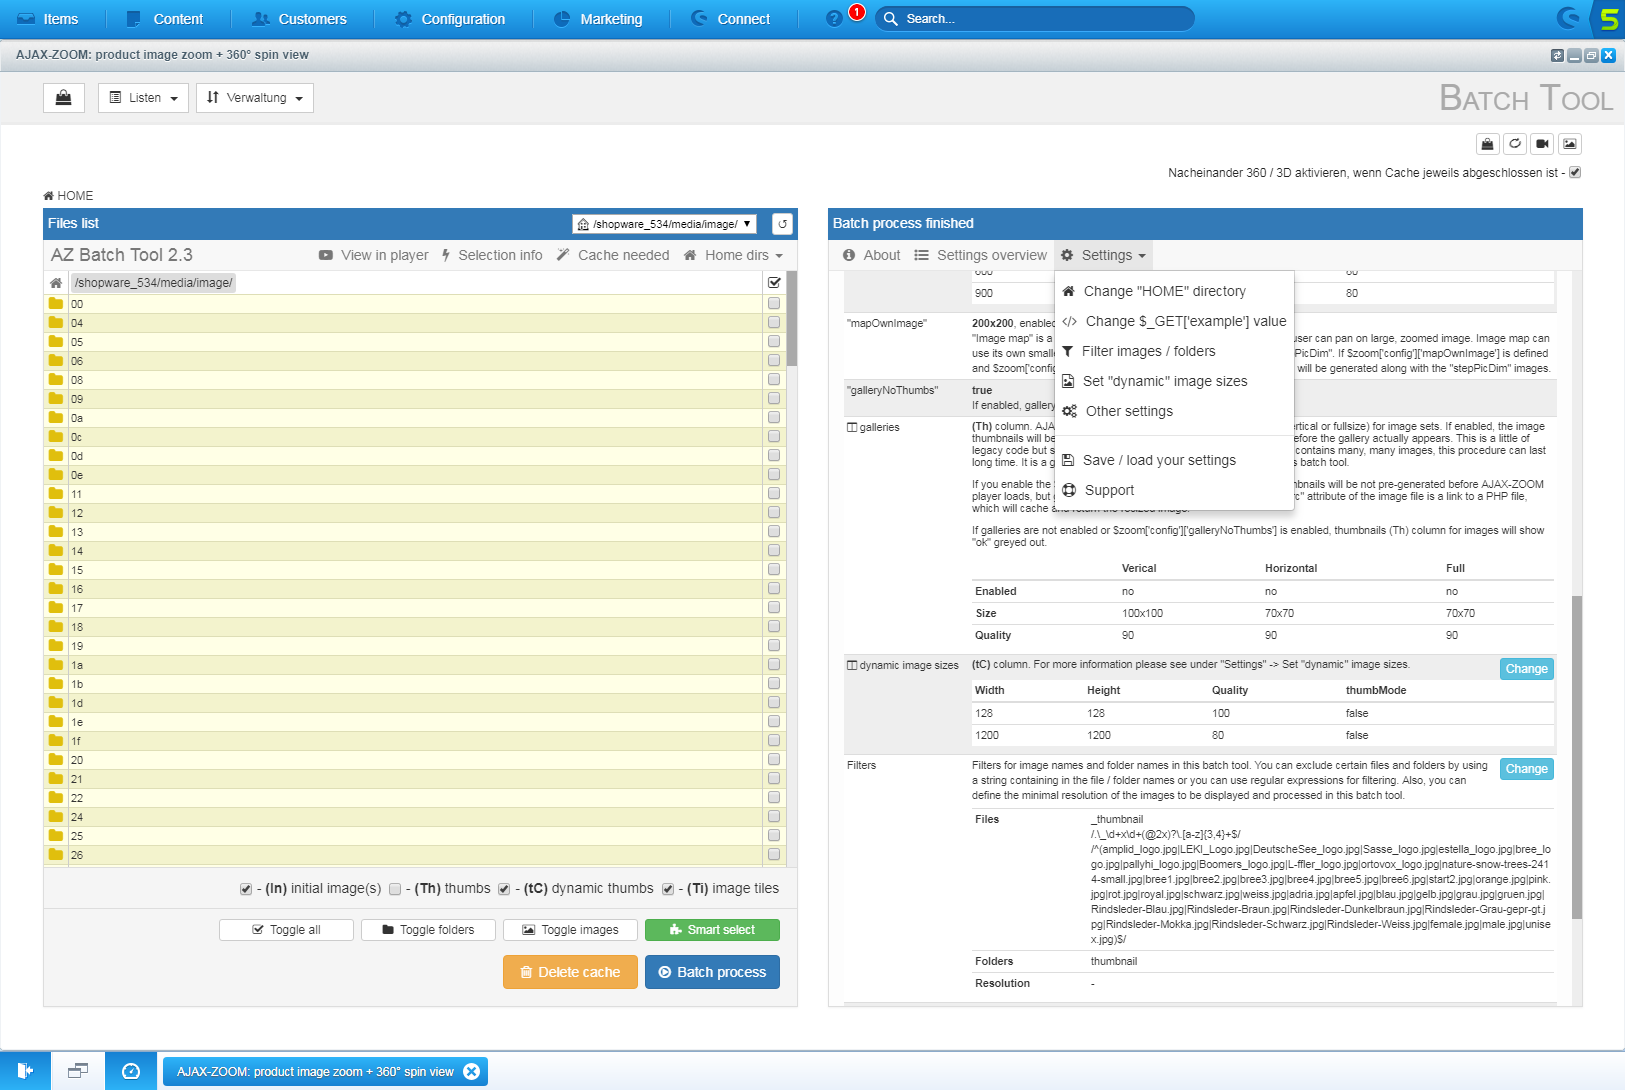
However, if you have thousands of images, it is a good idea to batch process all existing images, which you plan to show in the AJAX-ZOOM viewer, before launching a new website or before enabling AJAX-ZOOM at the frontend. With the latest batch file, it is possible to cover up to 100% of all caches, which AJAX-ZOOM would otherwise generate on the fly if not present.
Periodically, when you add 360 / 3D images to your already existing or new products, you can keep the 360 / 3D sets disabled and let the batch tool process any amount of 360 sets at the end of the day. The batch tool can automatically activate a 360 / 3D set after it finishes processing.

Frontend screenshots
Please click the buttons at the top of this page to see the live links to the screenshots below! The screenshots below show Shopware's product detail page when AJAX-ZOOM is fully enabled via a plugin option.
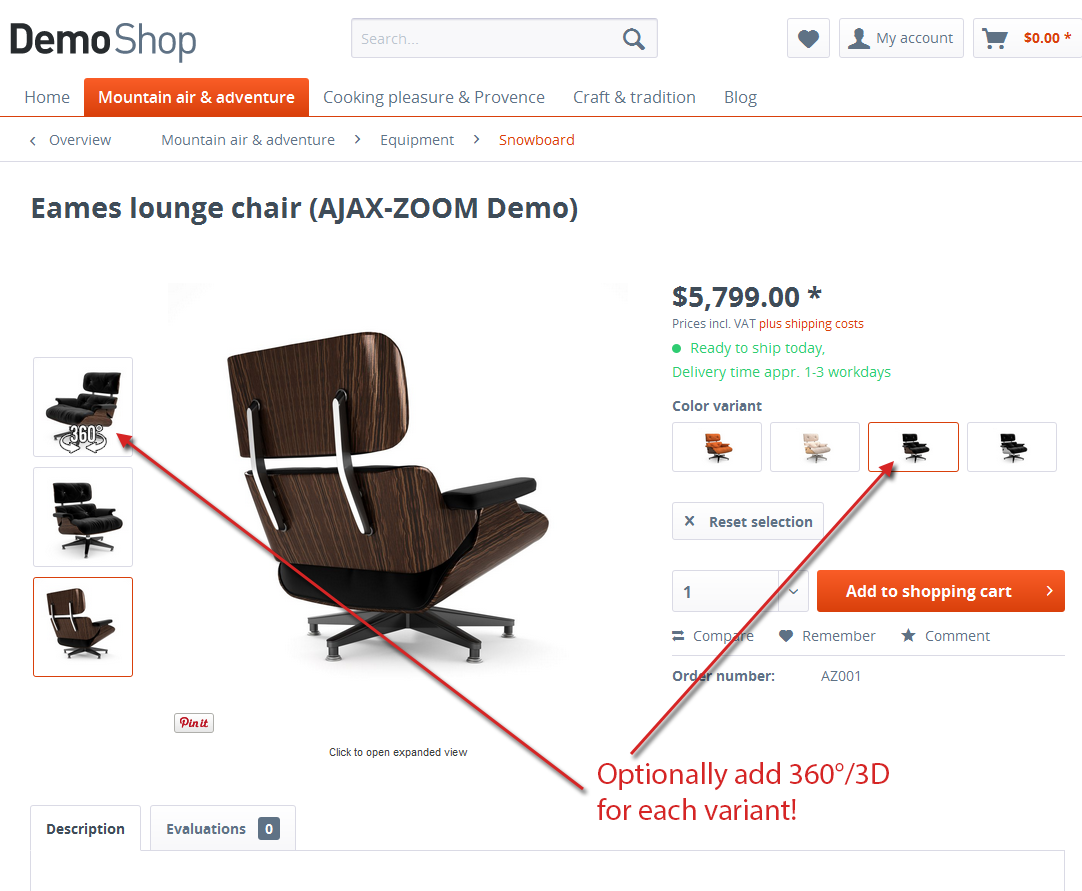

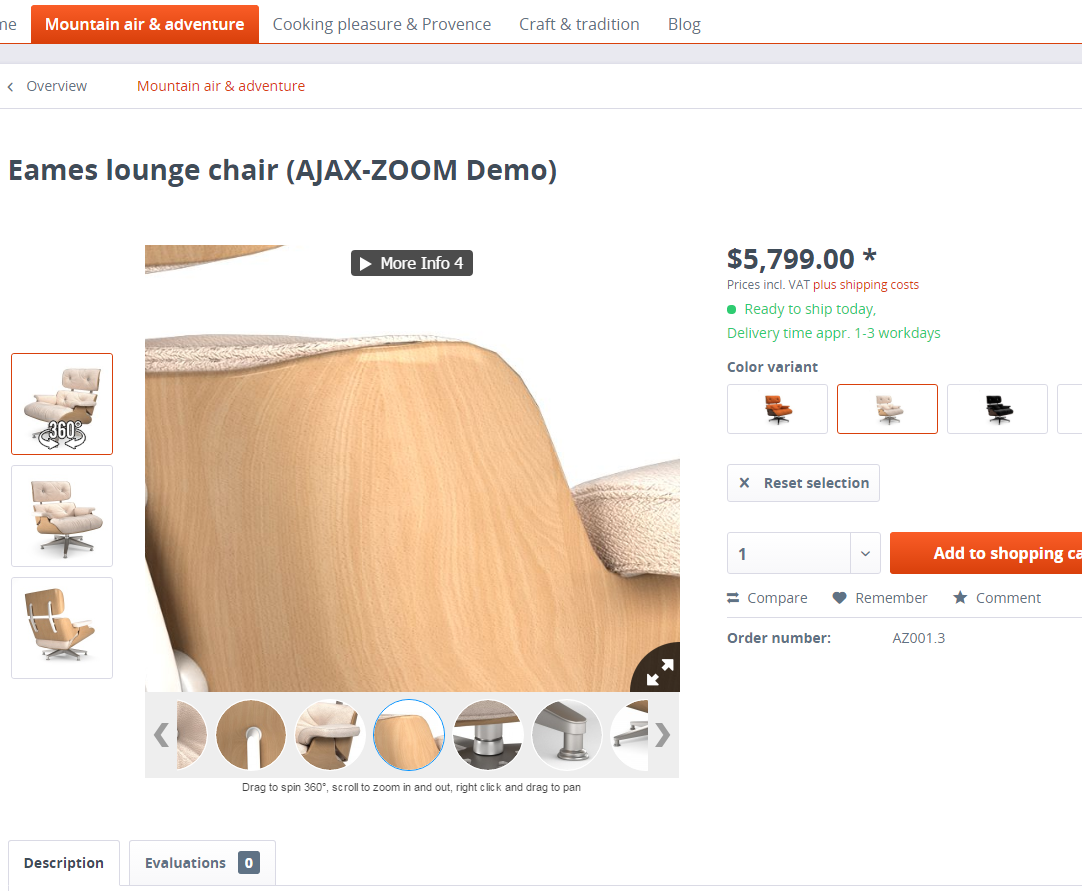
Default gallery / slider
These are views when the Shopware default slider is activated per option. You can let AJAX-ZOOM inject the 360-views and videos into the default Shopware product view slider. All unique possibilities like product tours or hotspots are preserved.
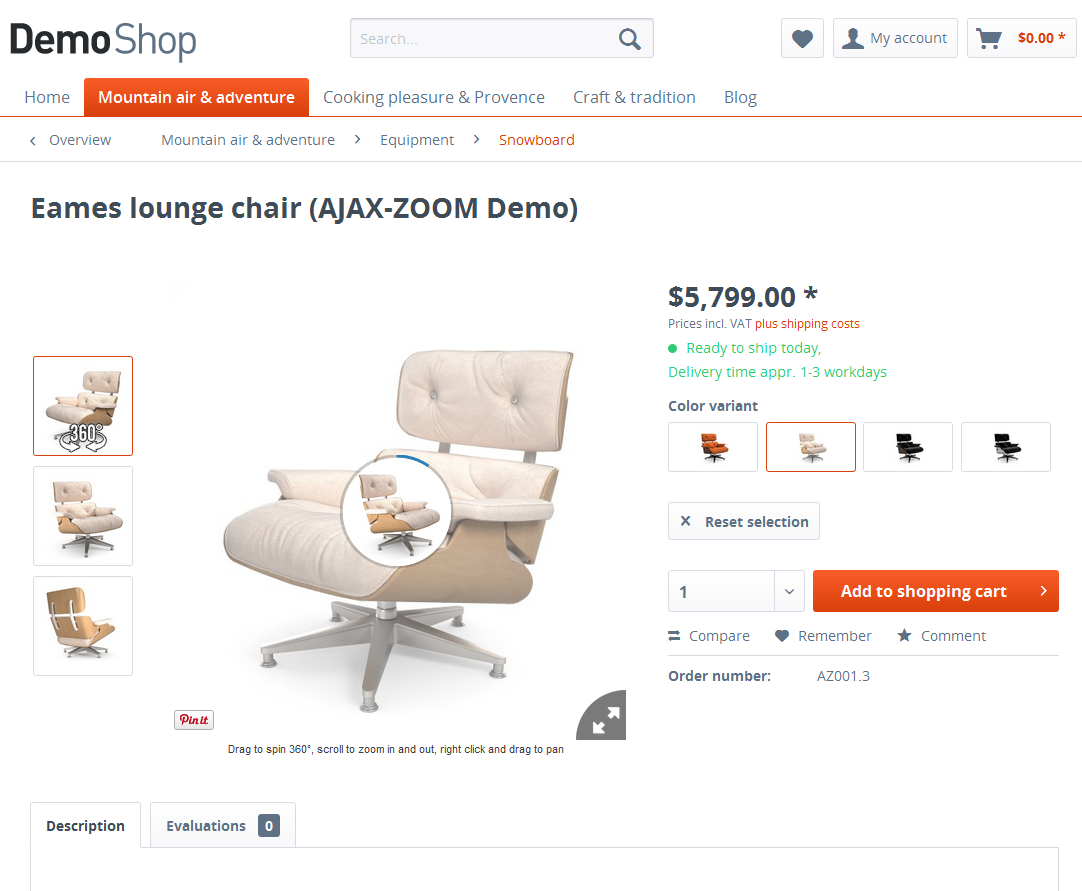
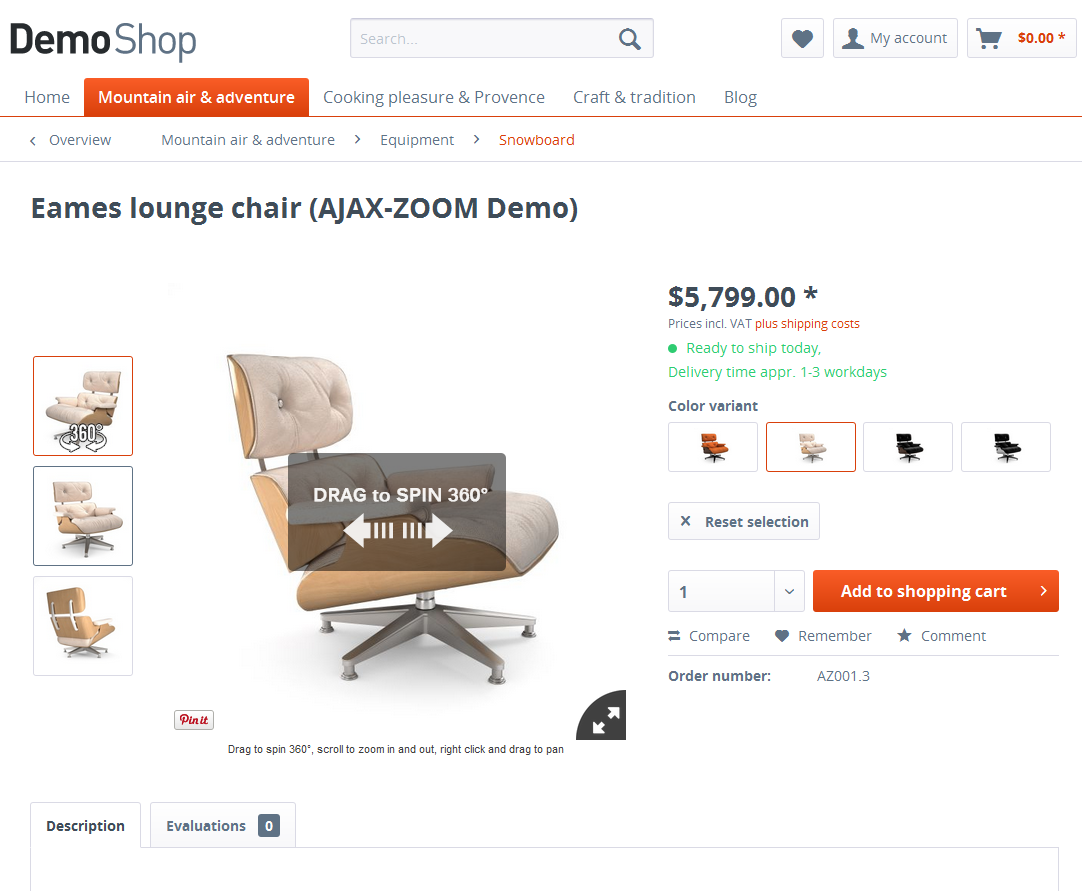
360-degree "Product Tour"
AJAX-ZOOM product tours can be used with both the AJAX-ZOOM mouseover player and the default Shopware product view slider.
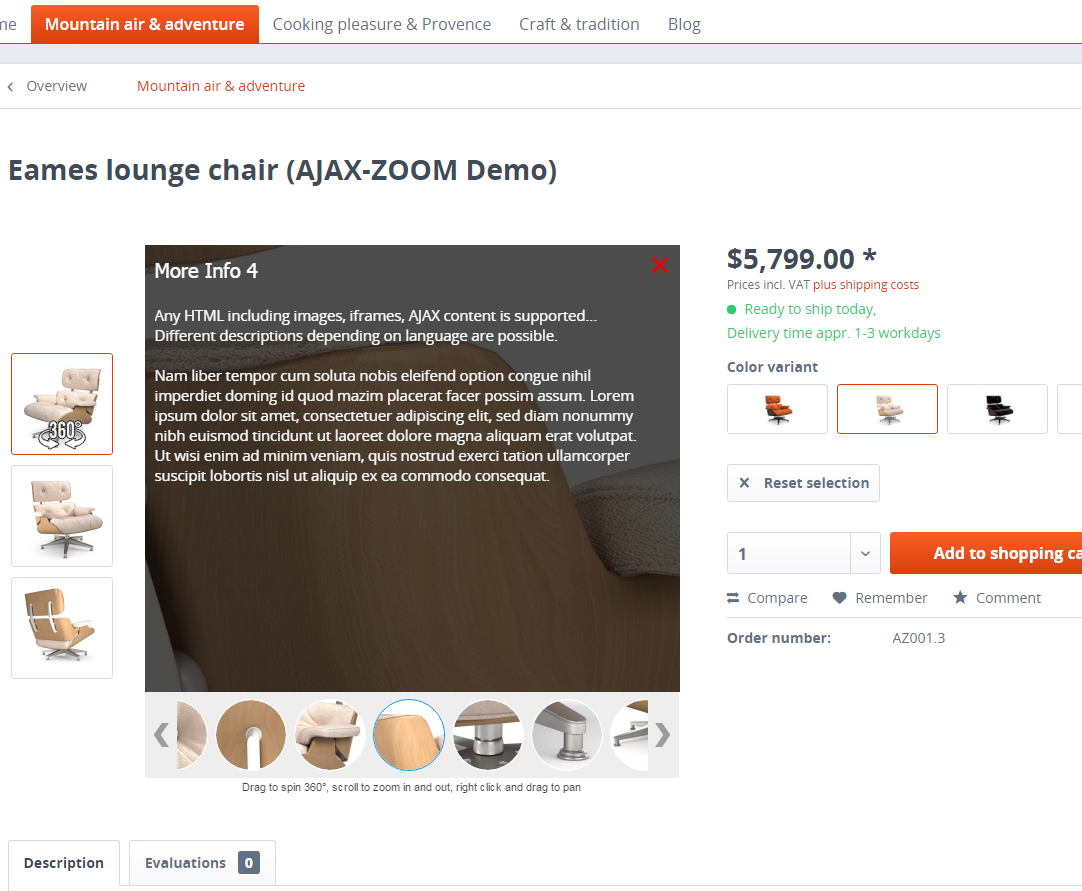
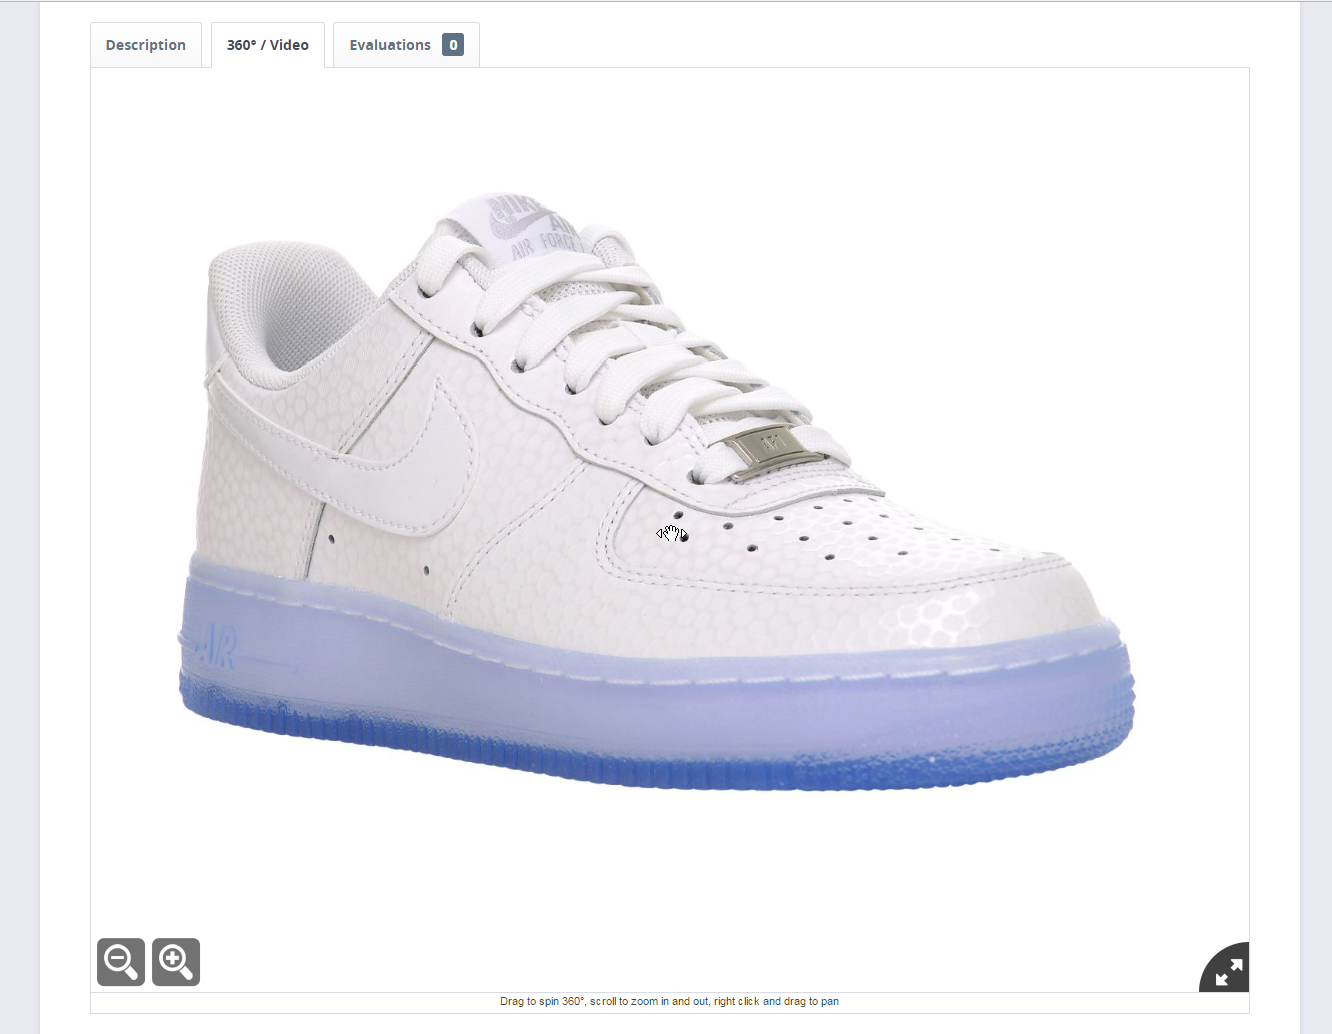
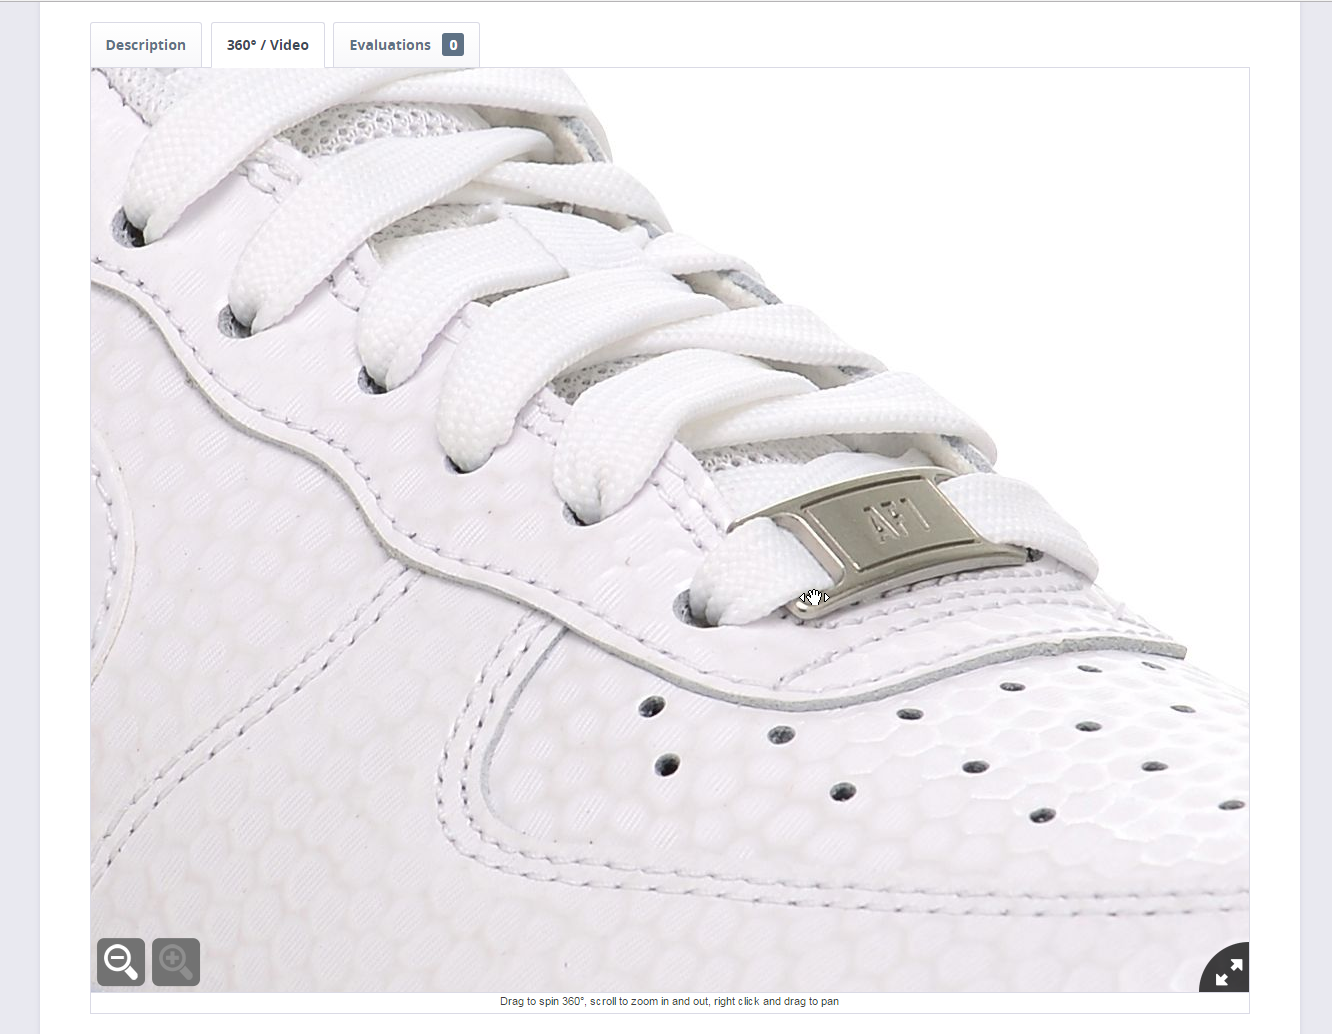
360-degree and Video within a tab
You can display AJAX-ZOOM 360-degree / 3D views, as well as videos optionally in tabs. The new tab is automatically created whenever a 360-degree view or a video is present for a product.
Handling regular images
For the regular images, there is no need to change anything. When product images are displayed with the AJAX-ZOOM mouseover/slider, you can optionally place hotspots (clickable markers in the image) on regular images. This is done with the same editor, which is also used for 360-degree animations:

Handling 360°/3D
To add 360° images, switch to the 'Items' -> 'AJAX-ZOOM' panel and select a product.
Alternatively, log in as an administrator in the browser and in new tab
call www.your-domain.com/backend/AjaxZoom.
There you will be able to:
- Define one or more 360° spins for the product.
- Upload 360° images right from the backend or
- Select a zip file that contains images for a 360° set to import.
These zip files must be uploaded in
/engine/Shopware/Plugins/Community/Frontend/AjaxZoom/zipdirectory and can be removed later. - After importing or uploading the images manually, you will be able to make some adjustments for this particular 360°, e.g. change rotation speed and many other options available for AJAX-ZOOM.
- Preview 360° in Fancybox before publishing.
- Activate / deactivate 360° view.
- Select combinations, e.g., color and size for which a 360° view should be shown. You can add more than one 360° view for a product.
- Create a 360° "Product Tour" with descriptions, videos... No programming knowledge is required.
- Add clickable and labeled hotspots to 360° / 3D animations. Requires some practice.
Requirements
- PHP 5.2+
- Shopware Ver. 5.1.0 or later.
- Free Ioncube loaders installed on the server or within the AJAX-ZOOM plugin directory. The plugin for Shopware is not encrypted. However, some AJAX-ZOOM main files require Ioncube:
- ZIP
- allow_url_fopen enabled for automatic downloading AJAX-ZOOM main application and placing it in
/engine/Shopware/Plugins/Community/Frontend/AjaxZoom/axZm"directory. If allow_url_fopen is disabled, you will have to do it manually; see "Troubleshooting" section on this page.
Installing
Upload plugin over plugin manager
- Switch to Configuration -> Plugin Manager, and in the left menu, choose "installed".
- At the top of the page, click on "Upload plugin" and choose the ZIP file with AJAX-ZOOM plugin for Shopware.
- If everything goes well and AJAX-ZOOM main script files can be automatically downloaded by the plugin, which can last a while, you will be able to activate the plugin after installation.
- In case nothing happens or you will get an error message, please download AJAX-ZOOM main script, unpack the ZIP
locally and upload only the content of "/axZm" folder into
/engine/Shopware/Plugins/Community/Frontend/AjaxZoom/axZm.
Manual installation
- Unpack and upload the plugin for Shopware in
/engine/Shopware/Plugins/Community/Frontend/AjaxZoom/ - Unpack and upload the content of "/axZm" folder from AJAX-ZOOM main script into
/engine/Shopware/Plugins/Community/Frontend/AjaxZoom/axZm - Make sure that
/engine/Shopware/Plugins/Community/Frontend/AjaxZoom/picis writable by PHP (e.g. chmod 0775) - Now, the AJAX-ZOOM plugin should be visible in Plugin Manager at the very bottom of the "uninstalled" section.
- Click on "install" icon.
- After installation, you might need to clear cache in Configuration -> Cache/Performance and reload the browser window.
Troubleshooting
AJAX-ZOOM has not been downloaded automatically
Please see installation steps above. Proceed with manual installation.
Backend password over .htpasswd / .htaccess
The hotspots and 360-degree tour editors may not work in the backend if the whole page is protected by, e.g., .htpasswd / .htaccess which is is often the case during the development phase, and the$_SERVER['PHP_AUTH_PW'] / $_SERVER['PHP_AUTH_USER']
are not set.
This is because integrating the editors in the backend required to use "cUrl" internally, meaning that the server accesses itself via http(s).
To allow it to do so, its server IP, that is, where Shopware is running, must be excluded from password entry.
Under Apache, you can rule out the own server IP like this
AuthType Basic
Require valid-user
AuthName "Please enter password"
AuthUserFile /www/passwords/.passwd
Allow from xxx.xxx.xxx.xxx
Satisfy Any
Replace images and AJAX-ZOOM cache
If Shopware is managed over external tools (not via Backend) and item images are replaced keeping the same file name, then AJAX-ZOOM does not get notified of that action, and AJAX-ZOOM cache is not cleared for this image. With the Ver. 1.2.3+, we have implemented several CLI commands to clear AJAX-ZOOM cache for all images of an item or specific (named) image files. Please configure your external tools accordingly (call CLI command over API) when an image file is replaced or an item is deleted. For more information in CLI, please see https://en.community.shopware.com/_detail_1653.html
As a temporal solution, you could add the following config parameters to/engine/Shopware/Plugins/Community/Frontend/AjaxZoom/zoomConfigCustomAZ.inc.php
$zoom['config']['cTimeCompare'] = 'filectime';
$zoom['config']['dynamicThumbsCtime'] = 'filectime';
Other
If you encounter any other troubles please report / contact our support. We will fix and document it with highest priority.Known issues
Shopware 5.4 and LAMP under Windows (not Linux)
In Shopware 5.4 versions the plugin will not work in the backend with LAMP under Windows, e.g. XAMPP, because of a Shopware bug. https://issues.shopware.com/issues/SW-21477German translation in Windows (not Linux)
German translation in snippets / templates does not work on windows, where instead of '/' the backslash '\' in DIRECTORY_SEPARATOR is used.Compatibility with other plugins
Plugins, which replace the frontend template in detail view, may influence the functionality of AJAX-ZOOM with default Shopware image slider enabled. Below is a list of known plugins:- Images of all variants - by K30 Webentwicklung
Update
Since AJAX-ZOOM Plugin for Shopware Ver. 1.3.2, both AJAX-ZOOM and the plugin can be updated from the plugin itself. Backups are automatically created for both, which can be restored if necessary.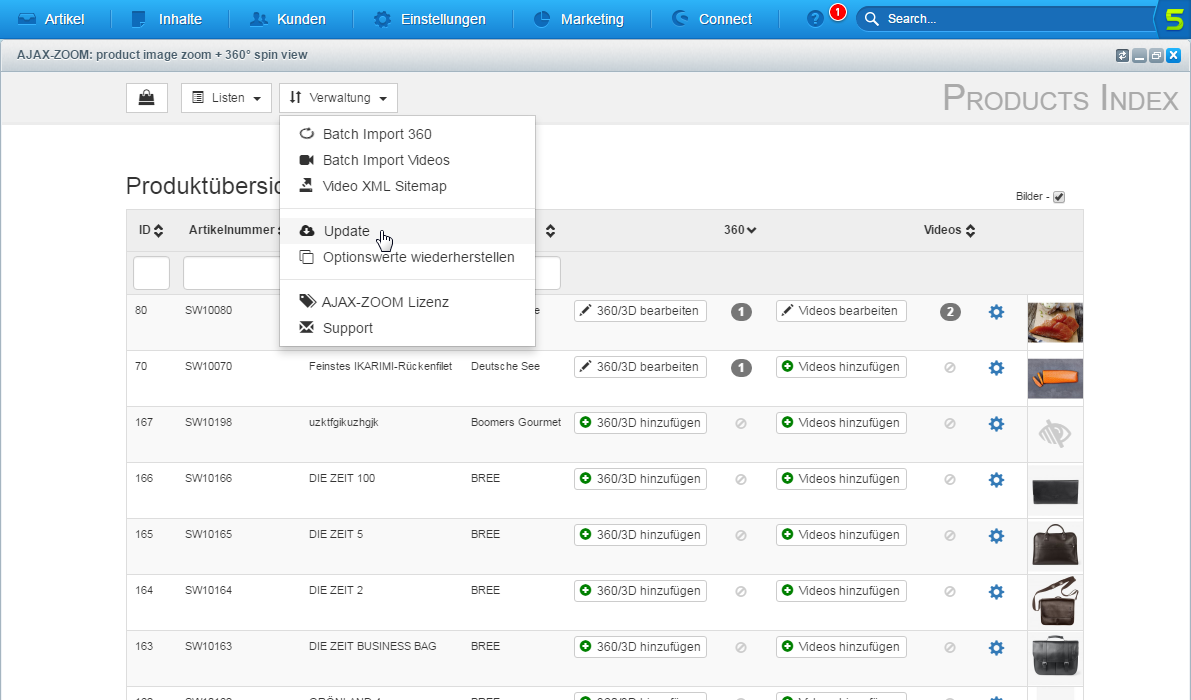
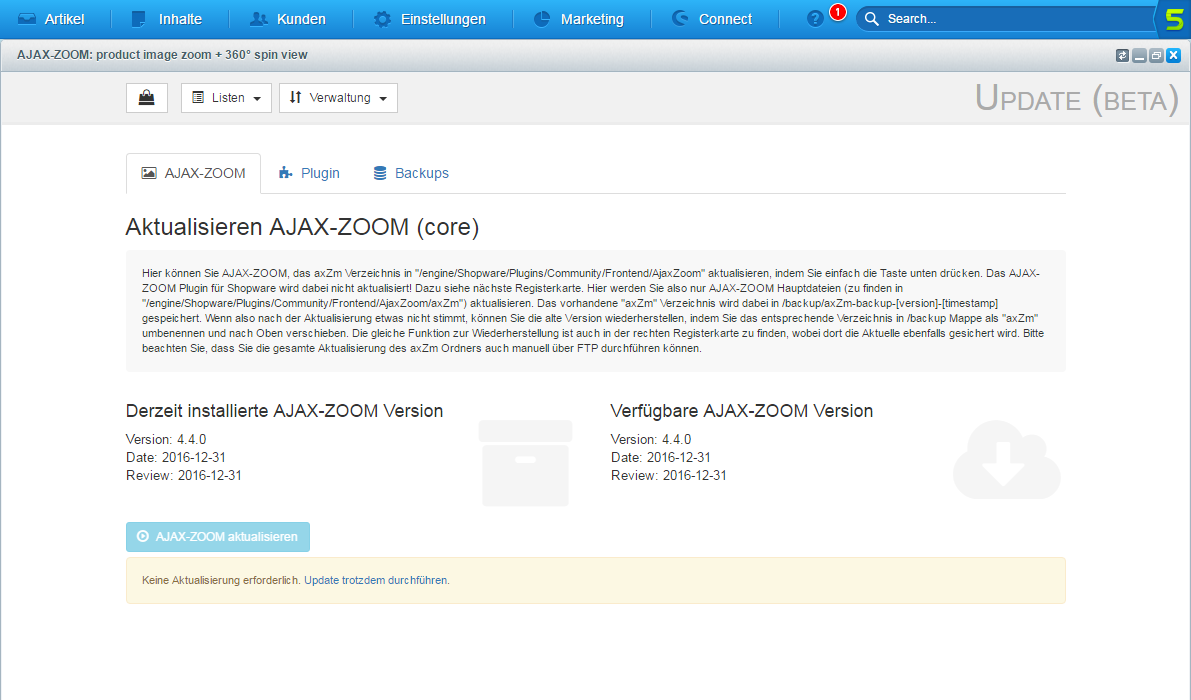


- Overwrite
/engine/Shopware/Plugins/Community/Frontend/AjaxZoomwith the last AJAX-ZOOM Plugin for Shopware version. - Overwrite
/engine/Shopware/Plugins/Community/Frontend/AjaxZoom/axZmwith the latest AJAX-ZOOM version. - Update plugin in Plugin Manager.
FAQ
How to install "ionCube Loader"?
ionCube loader is a widely used PHP extension, and it is required to operate AJAX-ZOOM on your server.
Before installing the loader, please check if it is not already installed on your server.
To check this, you can look into the output of phpinfo();.
You can also use get_loaded_extensions PHP function - print_r( get_loaded_extensions() );
to see if ionCube is installed.
If you do not detect ionCube on your server, please visit the official ionClube loaders page. There you can find "Loader Installer" and "Loader Wizard" packages, which can guide you through the installation process matching your operating system (Windows, Linux, FreeBSD, OpenBSD, OS X, Solaris).
Many hosting companies also have a guide in their FAQ on how to do this specifically for their configurations. Lastly, a mail to your hosting provider's support surely helps. ionCube is industry standard and should be a copy & paste answer for your hosting provider. If not, you should switch your hosting provider immediately.
Please note that each PHP version requires a different loader extension. When your provider offers a possibility to switch between several PHP versions, and you have added the "ionCube" extension via a separate php.ini on your own, please think about updating this php.ini file to link to the appropriate "ionCube" extension file.
Restarting the server (e.g., Apache) might be needed for the new extension to load (changes in php.ini effectively occur).
Some shared hosting companies such as "1&1" allow the users without root access to create their custom php.ini files
and "install" Ioncube loader this way.
However, this custom php.ini has only an effect on the folder whereinto you place it.
It has no impact on subfolders, as you might suspect.
Therefore, if you are dealing with this method of installing the loader, you must copy your custom php.ini into several folders.
If the AJAX-ZOOM module for your system installs itself into, e.g., /modules/ajaxzoom directory,
you must place the custom php.ini into /modules/ajaxzoom/axZm/ folder and
into, e.g., /admin12345/ folder (or wherever installing the modules takes place).
Do I need a license key to test AJAX-ZOOM module/plugin?
No, AJAX-ZOOM should work out of the box. For some modules/plugins, AJAX-ZOOM does not install itself if the "ionCube" extension is not present on the server (see above). Other than that, there is are limitations on the number of images and image resolution of the demo version. If you would like to test AJAX-ZOOM with higher resolution images ( > 3.2 megapixels / million pixels), please request an "Evaluation" license key for your dev domain or subdomain free of charge.
If you do not have a development server but would like to install the AJAX-ZOOM plugin on your production website, you should go to module/plugin settings and set the "displayOnlyForThisProductID" option. This option allows you to enable AJAX-ZOOM only for specified product ID, so you can test the module/plugin thoroughly without affecting the entire shop / conduct A/B tests.
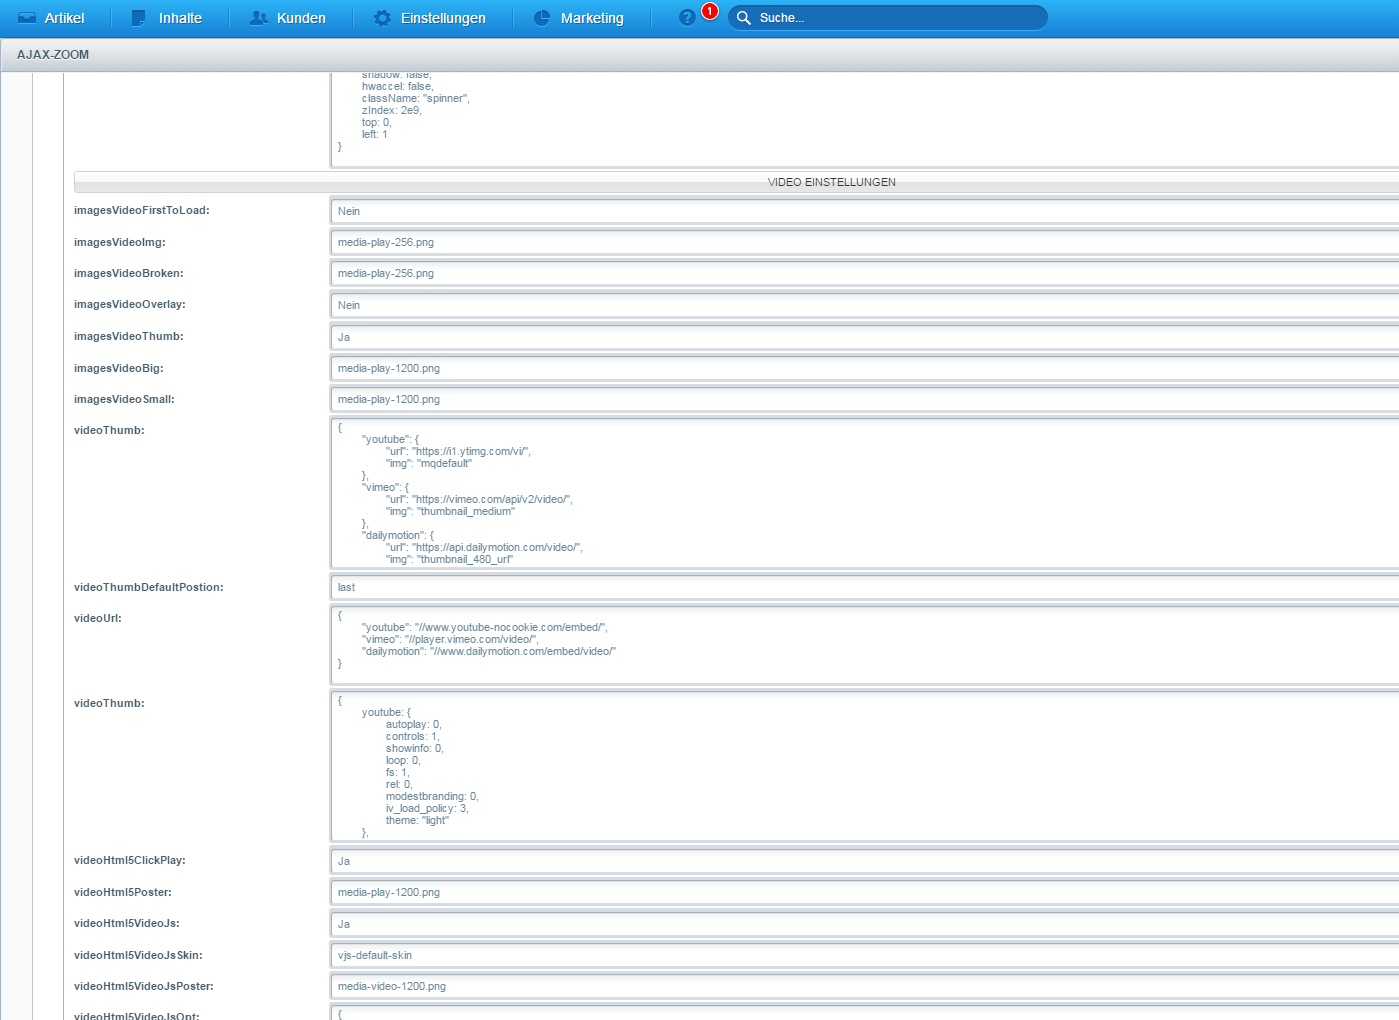
How to translate the plugin into other languages or change text strings?
The translation of the strings is done via the plugin options and within the AJAX-ZOOM's core PHP configuration file.
1. All plugin options are accessed over the backend. For example, if you want to add Russian translation to the "zoomMsg360" option, which is defined as JSON, you would need to add "key" and "value" to this JSON.
{
    "en": "Drag to spin 360°, scroll to zoom in and out, right-click and drag to pan",
    "de": "Ziehen um 360° zu drehen, zoomen mit dem Mausrad, rechte Maustaste ziehen verschiebt die Ansicht",
    "fr": "Faites glisser pour tourner à 360 °, faites défiler pour zoomer dans et hors, cliquer et faire glisser à droite pour vous déplacer",
    "es": "Arrastrar para girar en 360º, Rueda del ratón para utilizar el Zoom, botón derecho para mover la imagen"
}
So when you only need English as the default language (please keep it) and want to add a Russian translation string, you would change this option to
{
    "en": "Drag to spin 360°, scroll to zoom in and out, right-click and drag to pan",
    "ru": "Крутить 360° левой кнопкой мыши, колесом увеличивать, правой кнопкой смещать zoom"
}
2. Some other text strings are located in [ajaxzoom plugin directory] /axZm/zoomConfig.inc.php file,
which is part of AJAX-ZOOM core. Open this file in a text editor and find a string you are looking for.
For example, you are looking for the "Click to load" message.
It is located under $zoom['config']['spinNoInit'] option and looks like this:
$zoom['config']['spinNoInit'] = array(
    'enabled' => false,
    'file' => array('en' => 'click_to_load_en.png', 'de' => ''),
    'txt' => array(
        'en' => 'Click to load
360°
 view',
        'de' => 'Klicken um die
360° Ansicht
zu laden'
    ),
    'event' => 'click'
);
As you can see, this is a PHP array, and there are several other suboptions located in it.
The best way to proceed is to either copy the entire array into zoomConfigCustomAZ.inc.php
or copy only the suboption with locales into this file.
You can find zoomConfigCustomAZ.inc.php outside of the /axZm folder in the plugin directory.
2a. The below is what you would add to [ajaxzoom plugin directory] /zoomConfigCustomAZ.inc.php file
when you copy the entire array and add your translation, removing languages you do not need:
$zoom['config']['spinNoInit'] = array(
    'enabled' => true,
    'file' => array('en' => 'click_to_load_en.png', 'de' => ''),
    'txt' => array(
        'en' => 'Click to load
360°
 view',
        'ru' => 'Нажмите мышкой, чтоб загрузить 360° вид'
    ),
    'event' => 'click'
);
2b. Or you could just add the suboption to [ajaxzoom plugin directory] /zoomConfigCustomAZ.inc.php file like this:
$zoom['config']['spinNoInit']['txt'] = array(
    'en' => 'Click to load
360°
 view',
    'ru' => 'Нажмите мышкой, чтоб загрузить 360° вид'
);

// or

$zoom['config']['spinNoInit']['txt']['ru'] = 'Нажмите мышкой, чтоб загрузить 360° вид';
/zoomConfigCustomAZ.inc.php one level up,
outside of the "ajaxzoom" plugin directory, so when you update the plugin, this file does not get overwritten.
3. There is also a third possibility of adding a translation to strings located in
[ajaxzoom plugin directory] /axZm/zoomConfig.inc.php.
In the backend, under plugin configuration, you can find "azOptions" and "azOptions360",
which allow you to override configuration from [ajaxzoom plugin directory] /axZm/zoomConfig.inc.php
related to frontend display. If we wanted to do the same as above over "azOptions360" plugin option
(which is saved into the database), the result in your textarea would look like this:
Here, we do not need to define English, as the related JavaScript object will get extended by what you define in "azOptions360".
The possibility number 2 above (writing into [ajaxzoom plugin directory] /zoomConfigCustomAZ.inc.php)
is not applied then.
Download / Prices
There is no need to order AJAX-ZOOM before you have successfully installed and tested it! You can test in the test environment as long as necessary.
Since 2017, the AJAX-ZOOM plugin for shopware is also available in Shopware Plugin Store. If you purchase the plugin there, please contact us via the contact form, so that we can issue you the license key.
AJAX-ZOOM main files are downloaded automatically when the plugin is installed. If you want to manually install the AJAX-ZOOM Plugin for Shopware, see the installation steps above.
The license price primarily depends on the number of different images, which are displayed on a domain in the AJAX-ZOOM viewer. If you have sub-shops and all sub-shops are operated on the same server, then the license of each sub-shop must be able to cover all different images or images of the 360 (depending on what you use AJAX-ZOOM for) for all subshops. However, the multistore price regulation can reduce the license costs. For the complete license agreement, please visit the download section.
Changelog
2022-10-30
- Removed dependency on PHPExcel class located in the AJAX-ZOOM core package and replaced it with SimpleXLSX that is now part of the module for ShopWare. PHPExcel classes will be removed in the next AJAX-ZOOM core package update.
2022-10-19
- Fixed a bug at the backend that caused an empty page within the plugin when product title has a single quote.
2022-03-31
- Updated class with plugin options.
2021-10-29
- Fixed video preview error at backend
2021-09-16
- Fixes for Shopware 5.7.x
- Due to increased Shopware CSRF measures, updating the plugin via the internal functionality of the plugin is unreliable, and therefore, it was deactivated. If you want to update the AJAX-ZOOM plugin, please download it manually and install it via the plugin manager.
2021-04-10
- Fixed image thumbnails not showing at backend caused by specific server settings on some systems.
- Minor bug-fixes and improvements.
2020-04-20
- Added the prevention of computer going into sleep mode when importing many 360 views and creating cache in the same time.
- Added "preview" and "batchImport360" $_GET variables, which are available in the external AJAX-ZOOM configuration files to differentiate between specific tasks at the backend.
2020-04-16
2019-12-08
2019-10-14
2019-05-03
2019-04-20
2018-10-20
2018-08-30
2018-06-29
2018-05-28
2018-05-22
- Fixed a possible SW error when accessing 360 product tour and hotspot editors over SW backend.
- Disabled mod_pagespeed server extension within AJAX-ZOOM backend where pagespeed did not work as supposed to.
- Fixed SSL issue for AJAX-ZOOM Plugin for SW self update.
2018-04-09
2018-01-05
2017-12-05
2017-10-24
- Bugfixes
- Options update
2017-08-12
- Shopware 5.3.0 fixes
2017-06-19
- PSR-2 coding style
- Minor changes to pass Shopware Plugin Store technical validation
2017-05-11 (patch)
2017-04-16
- Small bug correction
- Option to display 360 / Videos within a tab on detail page
2017-03-31
- Hotspots at regular images
- Possibility to change plugin values for each product individually
- Place 360/3D in "product worlds" / blog entries
- Internal documentation
- Improvements...
2017-01-26
2017-01-08
2016-12-31
2016-10-17
2016-08-31
2016-08-26
2016-08-21
2016-08-15
2016-08-12
2016-08-05
- CSRF protection problem was solved with keeping backward compatibility.
- Integrated new hotspot editor.
- Some other issues were fixed.
2016-07-07
Added COLLATE=utf8_unicode_ci when database tables are created.
2016-06-09
2016-05-31
2016-05-12
2016-04-22
2016-04-12
2016-04-07
2016-01-31
2015-12-07
Comments (1)
Leave a Comment

To use the live support chat, MS Teams is required. If live support via MS Teams is not available immediately, please leave us a message or send an email using the contact form.
We respond to every inquiry or question related to the AJAX-ZOOM software!
Also to mention: great and dedicated support. Vadim reacts extremely fast, has tips and solutions for any issue that might occur.